Bemærk
Adgang til denne side kræver godkendelse. Du kan prøve at logge på eller ændre mapper.
Adgang til denne side kræver godkendelse. Du kan prøve at ændre mapper.
The Azure Copilot Resiliency Agent is an AI-powered assistant integrated into Azure Copilot that helps you design, assess, and improve the resiliency of your Azure workloads through natural language. Instead of navigating multiple tools and interpreting raw signals, you can interact with the agent conversationally to understand your resiliency posture, get actionable recommendations, and execute remediation. You can use the full agent experience in the Azure portal and a focused set of capabilities in GitHub Copilot.
Important
The Azure Copilot Resiliency Agent is currently in PREVIEW. See the Supplemental Terms of Use for Microsoft Azure Previews for legal terms that apply to Azure features that are in beta, preview, or otherwise not yet released into general availability.
To use the Resiliency Agent, select Resiliency from the New chat options in Azure Copilot.
Note
Administrators can enable or disable access to the Azure Copilot Resiliency Agent and other Azure Copilot agents. If you don't see the Resiliency Agent as an option when starting a new chat, check with your administrator.
The agent supports two primary capability areas:
Start Resilient — Design with resiliency from day one
Start Resilient helps you build resiliency into your applications before they are deployed. Describe your application architecture in natural language, and the agent will:
- Analyze your application topology and identify resiliency best practices relevant to your resources.
- Generate a detailed resiliency report with recommendations tailored to your architecture.
- Produce deployment-ready Bicep, ARM JSON, or Terraform with the recommended resilience configurations already enabled.
This capability is designed for teams that are building new applications or modernizing existing ones and want to ensure resiliency is a deployment default — not a remediation afterthought.
Get Resilient — Assess and improve your existing workloads
Get Resilient helps you understand and improve the resiliency posture of workloads that are already running in Azure. The agent can:
- Check whether individual resources or entire application groups (Service Groups) are zonally resilient.
- Identify prerequisites and blockers for enabling resiliency on your resources.
- Provide guided remediation — including direct conversions where supported, or step-by-step migration guidance for more complex scenarios.
- Generate enablement scripts in your preferred format (PowerShell, Azure CLI, Bicep, ARM JSON, or Terraform).
- Help you organize resources into Service Groups, set resiliency goals, and track compliance over time.
- Surface indicative cost impact so you can make informed decisions about remediation.
This capability is designed for teams managing existing workloads who want to systematically close resiliency gaps and maintain compliance with their organization's resiliency objectives.
How to Access the Resiliency Agent
There are two ways to launch the Resiliency Agent in the Azure portal:
Option 1: Via Azure Copilot
- Open the Azure portal.
- Navigate to the Resiliency overview page.
- Select the Copilot icon in the top-right corner of the Azure portal header bar. This action opens the Copilot side panel.
- In the Copilot panel, locate the agent selector dropdown near the top of the panel.
- Select the dropdown and choose "Resiliency" from the list of available agents. Other options include Copilot, Troubleshooting, Deployment, and Optimization.
- The panel header updates to show "Resiliency agent" and you see suggested starter prompts to begin your interaction.
Option 2: Via top actions on the Resiliency screen
When you're on the Resiliency overview page, you see top action buttons that provide quick entry points into common resiliency workflows. When you select any of these actions, the portal automatically opens the Copilot panel with the Resiliency Agent selected and prepopulated with a relevant prompt.
Tip
After the agent loads, you can interact with it by using the suggested prompts or by typing your own questions in natural language. The agent maintains context across multiple turns, so you can have a continuous conversation that progresses from assessment to remediation.
Use Azure Resiliency Agent in GitHub Copilot (Limited Preview)
Use the Azure Resiliency Agent plugin while working in a local repository with GitHub Copilot. The plugin provides a focused set of capabilities:
Note
Agent plugins bundle related GitHub Copilot customizations, such as custom agents, skills, and MCP servers, into one installation. For more information about discovering, installing, and managing agent plugins, see Agent plugins in Visual Studio Code.
- Ask general questions about Azure resiliency, high availability, availability zones, zone resilience, and zone redundancy.
- Assess a described application architecture or approved local architecture files.
- Generate new zone-resilient Bicep, ARM JSON, or Terraform.
- Review and correct existing Bicep, ARM JSON, or Terraform and related local files.
The plugin connects to the same hosted Azure Resiliency Agent used by Azure Copilot. When you submit a request, Azure MCP uses the default Azure tenant to determine the appropriate Azure data boundary and then sends the request to Azure Resiliency Agent.
Supported GitHub Copilot experiences
- GitHub Copilot in Visual Studio Code.
- GitHub Copilot CLI.
Before you begin
- For Visual Studio Code workflows, install the latest Visual Studio Code, and make sure GitHub Copilot Chat and Agent Plugins are enabled.
- For terminal workflows, install or update to the latest GitHub Copilot CLI. If your organization manages GitHub Copilot, the Copilot CLI policy must be enabled.
- Only Azure public cloud is currently supported.
- Install Node.js 22 or later, with
node,npm, andnpxavailable on yourPATH. - Use Windows, Linux, or macOS on an x64 or ARM64 device. The npm package downloads the matching Azure MCP binary and its runtime dependencies. You don't need a .NET SDK.
- Sign in to Azure by using Visual Studio Code, Azure CLI (
az login), Azure PowerShell, Azure Developer CLI, or Visual Studio. - Open the application repository or folder that contains the architecture documents or infrastructure-as-code files you want to assess.
After installing Node.js, restart Visual Studio Code and any open terminals. Verify that Node.js, npm, and npx are available:
node --version
npm --version
npx --version
If your configured npm registry requires authentication, sign in to that registry before the first Azure Resiliency tool call.
Network requirements
Azure MCP uses outbound HTTPS on port 443. If your organization restricts outbound traffic, allow access to:
- Your configured npm registry, normally
registry.npmjs.org, to download Azure MCP the first time you use the plugin and after package updates. login.microsoftonline.comfor Microsoft Entra authentication.management.azure.comto determine the Azure data boundary for the default tenant.agent.public.resiliencemanagement.azure.comto call Azure Resiliency Agent.
Important
If agent.public.resiliencemanagement.azure.com is blocked by a firewall, proxy, or network security policy, Azure MCP can't reach Azure Resiliency Agent. Add the host to your organization's outbound allow list before using the plugin.
Install Azure Resiliency Agent
You can start the installation from the Azure portal, the Awesome Copilot marketplace, Visual Studio Code, or GitHub Copilot CLI.
Start from the Azure portal
- From the Infrastructure resiliency overview in the Azure portal, select Explore in VS Code.
- Review the capabilities shown in the Resiliency Agent in Visual Studio Code panel.
- Select Try in VS Code.
- If your browser asks for confirmation, allow it to open Visual Studio Code.
- In Visual Studio Code, review the marketplace source, and then select Add Marketplace and Install.
- After installation, open the repository or folder that you want to assess and select AzureResiliencyAgent from GitHub Copilot Chat.
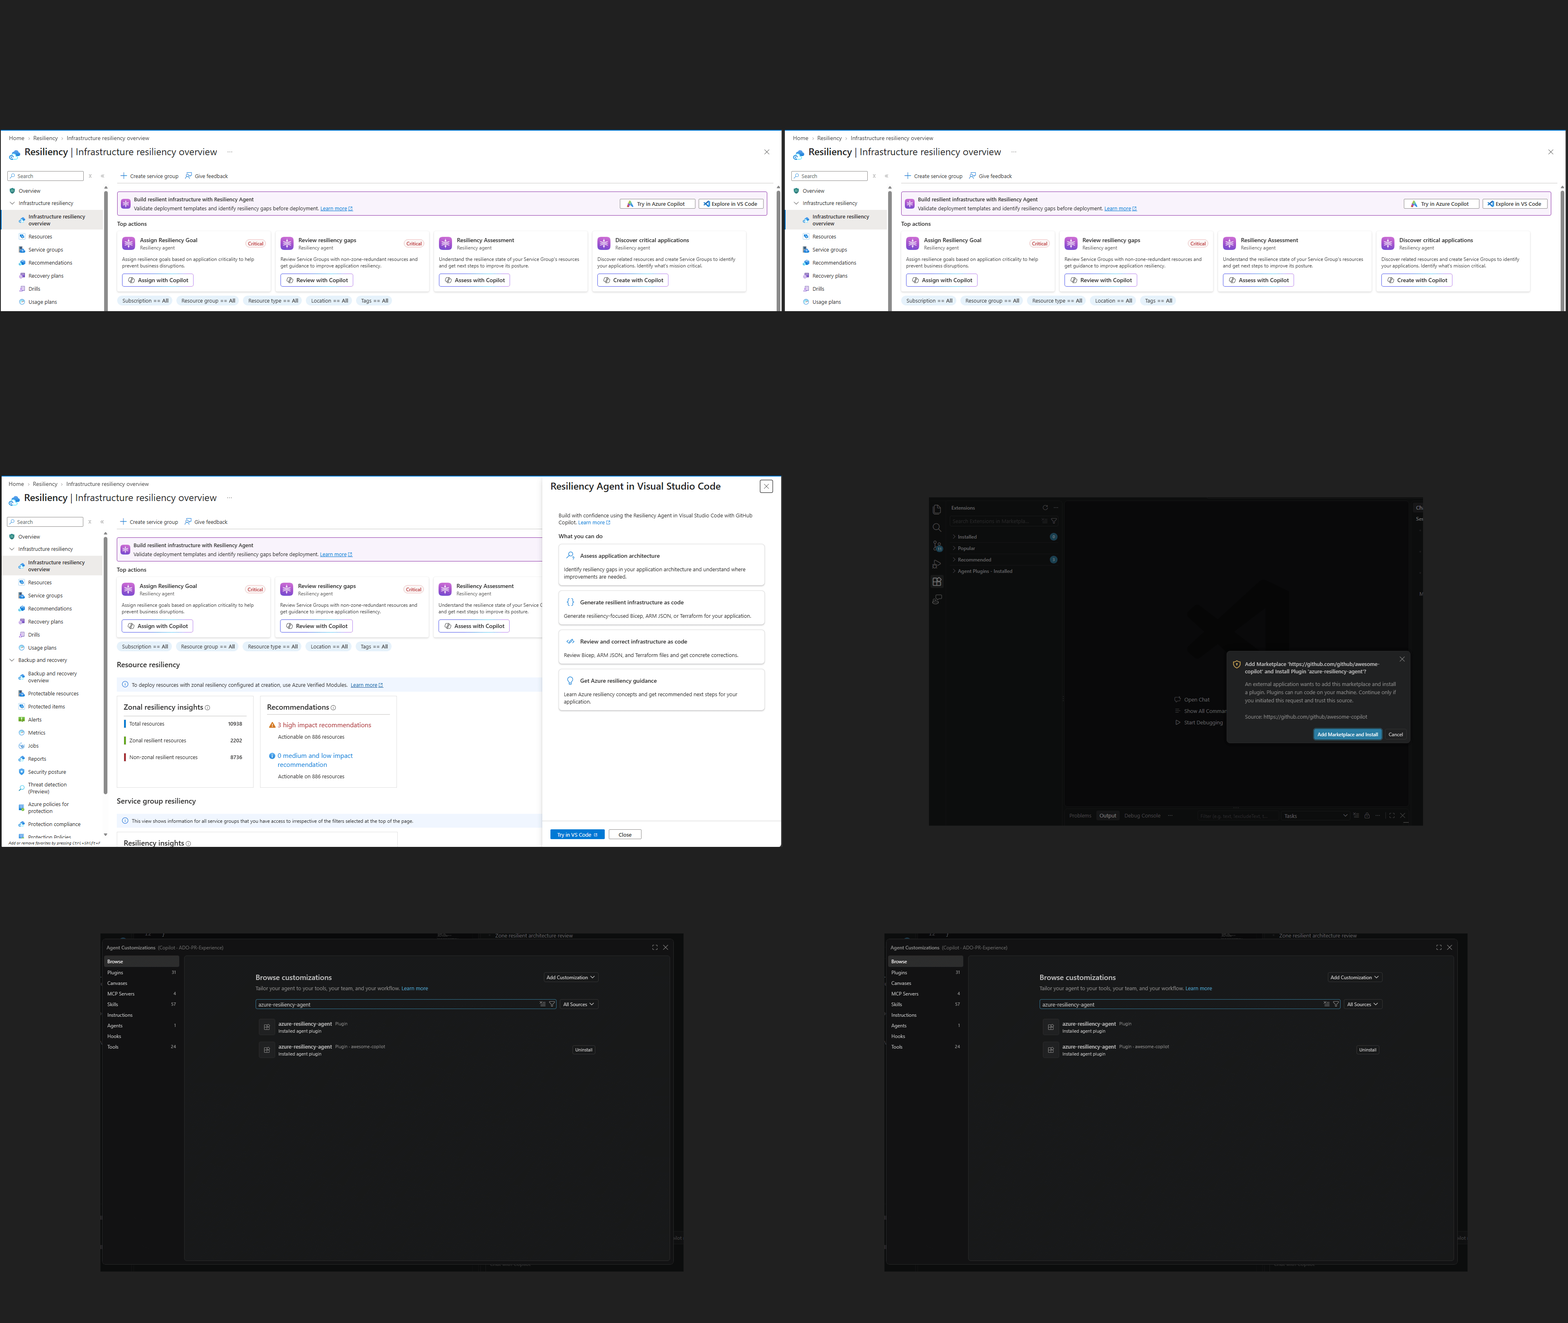
The portal action provides a path to install and open the GitHub Copilot experience. It doesn't automatically transfer Azure resources, repository files, or an existing Azure Copilot conversation to Visual Studio Code.
Install from the Awesome Copilot marketplace
- Open the Azure Resiliency Agent listing in Awesome Copilot.
- Review the publisher, source repository, plugin contents, and prerequisites.
- Select Install in VS Code.
- Review the marketplace source in Visual Studio Code, and then select Add Marketplace and Install.
Install directly in Visual Studio Code
- Run Chat: Open Customizations from the Command Palette.
- Select Browse, and then search for
azure-resiliency-agent. - Select Azure Resiliency Agent to review its publisher, contents, and README.
- Select Install.
- Open GitHub Copilot Chat and select AzureResiliencyAgent from the agent picker.
You can also open the Extensions view and search for
@agentPlugins azure-resiliency-agent.
Install in GitHub Copilot CLI
Install the Agent Plugin:
copilot plugin install azure-resiliency-agent@awesome-copilot
Start GitHub Copilot CLI with the agent selected:
copilot --agent azure-resiliency-agent:azure-resiliency
You can also select AzureResiliencyAgent from the interactive /agent
menu.
Verify the installation
In Visual Studio Code:
- Run Chat: Open Customizations.
- Select Plugins.
- Confirm that azure-resiliency-agent is installed and enabled for the intended profile or workspace.
- Open GitHub Copilot Chat and confirm that AzureResiliencyAgent appears in the agent picker.
In GitHub Copilot CLI, list the installed plugins:
copilot plugin list
Troubleshoot the Awesome Copilot marketplace
Awesome Copilot is a default plugin marketplace. Normally, you don't need to set up a marketplace in Visual Studio Code or GitHub Copilot CLI.
If the plugin doesn't appear in Visual Studio Code:
- Confirm that the
chat.plugins.enabledsetting is enabled. - Run Chat: Open Customizations, and then select Browse.
- Open the source menu and select Configure Marketplaces.
- Confirm that awesome-copilot is listed.
- If it's not listed, select Add Marketplace and enter
github/awesome-copilot. - Return to Browse, select the Awesome Copilot source, and search for
azure-resiliency-agent.
In GitHub Copilot CLI, verify the registered marketplaces:
copilot plugin marketplace list
If awesome-copilot isn't listed, add it and browse the marketplace:
copilot plugin marketplace add github/awesome-copilot
copilot plugin marketplace browse awesome-copilot
Note
The Agent Customizations editor and GitHub Copilot CLI maintain separate
plugin inventories. Manage a plugin from the experience where you installed
it. Visual Studio Code also discovers plugins installed in
~/.copilot/installed-plugins by GitHub Copilot CLI.
Start a conversation
After installation, open the repository that you want to assess and select AzureResiliencyAgent. Ask a resiliency question, describe an architecture, or identify the templates that you want reviewed.
When a request needs local files, the agent displays each file and asks for approval before sharing it. Only the files that you approve are sent to Azure Resiliency Agent for that assessment or review.
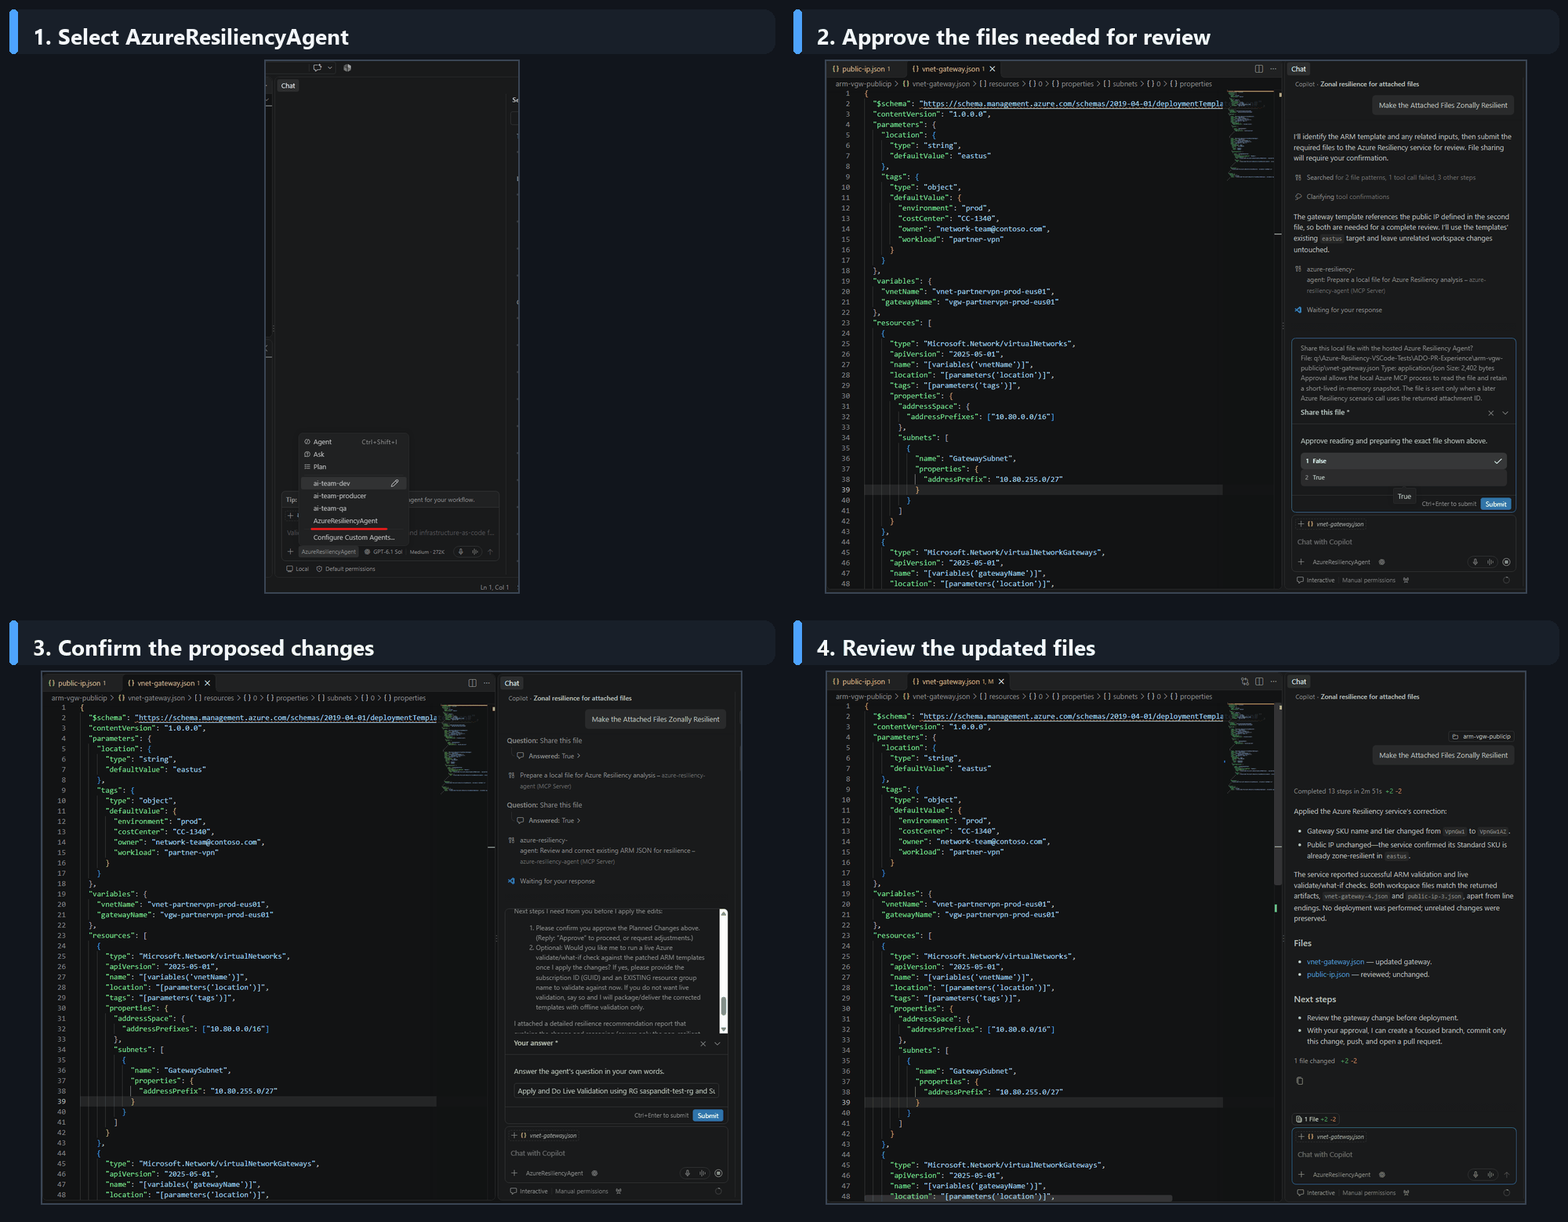
Example prompts for GitHub Copilot
Use these prompts with AzureResiliencyAgent in Visual Studio Code or GitHub Copilot CLI.
Sample prompts:
"How should I begin improving the resiliency of a new Azure application?"
"Use this architecture diagram to identify availability-zone resiliency gaps before deployment."
"Generate resilient Terraform for a web application with App Service and PostgreSQL."
"Review the ARM templates in this folder together and make only the changes required for zonal resilience."
"Correct the attached Terraform while preserving resource addresses, variables, and provider constraints."
Start Resilient — scenarios and sample prompts
The Start Resilient capability helps you design resilient architectures from scratch. The following sections describe key scenarios you can explore, along with sample prompts to get started.
Describe your application and get a resiliency plan
Tell the agent about your application's resources in natural language. The agent analyzes your topology, asks clarifying questions if needed (for example, region, configuration preferences), and generates a resiliency summary with a detailed recommendation report.
Sample prompts:
"My app has a VM, a PostgreSQL database, and a load balancer. Help me start my resilient journey."
"I'm building an application with AKS, Redis, Storage, and Cosmos DB. What should I do to make it resilient?"
"I have a web app with an App Service, SQL Database, and a Front Door. Can you assess the resiliency?"
Generate resilient infrastructure as code
Ask the agent to generate deployment-ready Bicep, ARM JSON, or Terraform for your resources with the recommended resiliency configurations already enabled. Specify the format that you want, or let the agent ask a clarification question before generating the files.
Sample prompts:
"Generate a Bicep template for a zonally resilient VM setup."
"Create an ARM JSON template for a resilient architecture with VMs, AKS, and Storage."
"Generate Terraform for my application with resiliency best practices included."
Larger application architectures
The agent can handle more complex application descriptions with multiple resource types. It produces a consolidated resiliency summary and detailed recommendations across all resources.
Sample prompts:
"My app includes VMs, AKS, Redis, Storage, and Cosmos DB. Help me design a resilient setup."
"Generate infrastructure as code for a zone-resilient architecture with VMs, AKS, and Storage. Ask me whether to use Bicep, ARM JSON, or Terraform."
Get Resilient — Scenarios and Sample Prompts
The Get Resilient capability helps you assess and improve the resiliency of your existing Azure workloads. The following sections describe key scenarios you can explore.
Check resource resiliency
Ask the agent to check whether a specific resource or your entire service group is zonally resilient. The agent returns the current resiliency status along with supporting configuration details.
Sample prompts:
"Is my VM zonally resilient?"
"Check the resiliency of my storage account."
"Get the zonal resiliency posture of my service group."
Check prerequisites for resiliency
Before enabling resiliency, you might need to address certain prerequisites. The agent can identify blocking conditions such as region limitations, permission requirements, or configuration dependencies.
Sample prompts:
"What are the prerequisites to make my VM zonally resilient?"
"What do I need to do before enabling zone redundancy on my database?"
Enable resiliency on your resources
For resources that support in-place conversion (mutable resources), the agent can directly enable zonal resiliency. For resources that require redeployment (such as VMs), the agent provides step-by-step guidance and scripts.
Sample prompts:
"Enable zonal resiliency for my PostgreSQL server."
"Enable zonal resiliency for my VM."
"How do I make my storage account zone-redundant?"
Important
For some resource types, the agent executes the change directly. For others (like VMs), it provides guidance and scripts rather than making changes, since these resources require redeployment.
Generate enablement scripts
The agent can generate scripts to enable or create zonally resilient resources in multiple formats, including PowerShell, Azure CLI, Bicep, Terraform, and ARM templates.
Sample prompts:
"Give me scripts to enable zonal resiliency for my resources."
"Generate scripts to create a zonally resilient storage account."
"Generate scripts for all resources in my service group."
Organize resources into service groups
Use service groups to logically group the Azure resources that make up an application. The agent can help you create service groups, add resources to them, and view their membership.
Sample prompts:
"Create a service group for my application."
"Add my VM and database to the service group."
"Show the resources in my service group."
Set resiliency goals and track compliance
After you create a service group, set resiliency goals and track how your resources comply over time. The agent supports creating goals, checking compliance status, excluding specific resources, and refreshing compliance after changes.
Sample prompts:
"Set a zonal resiliency goal for my service group."
"What is my goal compliance status?"
"Exclude this VM from my resiliency goal."
"Refresh my goal compliance after recent changes."
End-to-end guided workflow
The agent supports multi-turn conversations that progress naturally from assessment to remediation. You can start by checking your posture, then ask for scripts to fix problems, and continue through the full resiliency lifecycle in a single conversation.
Example conversation flow:
- Start with: "Create a service group for my app"
- Then: "Set resiliency goals"
- Then: "Check posture"
- Then: "Fix the problems" or "Give me scripts to fix it"
Tip
The agent maintains context across turns, so each step builds on the previous one. You don't need to repeat resource names or configuration details.
Known limitations
As this feature is in public preview, be aware of the following limitations:
- The agent is optimized for zonal resiliency scenarios. Regional resiliency and other resiliency dimensions will be added in future releases.
- Some operations might take a few moments to complete, especially for larger service groups.