Bemærk
Adgang til denne side kræver godkendelse. Du kan prøve at logge på eller ændre mapper.
Adgang til denne side kræver godkendelse. Du kan prøve at ændre mapper.
In this quickstart, you create a Microsoft Foundry project and deploy a model. If you're managing a team, you also grant access to team members. After you complete these steps, you or your team can start building AI applications using the deployed model.
Tip
This quickstart shows you how to create resources to build an agent with a basic setup. For more advanced scenarios that use your own resources, see Set up your environment for agent development.
Prerequisites
- An Azure account with an active subscription. If you don't have one, create a free Azure account, which includes a free trial subscription.
- If you're creating the project for yourself:
- Access to a role that allows you to create a Foundry resource, such as Foundry Account Owner or Foundry Owner on the subscription or resource group. For more information about permissions, see Role-based access control for Microsoft Foundry.
Important
The Foundry RBAC roles were recently renamed. Foundry User, Foundry Owner, Foundry Account Owner, and Foundry Project Manager were previously named Azure AI User, Azure AI Owner, Azure AI Account Owner, and Azure AI Project Manager. You might still see the previous names in some places while the rename rolls out. The role IDs and core permissions are unchanged by the rename.
- Access to a role that allows you to create a Foundry resource, such as Foundry Account Owner or Foundry Owner on the subscription or resource group. For more information about permissions, see Role-based access control for Microsoft Foundry.
- If you're creating the project for a team:
- Access to a role that allows you to complete role assignments, such as Owner. For more information about permissions, see Role-based access control for Microsoft Foundry.
- A list of user email addresses or Microsoft Entra security group IDs for team members who need access.
If you use the Azure CLI instead of the portal, the Contributor or Owner role on the resource group is enough to create the resource and project. You still need a role that can assign roles, such as Owner, to grant access to team members.
Select your preferred method by using the following tabs:
Install the Azure CLI version 2.80.0 or later. Check your version with
az version, and runaz upgradeif you need a newer one.Version 2.80.0 added the
az cognitiveservices account projectcommands that these steps use. On an earlier version, the commands fail withunrecognized argumentsor'project' is misspelled or not recognized by the system.Sign in to Azure:
az login
Create a project
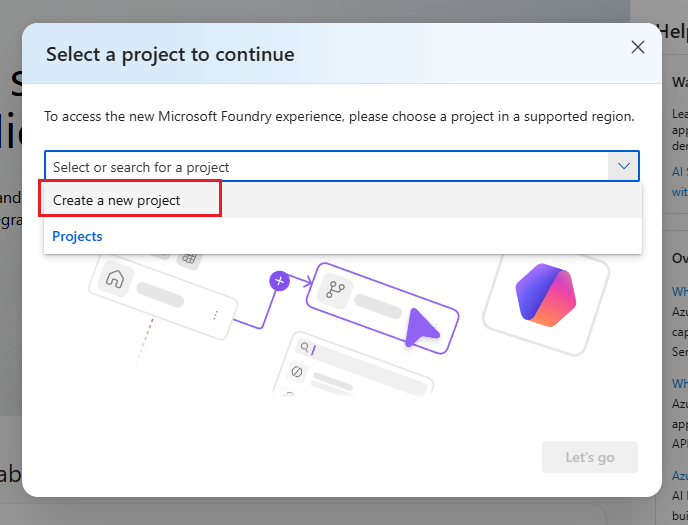
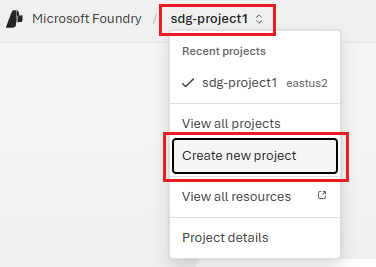
Create a Foundry project to organize your work. The project contains models, agents, and other resources your team uses.
Tip
Create your project in the West US 3 region if you want to try an instant model (preview).
Note
These steps require the Azure CLI version 2.80.0 or later and the Contributor or Owner role on the resource group. Run az version to check your version and az upgrade if you need a newer one. Run az login to sign in before you start. For supported regions, see Region support.
Create a resource group or use an existing one. For example, create
my-foundry-rgineastus:az group create --name my-foundry-rg --location eastusVerify that the resource group exists:
az group show --name my-foundry-rg --query properties.provisioningState --output tsvThe output shows
Succeeded.Create the Foundry resource with project management enabled. For example, create
my-foundry-resourcein themy-foundry-rgresource group:az cognitiveservices account create \ --name my-foundry-resource \ --resource-group my-foundry-rg \ --kind AIServices \ --sku S0 \ --location eastus \ --custom-domain my-foundry-resource \ --assign-identity \ --allow-project-management trueUse these values:
Parameter Purpose --assign-identityCreates the managed identity that project management requires. Without it, project creation fails with an error that a managed identity must be enabled on the resource. --allow-project-managementEnables project management. You can't change this setting after you create the resource. --custom-domainMust be globally unique. If my-foundry-resourceis taken, the command fails withCustomDomainInUse. Choose a different name and run the command again.Create a project. For example, create
my-foundry-projectin themy-foundry-resource:az cognitiveservices account project create \ --name my-foundry-resource \ --resource-group my-foundry-rg \ --project-name my-foundry-project \ --location eastusVerify that the resource is provisioned:
az cognitiveservices account show \
    --name my-foundry-resource \
    --resource-group my-foundry-rg \
    --query properties.provisioningState --output tsv
The output should show
Succeeded. If the output shows a different state, check your permissions, region availability, and resource quotas. For more help, see Create a multi-service resource.Verify the project was created:
az cognitiveservices account project show \
    --name my-foundry-resource \
    --resource-group my-foundry-rg \
    --project-name my-foundry-project \
    --query properties.provisioningState --output tsv
The output should show
Succeeded. If the command fails with a message that a managed identity must be enabled, confirm that you created the resource with--assign-identity.
Reference: az cognitiveservices account project

Deploy a model
Deploy a model that you can use. This example uses gpt-5-mini, but you can choose any available model.
Tip
To try an instant access model (preview), you can skip this step.
List the models available in your region so you can confirm the model name and version:
az cognitiveservices model list \
    --location eastus \
    --query "[?model.name=='gpt-5-mini'].{version:model.version,skus:join(',',model.skus[].name)}" \
    --output table
Deploy the model:
az cognitiveservices account deployment create \
    --name my-foundry-resource \
    --resource-group my-foundry-rg \
    --deployment-name gpt-5-mini \
    --model-name gpt-5-mini \
    --model-version "2025-08-07" \
    --model-format OpenAI \
    --sku-capacity 10 \
    --sku-name GlobalStandard
If the command fails with
DeploymentModelNotSupported, the model, version, or SKU isn't available in your region. Use the output of the previous step to choose a supported combination.Verify the deployment succeeded:
az cognitiveservices account deployment show \
    --name my-foundry-resource \
    --resource-group my-foundry-rg \
    --deployment-name gpt-5-mini \
    --query properties.provisioningState --output tsv
The output shows
Succeededwhen the deployment is ready.
Reference: az cognitiveservices account deployment
Get your project connection details
You need your project endpoint to connect from code. If you're administering this project for others, send them this endpoint along with the deployment name.
Get the project endpoint:
az cognitiveservices account project show \
    --name my-foundry-resource \
    --resource-group my-foundry-rg \
    --project-name my-foundry-project \
    --query 'properties.endpoints."AI Foundry API"' --output tsv
The output is your project endpoint, in the form https://my-foundry-resource.services.ai.azure.com/api/projects/my-foundry-project. Use this value in other quickstarts and tutorials.

For administrators - grant access
If you're administering a team, assign the Foundry User role to team members so they can use the project and deployed models. This role provides the minimum permissions needed to build and test AI applications. For other roles you might need to assign, see Role-based access control for Microsoft Foundry.
Get the project's resource ID:
PROJECT_ID=$(az cognitiveservices account project show \
    --name my-foundry-resource \
    --resource-group my-foundry-rg \
    --project-name my-foundry-project \
    --query id -o tsv)
Assign the Foundry User role to a team member:
Important
The Foundry RBAC roles were recently renamed. Foundry User, Foundry Owner, Foundry Account Owner, and Foundry Project Manager were previously named Azure AI User, Azure AI Owner, Azure AI Account Owner, and Azure AI Project Manager. You might still see the previous names in some places while the rename rolls out. The role IDs and core permissions are unchanged by the rename.
az role assignment create \
    --role "53ca6127-db72-4b80-b1b0-d745d6d5456d" \
    --assignee "user@contoso.com" \
    --assignee-principal-type User \
    --scope $PROJECT_ID
Note
Because the Foundry RBAC roles were recently renamed, use the role definition ID (GUID) instead of the role name in your code to avoid issues during the rename rollout:
- Foundry User:
53ca6127-db72-4b80-b1b0-d745d6d5456d - Foundry Owner:
c883944f-8b7b-4483-af10-35834be79c4a - Foundry Account Owner:
e47c6f54-e4a2-4754-9501-8e0985b135e1 - Foundry Project Manager:
eadc314b-1a2d-4efa-be10-5d325db5065e
To add a security group instead of an individual user:
az role assignment create \
    --role "53ca6127-db72-4b80-b1b0-d745d6d5456d" \
    --assignee-object-id "<security-group-object-id>" \
    --assignee-principal-type Group \
    --scope $PROJECT_ID
Verify the role assignment:
az role assignment list \
    --scope $PROJECT_ID \
    --role "53ca6127-db72-4b80-b1b0-d745d6d5456d" \
    --output table
Reference: az role assignment
Verify team member access
Ask a team member to verify their access by signing in to Microsoft Foundry and selecting the project from the project list.
If the team member can't access the project, verify that the role assignment completed successfully. Check that you used the correct email address or security group ID. Make sure the team member's Azure account is in the same Microsoft Entra tenant.
To confirm the deployed model is available, ask the team member to select Build in the upper-right navigation, then Models in the left pane.
Clean up resources
When you no longer want this project, delete the resource group to delete all resources associated with it.
az group delete --name my-foundry-rg --yes --no-wait
Deletion runs in the background. To confirm that the resource group is gone, run:
az group exists --name my-foundry-rg
The output shows false when deletion finishes.