Bemærk
Adgang til denne side kræver godkendelse. Du kan prøve at logge på eller ændre mapper.
Adgang til denne side kræver godkendelse. Du kan prøve at ændre mapper.
Note
This topic is about classic commands.
There is a new way to define commands. See Modern commanding overview (preview).
Learn how to override the default open behavior of data rows in an entity-bound grid so that selecting a row runs a custom action, such as opening a URL. By default, any of the following actions opens the table record:
- Double-clicking the data row, or selecting the primary column link in the row.
- Selecting a data row, and then pressing the Enter key.
- On a touch-enabled device, selecting a data row.
There might be situations where you don't want the table record to open (which is the default behavior), but want a custom action to be performed such as opening a URL using JavaScript functions. You can override the default behavior and define your own custom behavior by creating a command definition for a table with Mscrm.OpenRecordItem as the value of the ID parameter CommandDefinition, and defining a custom action on the Actions tab. The application looks for the Mscrm.OpenRecordItem command ID for a table when you try to open a record from the entity-bound grid and—if one is present—will execute the custom action instead of performing the default behavior of opening the table record.
Note
- This feature is supported only for Unified Interface.
- You can also use Ribbon Workbench, a community tool, to visually edit ribbons by using the UI. Note that tools created by the community aren't supported by Microsoft. If you have questions or issues with community tools, contact the publisher of the tool.
To specify a custom action when a table record is selected, complete the following steps:
- Create a web resource to perform the action.
- Create a custom button on the form by editing the customization.xml file.
- Import the customization.xml file.
Step 1: Create a web resource
Create a web resource to change the default behavior. In the following example, if you want to open a URL instead of displaying the record, create a JavaScript web resource to perform that action.
Create a new solution or edit an existing solution
Follow the instructions in Create a solution, or sign in to Power Apps and select Solutions from the left navigation. Select the unmanaged solution you want to edit.
Open the solution, and then select Objects in the left navigation.
In the menu, select + New > More > Web resource.
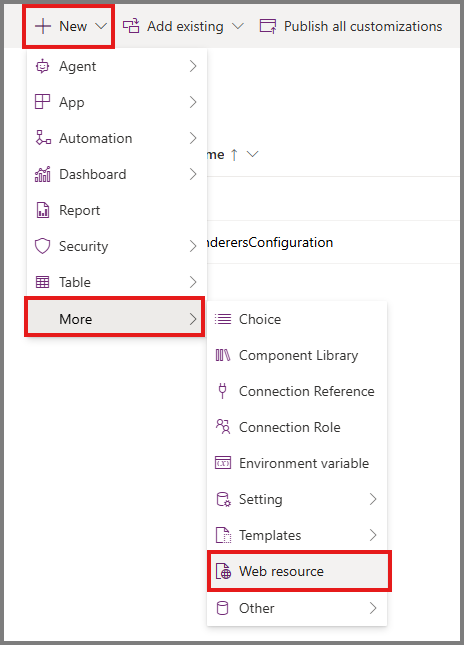
Copy the following code, paste it into the Code field, and edit the value of the URL you want to open:
function ChangeBehavior(){

 // Enter the url
 var url =  "Enter the URL";
 var OpenUrlOptions = {height: 800, width: 1000};
 Xrm.Navigation.openUrl(url, openUrlOptions);
}
Enter the Name of the web resource, and select the File type as JavaScript (JS).
Save and publish the web resource.
Step 2: Create a custom button
Create a custom button on the form where you want to change the default behavior. For example, if you have a subgrid on the accounts form that displays contact records in the subgrid, you need to create a button and add it to the contact form. You can create a button by editing the customization.xml file.
Open the solution that you created in step 1, and add the table where you want to create the button. You don't need to include all table components and metadata.
Select Add existing > Table.
From the list, select Contact.
Save and publish the solution.
Go to Overview and select Export to make edits to the customization.xml file.

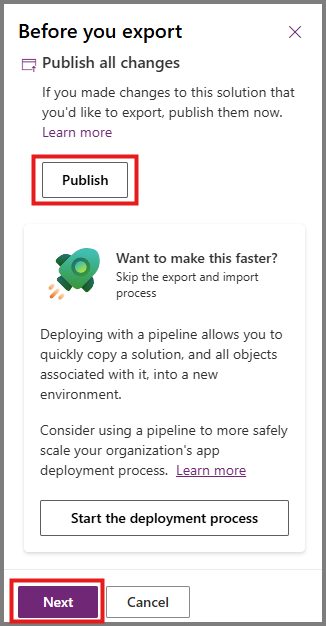
If you made recent changes that you didn't publish, select Publish, select Run to check whether the solution has any issues or dependencies, and then select Next.
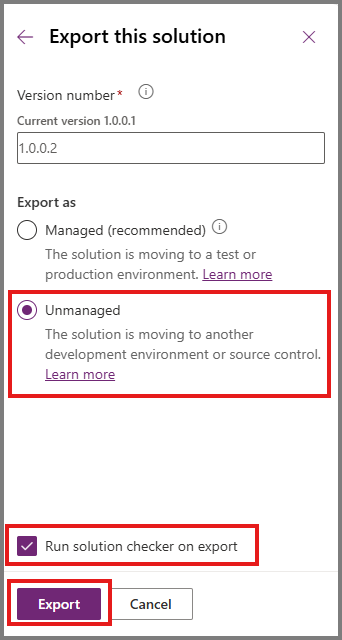
With the Unmanaged option selected, select Run solution checker on export and select Export.
When the solution is ready, select the Download button.

In the Downloads dialog box, select Open Folder.
Right-click to select the compressed .zip file that you downloaded, and then select Extract All....
Select a location to extract the files to, and then select Extract.
The
customizations.xmlfile is the file that you edit.Note
You can enable or disable the button; doing either still overrides the open default behavior.
Open the
customization.xmlfile, copy the following code, and replace the code inside theRibbonDiffXml:<RibbonDiffXml> <CustomActions> <CustomAction Id="cr5c1.Mscrm.OpenRecordItem.CustomAction" Location="Mscrm.SubGrid.contact.MainTab.Management.Controls._children" Sequence="28"> <CommandUIDefinition> <Button Alt="$LocLabels:Mscrm.OpenRecordItem.Alt" Command="Mscrm.OpenRecordItem" Id="Mscrm.OpenRecordItem" LabelText="$LocLabels:Mscrm.OpenRecordItem.LabelText" Sequence="28" TemplateAlias="o1" ToolTipTitle="$LocLabels:Mscrm.OpenRecordItem.ToolTipTitle" ToolTipDescription="$LocLabels:Mscrm.OpenRecordItem.ToolTipDescription" /> </CommandUIDefinition> </CustomAction> </CustomActions> <Templates> <RibbonTemplates Id="Mscrm.Templates" /> </Templates> <CommandDefinitions> <CommandDefinition Id="Mscrm.OpenRecordItem"> <EnableRules /> <DisplayRules /> <Actions> <JavaScriptFunction FunctionName="ChangeBehavior" Library="$webresource:cr5c1_samplescript" /> </Actions> </CommandDefinition> </CommandDefinitions> </RibbonDiffXml>Note
You need to replace the function name and the name of the web resource in the preceding XML file. Edit the preceding example XML file to replace it with your own default publisher.
This example changes the button for a subgrid on the accounts form that displays contact records in the subgrid. Therefore the
LocationisLocation="Mscrm.SubGrid.contact.MainTab.Management.Controls._children". You need to change this value to apply to a different button.
Step 3: Import the XML file
After you edit the
customization.xmlfile, open the containing folder.Select all the files or folders that were included when you extracted the solution. Right-click the selected files, select Compress To..., and then select ZIP File.
Note
This step creates a compressed .zip file in the same folder. The name of the file varies, but it's the same as one of the other files in the folder except with a .zip file name extension.
Sign in to Power Apps, and select Solutions from the left pane.
On the command bar, select Import solution.

On the Import a solution page, select Browse to locate the compressed .zip file that contains the solution you want to import.
Select Next.
On the page that displays information about the solution, select Import.
Wait a few moments while the import completes. View the results, and then select Close.
If you import any changes that require publishing, you must publish customizations before they're available.
If the import isn't successful, you see a report that shows any errors or warnings that were captured. Select Download Log File to see details about what caused the import to fail. The most common cause for an import to fail is that the solution didn't contain some required components.
When you download the log file, you get an XML file that you can open with Excel to view the contents.