Note
Access to this page requires authorization. You can try signing in or changing directories.
Access to this page requires authorization. You can try changing directories.
In this quickstart, you learn how to debug your Playwright Workspaces browser sessions by using the observability feature in Playwright Workspaces. Perform advanced diagnostics on your browser automation runs and Playwright tests by saving session recordings or test reports to Azure storage and viewing them in Azure portal using the Playwright Workspaces observability.
Prerequisites
- An Azure account with an active subscription. If you don't have an Azure subscription, create a free account before you begin.
- Your Azure account needs the Owner, Contributor, or one of the classic administrator roles.
- A Playwright project that uses Playwright runner and JavaScript SDK (NUnit and other runners aren't currently supported). If you don't have a project, create one by using the Playwright getting started documentation or use the Playwright Workspaces sample project.
- Azure CLI. If you don't have Azure CLI, see Install Azure CLI.
- The Playwright Workspace must use Microsoft Entra ID authentication. Authentication using an access token isn't supported for observability.
Enable observability and link a storage account to a workspace
To get started with Playwright Workspaces observability, first enable it in your workspace and link a storage account to store your artifacts. You can get started with a new workspace or use your existing workspace.
Sign in to the Azure portal by using the credentials for your Azure subscription.
From the portal Home page, search for and select Azure App Testing.

On the Azure App Testing hub, select Create under Playwright Workspaces.

On the Create a Playwright workspace resource page, enter the following information in the Basics tab:
Field Description Subscription Select the Azure subscription that you want to use for this Playwright workspace. Resource group Select an existing resource group. Or select Create new, and then enter a unique name for the new resource group. Name Enter a unique name for your workspace.
The name can only consist of alphanumeric characters and hyphens, and have a length between 3 and 24 characters.Location Select a geographic location for your workspace.
This location also determines where the test execution results are stored.Navigate to the Capabilities tab, and enter the following information:
Field Description Observability Toggle is set to Enabled by default to enable users to save and view their test run reports from Playwright Workspace. If you want to turn off observability, toggle the setting to Disabled. Storage account Toggle is set to Enabled by default to enable users to save and view their test run reports from Playwright Workspace. If you want to turn off observability, toggle the setting to Disabled. Note
Playwright Workspaces observability uses Azure Storage to store your test reports and other artifacts. Storage costs are determined based on your storage account's data-retention settings.
Note
Optionally, configure more details on the Tags tab. Tags are name/value pairs that you use to categorize resources and view consolidated billing by applying the same tag to multiple resources and resource groups.
Note
Saving observability artifacts to a customer-managed Azure Storage account currently requires network access to the storage account's public endpoint. Storage accounts configured for private-endpoint-only access aren't supported for artifact storing scenarios.
After you finish configuring the resource, select Review + Create.
Review the settings you provide, and then select Create. It takes a few minutes to create the workspace. Wait for the portal page to display Your deployment is complete before moving on.


Add role-based access control (RBAC) roles for the linked storage account
Open the linked storage account in Azure portal.
Go to the Access Control (IAM) tab.

Select Add role assignment.

Under Job function roles, search for and select Storage Blob Data Contributor role and select Next.

Select and add all members who run tests.

Select Review + assign.


Install Playwright Workspaces package
To use Playwright Workspaces, install the Playwright Workspaces package.
npm init @azure/playwright@latest
This command generates a playwright.service.config.ts file, which directs and authenticates Playwright to Playwright Workspaces.
If you already have this file, the package asks you to overwrite it.
Enable HTML and Playwright Workspaces reporter
To use the Playwright Workspaces observability feature, enable the HTML and Playwright Workspaces reporter by adding the following setting in the playwright.service.config.ts file –
reporter: [
    ["html", { open: "never" }], // HTML reporter must come first
    ["@azure/playwright/reporter"], // Azure reporter uploads HTML report
]
Enable artifacts in your Playwright setup
In the playwright.config.ts file of your project, make sure you are collecting all the required artifacts.
use:
{
    trace: 'on-first-retry',
    video:'retain-on-failure',
    screenshot:'on'
}
Configure the browser endpoint
In your setup, provide the region-specific browser endpoint. The endpoint depends on the Azure region you selected when creating the workspace.
To get the browser endpoint URL, follow these steps:
Sign in to the Azure portal with your Azure account and go to your workspace.
Select the Get Started page.

In Add the browser endpoint to your setup, copy the endpoint URL.
Ensure this URL is available in the
PLAYWRIGHT_SERVICE_URLenvironment variable.


Set up your environment
To set up your environment, configure the PLAYWRIGHT_SERVICE_URL environment variable with the value you obtained in the previous steps.
Use the dotenv module to manage your environment. By using the dotenv module, you can define your environment variables in the .env file.
Add the
dotenvmodule to your project.npm i --save-dev dotenvAdd the following code snippet in
playwright.service.config.ts.require('dotenv').config();Create a
.envfile alongside theplaywright.config.tsfile in your Playwright project.PLAYWRIGHT_SERVICE_URL={MY-REGION-ENDPOINT}Ensure you replace the
{MY-REGION-ENDPOINT}text placeholder with the value you copied earlier.
Set up authentication
To run your Playwright tests in your Playwright workspace, you need to authenticate the Playwright client where you're running the tests with the service. Authenticate from either your local dev machine or CI machine.
Note
Playwright Workspaces observability for test automation supports only Microsoft Entra ID based authentication. If you're using access tokens for authentication, you can't use observability.
Set up authentication using Microsoft Entra ID
Microsoft Entra ID is the only supported authentication for using observability feature in Playwright Workspace. From your local dev machine, you can use Azure CLI to sign in
az login
Note
If you're a part of multiple Microsoft Entra tenants, make sure you sign in to the tenant where your workspace belongs. You can get the tenant ID from Azure portal. See Find your Microsoft Entra Tenant. Once you get the ID, sign in using the command az login --tenant <TenantID>.
Run your tests with Playwright Workspaces
You completed the configuration for running your Playwright tests in the cloud with Playwright Workspaces. You can either use the Playwright CLI to run your tests, or use the Playwright Test Visual Studio Code extension.
Open a terminal window.
Enter the following command to run your Playwright test suite on remote browsers in your workspace:
npx playwright test --config=playwright.service.config.ts --workers=20Depending on the size of your test suite, this command runs your tests on up to 20 parallel workers.
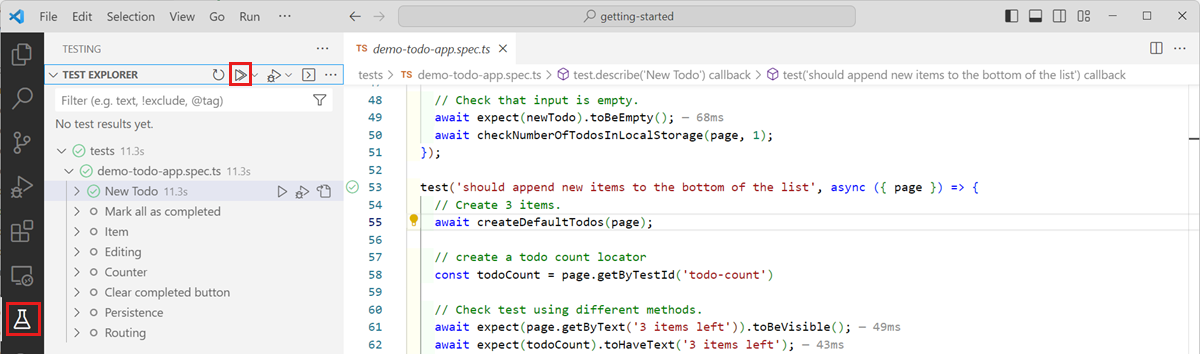
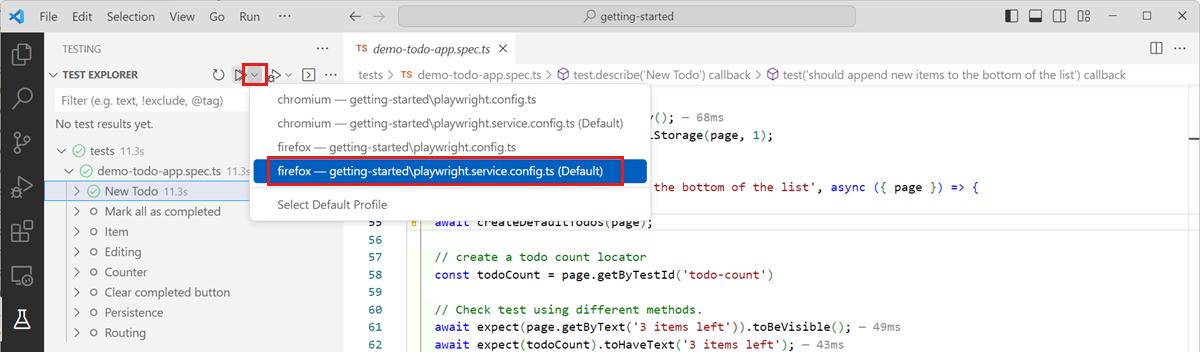
Debug test runs and results in the Azure portal
Add role-based access control (RBAC) roles for the linked storage account
Open the linked storage account in Azure portal.
Go to the Access Control (IAM) tab.
Select Add role assignment.
Under Privileged administrator roles, search for and select Storage Blob Data Viewer role and select Next.

Select and add all members who can view the test reports.

Select Review + assign.


(Only if trace is enabled) Allow list public trace viewer in the linked storage account
Open the linked storage account in Azure portal.
Go to Settings > Resource sharing (CORS).

Under Blob service, add a new record:
- Allowed origins:
https://trace.playwright.dev - Allowed methods:
GET,OPTIONS - Max age: Enter a value between 0 and 2147483647.

- Allowed origins:
Select Save.


View saved test reports in Azure portal
You can now troubleshoot the failed test cases in the Azure portal.
After your test run completes, the reporter generates a link to the Test runs page in Azure portal. Open this link to view detailed test results and associated artifacts.

The Test runs page provides all the necessary information for troubleshooting. You can:
- View detailed error logs, test steps, and attached artifacts such as screenshots or videos.
- Navigate directly to the Trace Viewer for deeper analysis.

The Trace Viewer allows you to step through your test execution visually. You can:
- Use the timeline to hover over individual steps, revealing the page state before and after each action.
- Inspect detailed logs, DOM snapshots, network activity, errors, and console output for each step.


Tip
For a better experience, open the trace viewer in a new browser tab by pressing the Ctrl button and selecting View trace.
Prerequisites
Before you begin, ensure you have the following items:
- An Azure account with an active subscription. If you don't have an Azure subscription, create a free account.
- The Owner, Contributor, or one of the classic administrator roles on your Azure account.
- To let the Azure portal assign storage permissions to the managed identity for you, a role that can assign roles on the storage account, such as Owner, User Access Administrator, or Role Based Access Control Administrator. If you don't have one of these roles, ask someone who does to assign the permissions for you.
- An MCP client that's connected to the Playwright Workspaces remote MCP server, such as GitHub Copilot app, Visual Studio Code with GitHub Copilot, or GitHub Copilot CLI. To set one up, see Quickstart: Automate browser tasks with the remote MCP server.
Turn on observability and configure storage
Session recordings are stored in an Azure storage account that's linked to your workspace. Playwright Workspaces uses a managed identity to write artifacts to that storage account. To set up this configuration, turn on observability, select a storage account, and choose the managed identity. You can create a new workspace or update an existing one.
Sign in to the Azure portal by using the credentials for your Azure subscription.
From the portal home page, search for and select Azure App Testing.
On the Azure App Testing hub, under Playwright Workspaces, select Create.
On the Basics tab of the Create a Playwright workspace page, enter the following information:
Field Description Subscription Select the Azure subscription that you want to use for this Playwright workspace. Resource group Select an existing resource group. Or select Create new, and then enter a unique name for the new resource group. Name Enter a unique name for your workspace. The name can contain only alphanumeric characters and hyphens, and must be 3 to 24 characters long. Location Select a geographic location for your workspace. Select the Capabilities tab, and then enter the following information:
Field Description Observability Turn on to capture reports, traces, and session recordings. Storage account Select an existing storage account, or select Create new to create one. Playwright Workspaces stores your session recordings and other artifacts in this storage account. Identity type Select the managed identity that Playwright Workspaces uses to access the storage account: System-assigned or User-assigned. If you select User-assigned, choose the user-assigned managed identity. Identity permissions Select Assign permissions to the managed identities on my behalf to have the Azure portal assign the Storage Blob Data Contributor role on the storage account to the managed identity. Select this option only if you have permission to assign roles on the storage account. Otherwise, clear it and assign the role manually. 
Optionally, add tags on the Tags tab. Tags are name/value pairs that you use to categorize resources and view consolidated billing by applying the same tag to multiple resources and resource groups.
Select Review + create. Review your settings, and then select Create.
It takes a few minutes to create the workspace. Wait until the portal shows Your deployment is complete before you continue.


Note
All workspace features that need a storage account, such as session recording, reporting, and browser profiles, use the same storage account and managed identity that you configure on the Capabilities page.
Note
Playwright Workspaces observability stores your session recordings and other artifacts in Azure Storage. Storage costs depend on your storage account's data-retention settings.
Note
To save artifacts, the storage account must allow network access through its public endpoint. Storage accounts that allow access only through private endpoints aren't currently supported for storing artifacts.
Assign storage permissions to the managed identity
If you cleared Assign permissions to the managed identities on my behalf, or if you don't have permission to assign roles on the storage account, assign the role manually. If you don't have the required permission, ask someone with the Owner, User Access Administrator, or Role Based Access Control Administrator role on the storage account to complete these steps.
In the Azure portal, go to the storage account that's linked to your workspace.
Select Access control (IAM) > Add > Add role assignment.
On the Role tab, search for and select Storage Blob Data Contributor, and then select Next.
On the Members tab, for Assign access to, select Managed identity.
Select Select members, and then select the managed identity that you chose for the workspace:
- For a system-assigned identity, select Playwright Workspace as the managed identity type, and then select your workspace.
- For a user-assigned identity, select User-assigned managed identity, and then select the identity.
Select Select, and then select Review + assign.
Tip
Role assignments can take a few minutes to take effect. If recordings don't appear right away, wait a few minutes and run the session again.
Turn on session recording in your MCP client
The remote MCP server records a browser session only when your MCP client asks for it. To turn on recording, add the following HTTP header to the remote MCP server configuration in your MCP client:
| Header | Value |
|---|---|
x-ms-enable-sessionartifacts |
Enabled |
Every browser session that the client creates through this MCP server connection is recorded. Sessions from clients that don't send the header aren't recorded. Keep your existing URL and authentication settings when you add the header.
In GitHub Copilot app, select Customize in the sidebar, and then select the Installed tab.
Under MCP Servers, find the Playwright Workspaces server, for example
playwright-cloud-browsers-<workspace-name>, open its More options menu, and select Edit configuration.Under Headers, select Add header, and then enter the following values:
- Name:
x-ms-enable-sessionartifacts - Value:
Enabled
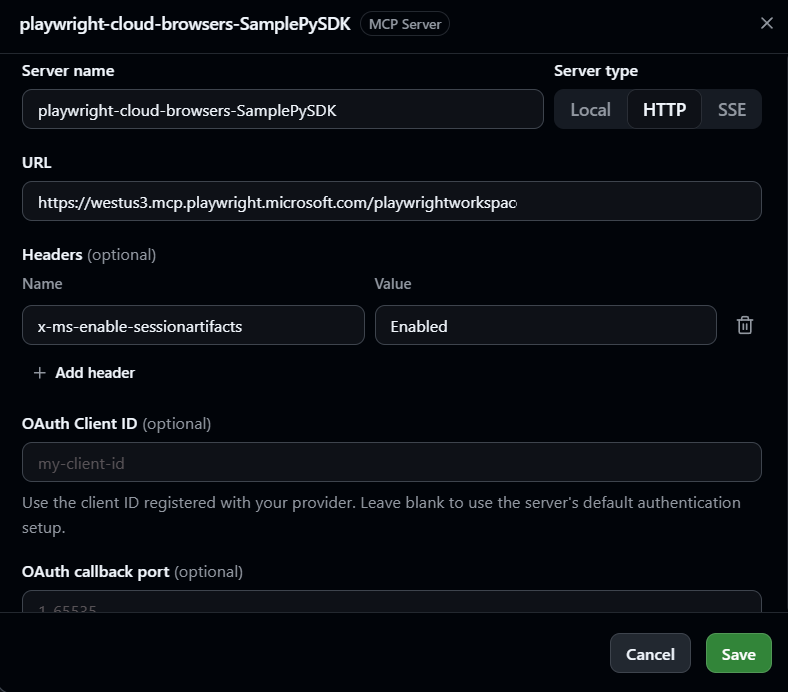
- Name:
Select Save.
Tip
If your server entry already has other Playwright Workspaces headers, such as x-ms-browser-profile-id or x-ms-secret-store-id, add x-ms-enable-sessionartifacts to the same set of headers.
Run a browser session with your agent
Ask your agent to do a browser task. For example, enter the following prompt:
Open https://playwright.dev, open the Docs page, and tell me the title of the page.
The agent opens a cloud browser in your workspace, completes the task, and closes the session. Because your MCP client sends the x-ms-enable-sessionartifacts header, the session's artifacts are saved to the linked storage account.
The agent returns a link to the saved browser session in Azure portal.
Caution
Session recordings capture what the browser shows, including screenshots of each page, page content, and network traffic. If your agent works with sensitive data, limit who can read the linked storage account, and set a data-retention policy that meets your organization's requirements.
View session recordings in the Azure portal
To view recordings in the Azure portal, you need read access to the linked storage account, and the storage account must allow Trace Viewer to load the trace files.
Assign a storage role to people who view recordings
In the Azure portal, go to the storage account that's linked to your workspace.
Select Access control (IAM) > Add > Add role assignment.
On the Role tab, search for and select Storage Blob Data Reader, and then select Next.
On the Members tab, select and add everyone who needs to view session recordings.
Select Review + assign.
Allow Trace Viewer to read from the storage account
In the Azure portal, go to the linked storage account.
Select Settings > Resource sharing (CORS).
On the Blob service tab, add a record with the following values:
Field Value Allowed origins https://trace.playwright.devAllowed methods GET,OPTIONSMax age A value between 0and2147483647.Select Save.
Review a recorded session
In the Azure portal, go to your Playwright workspace.
Select Browser sessions > Browser activity log.
The Browser activity log lists the browser sessions in your workspace. Each session shows the name, session ID, creator, source type, start time, source ID, billable time, browser type, and status. To find a session, filter the list by Time range, Source Type, Status, or source ID. Your MCP client creates sessions with the source type Mcp.

Select the name of the session that your agent ran.
The session page shows the Session details and the Session playback. In the playback, you can:
- Move along the timeline to see the page at any point in the session.
- Select an action in the Actions list to see the page Before and After the action.
- Use the Locator, Call, Log, Errors, Console, Network, Source, and Attachments tabs to inspect the details of each action.
- Open the session in Trace Viewer for deeper analysis.

To go back to the list, select View all sessions.


Stop recording sessions
To stop recording new sessions, remove the x-ms-enable-sessionartifacts header from your MCP client configuration. Existing recordings stay in your storage account until you delete them, or until your storage account's data-retention settings remove them.
Data residency
All session recordings and other artifacts are stored in the Azure storage account that you link to your workspace. You own and control this storage account, including its region, access, network settings, and data retention.
Playwright Workspaces stores only the metadata that it needs to list and manage your sessions, such as the session name and ID, creator, status, start and end times, billable time, source type, and browser type. Playwright Workspaces doesn't store any client-side data from your browser sessions, such as page content, screenshots, videos, traces, console messages, or network traffic.