Note
Access to this page requires authorization. You can try signing in or changing directories.
Access to this page requires authorization. You can try changing directories.
Applies to:  SQL Server on Azure VM
In this quickstart, you use the Azure portal to create a Linux virtual machine (VM) with SQL Server installed. You learn how to:
- Create a Linux VM running SQL Server
- Connect to the new VM with SSH
- Verify registration with the SQL IaaS Agent extension
- Configure for remote connections
Note
Deploying SQL Server on Linux VMs by using the Azure portal script-based experience is currently in preview. Precreated SQL Server on Linux Azure Marketplace images are deprecated. Instead, you start from a supported Linux base image, and Azure installs and configures SQL Server during VM provisioning. For more information, see Azure portal deployment.
Prerequisites
If you don't have an Azure subscription, create a free account before you begin.
Create a Linux VM
You can start from the Create a virtual machine page in the Azure portal, or from the Azure SQL hub. Both options lead to the same guided SQL Server configuration.
Use this option to start from the standard VM creation experience in the Azure portal.
Sign in to the Azure portal.
Go to Virtual machines, and then select Create. You can also select Create a resource > Virtual machine.
On the Basics tab, select your Subscription and Resource group.

In Virtual machine name, enter a name for your new Linux VM.
Enter or select the following values:
Region: Select the Azure region that's right for you.
Availability options: Choose the availability and redundancy option that's best for your apps and data.
Image: Select a supported Linux base image, such as RHEL 9, RHEL 10, Ubuntu 22.04, Ubuntu 24.04, or Ubuntu 26.04.
Size: Select a VM size. For more information, see VM sizes.

Tip
For development and functional testing, use a VM size of DS2 or higher. For performance testing, use DS13 or higher.
Configure the administrator account and inbound ports as described in Configure authentication and ports.
Go to the Advanced tab, and select Install SQL Server. The SQL Server settings tab becomes available.
On the SQL Server settings tab, configure your SQL Server deployment as described in Configure SQL Server settings.
Select Review + create, review the configuration summary, and then select Create.

Azure provisions the VM, installs and configures SQL Server, and registers the VM with the SQL Server IaaS Agent extension.
Configure authentication and ports
On the Basics tab, configure the following settings:
Authentication type: Select SSH public key.
Note
You can use an SSH public key or a password for authentication. SSH is more secure. For instructions on how to generate an SSH key, see Create SSH keys on Linux and Mac for Linux VMs in Azure.
Username: Enter the administrator name for the VM.
SSH public key: Enter your RSA public key.
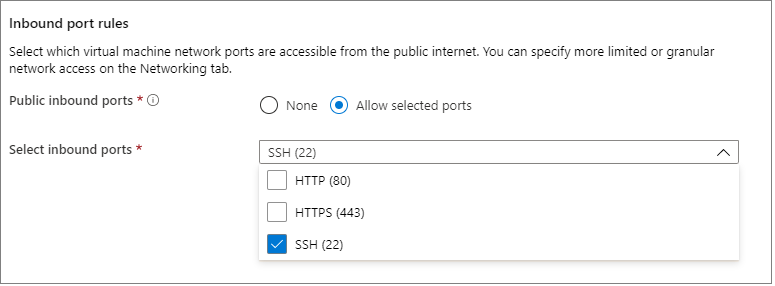
Public inbound ports: Choose Allow selected ports, and select the SSH (22) port in the Select public inbound ports list. In this quickstart, you need this step to connect to the VM. To remotely connect to SQL Server, you need to allow traffic to the default SQL Server port (1433) after you create the VM.
Configure SQL Server settings
On the SQL Server settings tab, configure the following options. The portal shows only options that are valid for your selected operating system, SQL Server version, and licensing model.
- SQL Server version: Choose a version, such as SQL Server 2025 or SQL Server 2022.
- Edition: Choose Enterprise, Standard, Developer, Express, or Evaluation. Available editions depend on the selected version.
- Licensing model: Choose Pay-as-you-go (default) or Azure Hybrid Benefit. To choose Azure Hybrid Benefit, you must have a SQL Server license with License Mobility through Software Assurance.
- Advanced configuration: You can configure SQL Server options in the portal, or upload a custom
mssql.conffile. For more information aboutmssql.confsettings, see Configure SQL Server on Linux with the mssql-conf tool.
You can also make changes to the settings on the Disks, Networking, Management, Monitoring, and Tags tabs, or keep the default settings.
Connect to the Linux VM
If you already use a BASH shell, connect to the Azure VM using the ssh command. In the following command, replace the VM user name and IP address to connect to your Linux VM.
ssh azureadmin@40.55.55.555
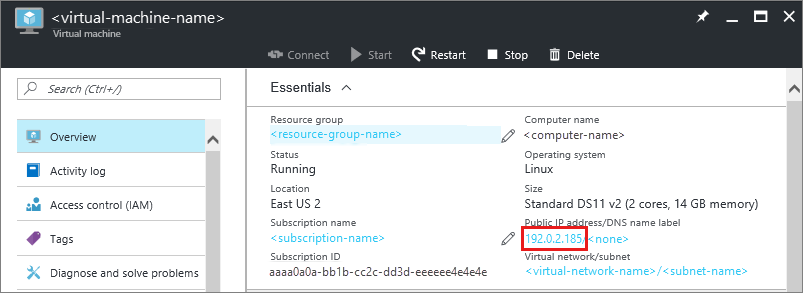
You can find the IP address of your VM in the Azure portal.
If you're running on Windows and don't have a BASH shell, install an SSH client, such as PuTTY.
Run PuTTY.
On the PuTTY configuration screen, enter your VM's public IP address.
Select Open and enter your username and password at the prompts.
For more information about connecting to Linux VMs, see Create a Linux VM on Azure using the Azure portal.
Note
If you see a PuTTY security alert about the server's host key not being cached in the registry, choose from the following options. If you trust this host, select Yes to add the key to PuTTy's cache and continue connecting. If you want to carry on connecting just once, without adding the key to the cache, select No. If you don't trust this host, select Cancel to abandon the connection.
Add the tools to your path (optional)
Several SQL Server packages are installed by default, including the SQL Server command-line tools package. The tools package contains the sqlcmd and bcp tools. For convenience, you can optionally add the tools path, /opt/mssql-tools/bin/, to your PATH environment variable.
Run the following commands to modify the PATH for both login sessions and interactive/non-login sessions:
echo 'export PATH="$PATH:/opt/mssql-tools/bin"' >> ~/.bash_profile
echo 'export PATH="$PATH:/opt/mssql-tools/bin"' >> ~/.bashrc
source ~/.bashrc
Verify registration with the SQL IaaS Agent extension
When you deploy a VM by using the Azure portal deployment experience, Azure automatically registers it with the SQL Server IaaS Agent extension. Registration creates a SQL virtual machine resource that's separate from the VM resource. You can then manage the SQL Server license type from Azure.
To verify registration, go to SQL virtual machines in the Azure portal and confirm that your VM is listed. For other options, see Verify registration status.
You can unregister the VM or register it again after deployment. For instructions, see Register a Linux SQL Server VM with the SQL Server IaaS Agent extension.
Configure for remote connections
If you need to remotely connect to SQL Server on the Azure VM, you must configure an inbound rule on the network security group. The rule allows traffic on the port on which SQL Server listens (default of 1433). The following steps show how to use the Azure portal for this step.
Tip
If you selected the inbound port MS SQL (1433) in the settings during provisioning, these changes have been made for you. You can go to the next section on how to configure the firewall.
In the portal, select Virtual machines, and then select your SQL Server VM.
In the left navigation pane, under Settings, select Networking.
In the Networking window, select Add inbound port under Inbound Port Rules.

In the Service list, select MS SQL.

Select OK to save the rule for your VM.

Open the firewall on RHEL
If you created a Red Hat Enterprise Linux (RHEL) VM and want to connect remotely, you also need to open port 1433 on the Linux firewall.
Connect to your RHEL VM.
In the BASH shell, run the following commands:
sudo firewall-cmd --zone=public --add-port=1433/tcp --permanent
sudo firewall-cmd --reload