Note
Access to this page requires authorization. You can try signing in or changing directories.
Access to this page requires authorization. You can try changing directories.
Important
Azure Dedicated HSM is being retired. Microsoft will fully support existing Dedicated HSM customers until July 31, 2028. No new customer onboardings are accepted. For full details and required actions, see the official Azure update.
If you're an Azure Dedicated HSM user, see Migrate from Azure Dedicated HSM to Managed HSM or Azure Cloud HSM. Azure Cloud HSM is now generally available and the successor to Azure Dedicated HSM.
New customers should evaluate and onboard to Azure Cloud HSM, Managed HSM, or Azure Key Vault based on their workload requirements. For guidance, see How to choose the right Azure key management solution.
Azure Dedicated HSM provides a physical device for sole customer use, with complete administrative control and full management responsibility. Because the service provides physical hardware, Microsoft controls how it allocates those devices to ensure effective capacity management. As a result, within an Azure subscription, the Dedicated HSM service isn't normally visible for resource provisioning. To access the Dedicated HSM service, you must contact your Microsoft account executive to request registration for the Dedicated HSM service. You can provision the service only after this process completes successfully.
This tutorial shows a typical provisioning process where:
- A customer has a virtual network already
- They have a virtual machine
- They need to add HSM resources into that existing environment.
A typical, high availability, multi-region deployment architecture may look as follows:
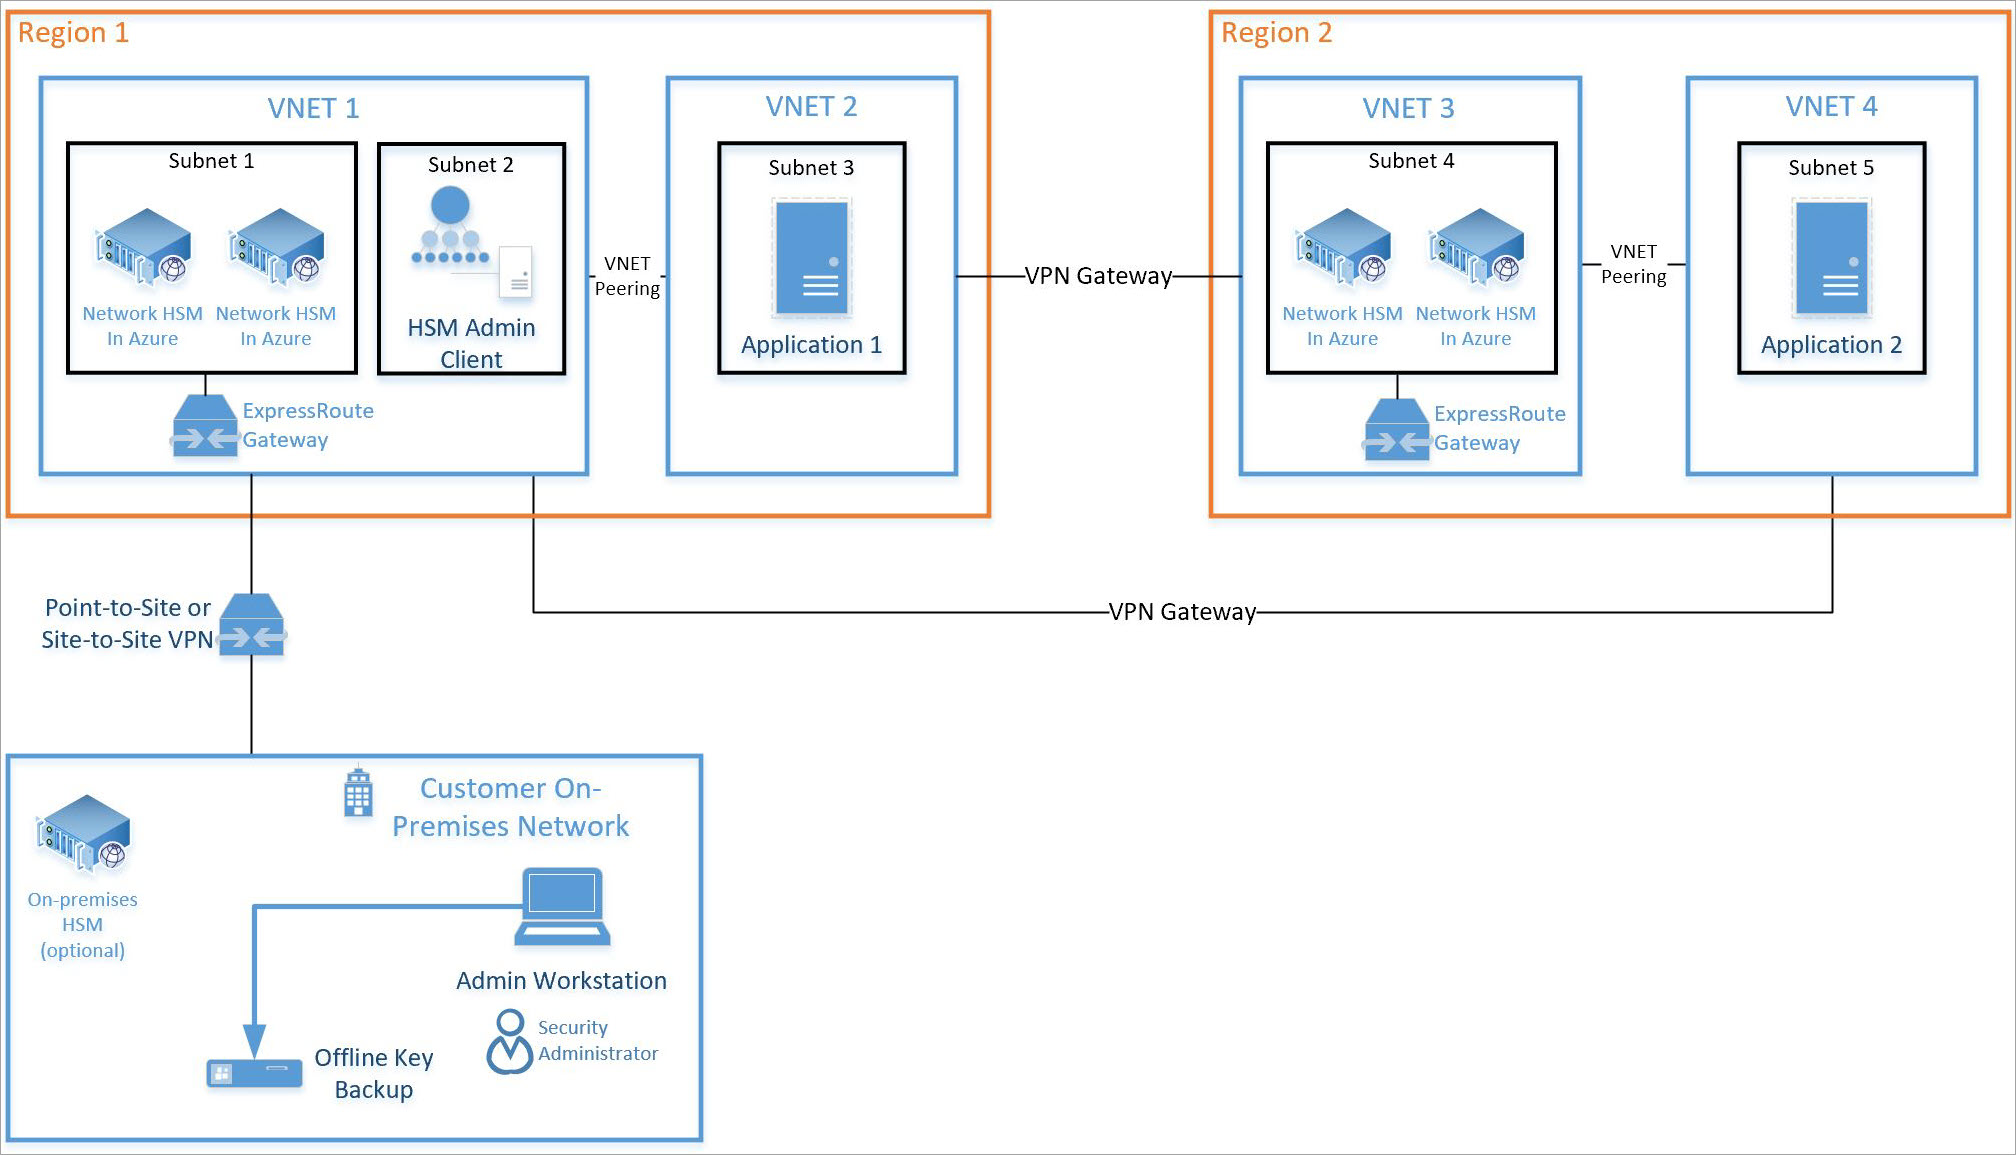
This tutorial focuses on a pair of HSMs and required ExpressRoute gateway (see Subnet 1 above) being integrated into an existing virtual network (see VNET 1 above). All other resources are standard Azure resources. The same integration process can be used for HSMs in subnet 4 on VNET 3 above.
Prerequisites
Azure Dedicated HSM is not currently available in the Azure portal. All interaction with the service must be via command-line or using PowerShell. This tutorial uses the command-line (CLI) interface in the Azure Cloud Shell. If you're new to the Azure CLI, follow getting started instructions here: Azure CLI 2.0 Get Started.
Assumptions:
- You have an assigned Microsoft Account Manager to qualify for onboarding and use of Azure Dedicated HSM.
- You went through the Azure Dedicated HSM registration process and been approved for use of the service. If not, then contact your Microsoft account representative for details.
- You created a Resource Group for these resources and the new ones deployed in this tutorial will join that group.
- You already created the necessary virtual network, subnet, and virtual machines as per the diagram and now want to integrate 2 HSMs into that deployment.
All instructions in this article assume that you're at the Azure portal and have the Cloud Shell open (select ">_" towards the top right of the portal).
Provision a dedicated HSM
Provisioning HSMs and integrating them into an existing virtual network via ExpressRoute gateway is validated using ssh. This validation helps ensure reachability and basic availability of the HSM device for any further configuration activities.
Validate feature registration
Any provisioning activity requires that the Dedicated HSM service is registered for your subscription. To validate that, run the following commands in the Azure portal Cloud Shell.
az feature show \
   --namespace Microsoft.HardwareSecurityModules \
   --name AzureDedicatedHSM
The commands should return a status of "Registered". If the commands don't return "Registered", you must register for this service by contacting your Microsoft account representative.

Create HSM resources
Before you create HSM resources, there are some prerequisite resources, you need. You must have a virtual network with subnet ranges for compute, HSMs, and gateway. The following commands serve as an example of what would create such a virtual network.
az network vnet create \
  --name myHSM-vnet \
  --resource-group myRG \
  --address-prefix 10.2.0.0/16 \
  --subnet-name compute \
  --subnet-prefix 10.2.0.0/24
az network vnet subnet create \
  --vnet-name myHSM-vnet \
  --resource-group myRG \
  --name hsmsubnet \
  --address-prefixes 10.2.1.0/24 \
  --delegations Microsoft.HardwareSecurityModules/dedicatedHSMs
az network vnet subnet create \
  --vnet-name myHSM-vnet \
  --resource-group myRG \
  --name GatewaySubnet \
  --address-prefixes 10.2.255.0/26
Note
The most important configuration for the virtual network is that the subnet for the HSM device must have delegations set to "Microsoft.HardwareSecurityModules/dedicatedHSMs". HSM provisioning doesn't work without this option being set.
The virtual network also requires an ExpressRoute gateway. Without a gateway, the HSM create operation fails with an error in connecting the device to the virtual network. Create the gateway with the az network vnet-gateway create command and the ErGwScale SKU. Azure automatically assigns and manages the gateway's public IP address, so don't create a public IP resource or pass the --public-ip-addresses parameter.
az network vnet-gateway create \
  --resource-group myRG \
  --name myergw \
  --vnet myHSM-vnet \
  --gateway-type ExpressRoute \
  --sku ErGwScale \
  --min-scale-unit 1 \
  --max-scale-unit 1
The gateway takes approximately 17 minutes to deploy.
After you configure your network, use these Azure CLI commands to provision your HSMs.
Use the az dedicated-hsm create command to provision the first HSM. The HSM is named hsm1. Substitute your subscription:
az dedicated-hsm create --location westus --name hsm1 --resource-group myRG \
     --stamp-id stamp1 --sku "SafeNet Luna Network HSM A790" \
     --subnet id="/subscriptions/aaaa0a0a-bb1b-cc2c-dd3d-eeeeee4e4e4e/resourceGroups/myRG/providers/Microsoft.Network/virtualNetworks/myHSM-vnet/subnets/hsmsubnet" \
     --network-interfaces private-ip-address=10.2.1.4
The HSM create operation takes approximately 7 minutes to complete.
To see a current HSM, run the az dedicated-hsm show command:
az dedicated-hsm show --resource-group myRG --name hsm1Provision the second HSM by using this command:
az dedicated-hsm create --location westus --name hsm2 --resource-group myRG \
     --stamp-id stamp2 --sku "SafeNet Luna Network HSM A790" \
     --subnet id="/subscriptions/aaaa0a0a-bb1b-cc2c-dd3d-eeeeee4e4e4e/resourceGroups/myRG/providers/Microsoft.Network/virtualNetworks/myHSM-vnet/subnets/hsmsubnet" \
     --network-interfaces private-ip-address=10.2.1.5
Run the az dedicated-hsm list command to view details about your current HSMs:
az dedicated-hsm list --resource-group myRG
There are some other commands that might be useful. Use the az dedicated-hsm update command to update an HSM:
az dedicated-hsm update --resource-group myRG --name hsm1
To delete an HSM, use the az dedicated-hsm delete command:
az dedicated-hsm delete --resource-group myRG --name hsm1
Verify the deployment
To verify the devices are provisioned and to see device attributes, run the following command set. Ensure the resource group is set appropriately and the resource name is exactly as you have in the parameter file.
subid=$(az account show --query id --output tsv)
az resource show \
   --ids /subscriptions/$subid/resourceGroups/myRG/providers/Microsoft.HardwareSecurityModules/dedicatedHSMs/HSM1
az resource show \
   --ids /subscriptions/$subid/resourceGroups/myRG/providers/Microsoft.HardwareSecurityModules/dedicatedHSMs/HSM2
The output looks something like the following output:
{
    "id": n/subscriptions/aaaa0a0a-bb1b-cc2c-dd3d-eeeeee4e4e4e/resourceGroups/HSM-RG/providers/Microsoft.HardwareSecurityModules/dedicatedHSMs/HSMl",
    "identity": null,
    "kind": null,
    "location": "westus",
    "managedBy": null,
    "name": "HSM1",
    "plan": null,
    "properties": {
        "networkProfile": {
            "networkInterfaces": [
            {
            "id": n/subscriptions/aaaa0a0a-bb1b-cc2c-dd3d-eeeeee4e4e4e/resourceGroups/HSM-RG/providers/Microsoft.Network/networkInterfaces/HSMl_HSMnic", "privatelpAddress": "10.0.2.5",
            "resourceGroup": "HSM-RG"
            }
            L
            "subnet": {
                "id": n/subscriptions/aaaa0a0a-bb1b-cc2c-dd3d-eeeeee4e4e4e/resourceGroups/HSM-RG/providers/Microsoft.Network/virtualNetworks/demo-vnet/subnets/hsmsubnet", "resourceGroup": "HSM-RG"
            }
        },
        "provisioningState": "Succeeded",
        "stampld": "stampl",
        "statusMessage": "The Dedicated HSM device is provisioned successfully and ready to use."
    },
    "resourceGroup": "HSM-RG",
    "sku": {
        "capacity": null,
        "family": null,
        "model": null,
        "name": "SafeNet Luna Network HSM A790",
        "size": null,
        "tier": null
    },
    "tags": {
        "Environment": "prod",
        "resourceType": "Hsm"
    },
    "type": "Microsoft.HardwareSecurityModules/dedicatedHSMs"
}
You can also now see the resources using the Azure resource explorer. Once in the explorer, expand "subscriptions", expand your specific subscription for Dedicated HSM, expand "resource groups", expand the resource group you used and finally select the "resources" item.
Test the deployment
Testing the deployment is a case of connecting to a virtual machine that can access one or more HSMs and then connecting directly to the HSM device. These actions confirm the HSM is reachable. The ssh tool is used to connect to the virtual machine. The command is similar to the following but with the administrator name and dns name you specified in the parameter.
ssh adminuser@hsmlinuxvm.westus.cloudapp.azure.com
The IP Address of the VM could also be used in place of the DNS name. If the command is successful, it will prompt for a password, and you should enter that. Once logged on to the virtual machine, you can sign in to the HSM using the private IP address found in the portal for the network interface resource associated with the HSM.

Note
Notice the "Show hidden types" checkbox, which when selected will display HSM resources.
In the screenshot, clicking the "HSM1_HSMnic" or "HSM2_HSMnic" would show the appropriate Private IP Address. Otherwise, the az resource show command is a way to identify the right IP Address.
When you have the correct IP address, run the following command substituting that address:
ssh tenantadmin@10.0.2.4
If successful, you are prompted for a password. The default password is PASSWORD and the HSM will first ask you to change your password so set a strong password and use whatever mechanism your organization prefers to store the password and prevent loss.
Important
If you lose this password, the HSM must be reset and that means losing your keys.
When you're connected to the HSM using ssh, run the following command to ensure the HSM is operational.
hsm show
The output should look like this:
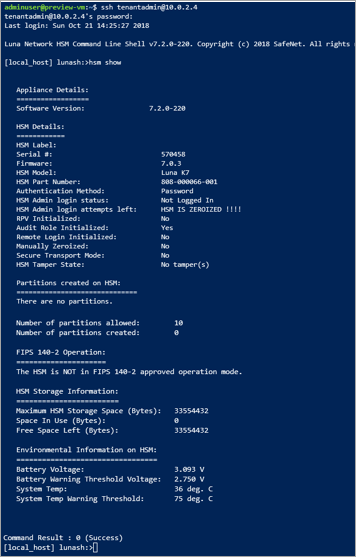
At this point, you've allocated all resources for a highly available, two HSM deployment and validated access and operational state. Any further configuration or testing involves more work with the HSM device itself. For this, you should follow the instructions in the Thales Luna 7 HSM Administration Guide chapter 7 to initialize the HSM and create partitions. All documentation and software are available directly from Thales for download once you are registered in the Thales customer support portal and have a Customer ID. Download Client Software version 7.2 to get all required components.
Delete or clean up resources
If you are finished with just the HSM device, it can be deleted as a resource and returned to the free pool. The obvious concern when doing this is any sensitive customer data that is on the device. The best way to "zeroize" a device is to get the HSM admin password wrong three times. (Not the appliance admin, the actual HSM admin). As a safety measure to protect key material, the device can't be deleted as an Azure resource until it is in the zeroized state.
Note
If you have issue with any Thales device configuration, contact Thales customer support.
If you are finished with all resources in the resource group, you can remove them with the following command:
az group delete \
   --resource-group myRG \
   --name HSMdeploy \
   --verbose
Next steps
After completing the steps in the tutorial, Dedicated HSM resources are provisioned and you have a virtual network with necessary HSMs, and further network components to enable communication with the HSM. You're now in a position to complement this deployment with more resources as required by your preferred deployment architecture. For more information on helping plan your deployment, see the Concepts documents. A design with two HSMs in a primary region addressing availability at the rack level, and two HSMs in a secondary region addressing regional availability is recommended.