Note
Access to this page requires authorization. You can try signing in or changing directories.
Access to this page requires authorization. You can try changing directories.
Use Microsoft Configuration Manager to migrate servers running Windows Server 2012 R2 or Windows Server 2016 from the previous Microsoft Monitoring Agent (MMA)-based Microsoft Defender for Endpoint solution to the modern unified solution. This procedure uses the Defender for Endpoint unified solution upgrade script to install the unified solution, remove the Defender for Endpoint workspace from MMA, and apply the onboarding package.
Important
This manual procedure applies to Configuration Manager versions earlier than 2207. Configuration Manager version 2207 or later can fully automate deployment and upgrades. For current migration options, see Microsoft Configuration Manager migration scenarios.
Prerequisites
Before you create the application, make sure your environment meets these requirements:
- Configuration Manager version earlier than 2207. Configuration Manager version 2107 or later is required if you also use it to configure Endpoint Protection policies.
- A device collection that contains servers running Windows Server 2012 R2 or Windows Server 2016 that use the MMA-based Defender for Endpoint solution.
- The correct Defender for Endpoint workspace ID configured in the Microsoft Monitoring Agent item in Control Panel on each server.
- The required servicing stack updates, cumulative updates, and Microsoft Defender Antivirus platform updates. Review the prerequisites for Windows Server 2016 and Windows Server 2012 R2.
- Access to the Microsoft Defender portal and permission to download Defender for Endpoint installation and onboarding packages.
- A Configuration Manager content source that the site server computer account can access.
Gather the deployment files
Download the latest unified solution package, onboarding package, and migration script. Save all three files in the same Configuration Manager content source folder.
On the Onboarding page in the Microsoft Defender portal at https://security.microsoft.com/preferences2/endpointsOnboarding, select Windows Server 2016 and Windows Server 2012 R2.
For Deployment method, select Group Policy, and then download the installation package and onboarding package. The migration script requires the noninteractive
.cmdonboarding file included in the Group Policy package.
Download the latest Defender for Endpoint unified solution upgrade script, and extract
install.ps1. For migration details and script options, see Server migration scenarios from the previous MMA-based solution.Save the unified solution installer, the onboarding
.cmdfile, andinstall.ps1in the Configuration Manager content source folder.

Create the application
Create a script installer deployment type that runs the migration script in the system context.
In the Configuration Manager console, select the Software Library workspace. Expand Application Management, select Applications, and then select Create Application.
On the General page, select Manually specify the application information, and then select Next.

On the General Information page, enter a name and any other information that your organization requires, and then select Next.
On the Software Center page, enter the required localized application name, configure any other Software Center details, and then select Next.
On the Deployment Types page, select Add.
On the General page of the Create Deployment Type Wizard, select Script Installer from the Type list. Select Manually specify the deployment type information, and then select Next.
On the General Information page, enter a name for the deployment type, and then select Next.

On the Content page, enter the Universal Naming Convention (UNC) path to the folder that contains the deployment files in Content location. For example,
\\ServerName\h$\SOFTWARE_SOURCE\path.In Installation program, enter the following command. Replace
<workspace ID>with the Defender for Endpoint workspace ID used by the MMA-based solution:Powershell.exe -ExecutionPolicy ByPass -File install.ps1 -RemoveMMA <workspace ID> -OnboardingScript .\WindowsDefenderATPOnboardingScript.cmdThe ExecutionPolicy parameter value
Bypassapplies only to the PowerShell process started by this command. The migration guidance recommends theAllSignedexecution policy. If the script runs as SYSTEM, import the script signing certificate into the Local Computer Trusted Publishers store.Important
The RemoveMMA parameter removes only the specified Defender for Endpoint workspace as an optional cleanup step. MMA might still be required for other workspaces or functionality. Confirm that the workspace ID is correct before you deploy the application.

Select Next. On the Detection Method page, select Add Clause.
In the Detection Rule dialog, configure these settings:
- Setting type: Registry
- Hive: HKEY_LOCAL_MACHINE
- Key:
SYSTEM\CurrentControlSet\Services\Sense - Value: Leave blank.
- Detection option: This registry setting must exist on the target system to indicate presence of this application
The registry key detects whether the Defender for Endpoint sensor service is installed. It doesn't confirm that the server is onboarded or reporting to the Defender for Endpoint service.

Select OK, and then select Next.
On the User Experience page, configure these settings:
- Installation behavior: Install for system
- Logon requirement: Whether or not a user is logged on
- Installation program visibility: Use Normal for a pilot deployment if you need to observe the installation. Use Minimized for a broader deployment.
- Allow users to view and interact with the program installation: Clear this option.
- Maximum allowed run time (minutes): Enter a value that allows the script to complete and fits within your maintenance windows. The Configuration Manager default is 120 minutes.

Select Next.
On the Requirements page, add requirements if needed to limit installation to Windows Server 2012 R2 and Windows Server 2016, and then select Next.
On the Dependencies page, add any dependencies that your environment requires, and then select Next.
Review the deployment type settings on the Summary page, select Next, and then select Close after the deployment type is created.
In the Create Application Wizard, review the application settings, select Next, and then select Close after the application is created.


Deploy the application
Deploy the application to the device collection that contains the servers you want to migrate.
In the Applications node of the Configuration Manager console, select the application, and then select Deploy.
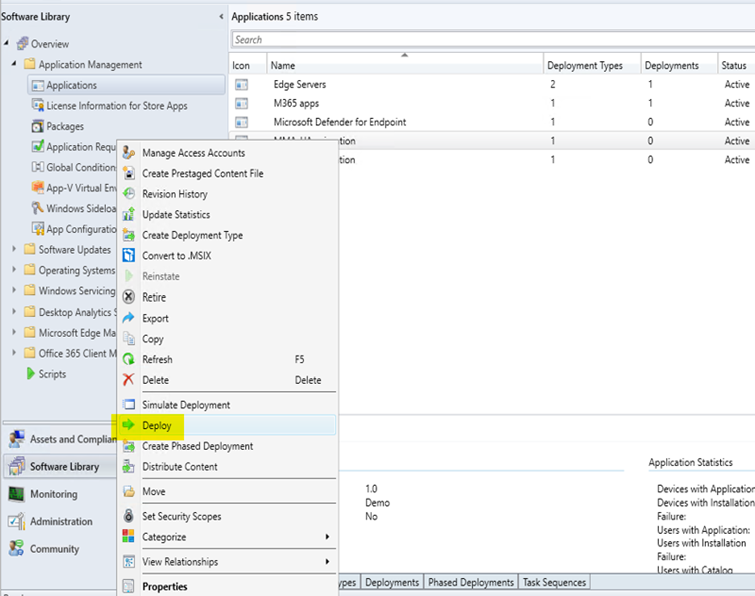
On the General page of the Deploy Software Wizard, select the device collection that contains the servers to migrate.
On the Content page, add the distribution points or distribution point groups that should host the application content.
On the Deployment Settings page, select Install. Select Required to install the application automatically according to the configured schedule, or select Available to allow an administrator to start installation from Software Center.
Configure scheduling, user notifications, and alert settings for your environment.
Review the deployment settings on the Summary page, select Next, and then select Close after the deployment is created.
Verify the migration
Configuration Manager application detection confirms that the Defender for Endpoint sensor service is installed. Verify onboarding and reporting separately.
In the Configuration Manager console, select the Monitoring workspace, and then select Deployments to review deployment status.
On a migrated server, review
C:\Windows\CCM\Logs\AppEnforce.logfor application enforcement details.Confirm that the server appears in the device inventory in the Microsoft Defender portal and has a recent sensor health status.
To confirm that the server reports detections to the service, run a detection test on the onboarded server.
The migration script creates Event Trace Log (ETL) files by default. During a Configuration Manager deployment, these files are typically in the script's working directory under C:\Windows\ccmcache\. Provide the ETL files to Microsoft Support when you troubleshoot installation or onboarding failures.
Related content
- Microsoft Monitoring Agent setup
- Create applications in Configuration Manager
- Deploy applications in Configuration Manager
- Microsoft Defender for Endpoint with Configuration Manager
- Onboard servers through the Microsoft Defender for Endpoint onboarding experience
- Defending Windows Server 2012 R2 and Windows Server 2016