Nota
L'accesso a questa pagina richiede l'autorizzazione. È possibile provare ad accedere o modificare le directory.
L'accesso a questa pagina richiede l'autorizzazione. È possibile provare a modificare le directory.
This article gives an overview of how to migrate from Dynamics SL on-premises to Business Central online. Understanding the data migration basics helps you plan and execute a smooth transition to the cloud.
Understanding cloud migration
Data migration securely moves data from an on-premises SQL Server instance to Business Central online. You manage cloud migration from Business Central online through a connection to the on-premises database and various components that establish a pipeline for replicating data. The on-premises solution remains the operative environment until you complete the cloud migration.
Components involved
The following figure shows the main components involved in the data migration process.
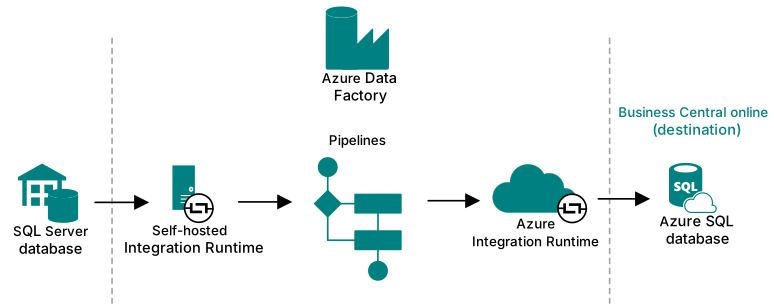
| Component | Description |
|---|---|
| On-premises database | This database is the on-premises SQL Server database that stores business data for the companies to migrate to the cloud. |
| Azure Data Factory | A key component of the data migration is Azure Data Factory. Azure Data Factory is a managed cloud service built for migrating large amounts of raw data across data sources and controlling data integration projects. Azure Data Factory migrates the data between on-premises and online directly. In other words, it doesn't look at any permissions within the applications you're transferring data between—only SQL permissions. |
| Pipelines | Pipelines are the main elements of Azure Data Factory. Pipelines are groupings of activities that copy, move, and transform data, and also orchestrate its flow. |
| Integration Runtime | The Integration Runtime component is the compute infrastructure of Azure Data Factory. There are two Integration Runtime instances in the end-to-end process. The first instance securely copies data from on-premises to the cloud, where the pipelines are created. If the on-premises database is an SQL Server database, you use a self-hosted integration runtime. This runtime is installed locally on the on-premises network and registered in Azure Data Factory. |
| Online database | This database is the Azure SQL Database of the Business Central environment to which you're migrating data. |
What data is migrated
In general, the cloud migration tool migrates the following data:
- System and company setup, including accounting periods, tax areas, and locations. These records correspond to Dynamics SL fiscal periods, tax groups, and inventory sites.
- Master data for accounts, customers, vendors, and items
- Open document amounts for customers and vendors
- Account balances by period
- Historical data
The company data that is migrated is configurable as part of cloud migration setup. Learn more in Configure Dynamics SL company migration and Migrate Dynamics SL data to the cloud.
How data is migrated
Data is replicated table by table, and successes and failures are tracked for each table. If a table fails to replicate, the error is captured, and replication moves on to the next table. Tables fail to replicate if they can't be found, or if the schema doesn't match between the cloud and the on-premises tables.
Typically, you first run the migration as a test on a sandbox environment. Then, when you're ready to go live, you run the migration on the production environment. The data migration time can vary depending on factors such as the amount of data to migrate, your SQL Server configuration, and your connection speeds.
Important
Don't set up cloud migration for a production environment that's already in use for business. You risk that the migration process overwrites data that's needed to run the business. Even if your migration targets a different company in that environment, you risk that the upgrade overwrites data that's shared across companies in the target environment.
End-to-end migration process
This section outlines the general process or phases you go through to migrate data from on-premises to online.
Migration Assessment
Before migrating your on-premises deployment to the cloud, evaluate its readiness using the Dynamics SL Analysis and Dynamics SL Repair tools. These tools provide migration options based on your needs and detect potential migration issues based on your Dynamics SL system structure. Download the Dynamics SL Analysis and Repair tools from Microsoft's BCTech repository.
The Analysis Tool connects to a Microsoft Dynamics SL database and generates an analysis report text file.
The report outlines and provides an overview of the modules in use and examines the data that can be migrated to Business Central.
Analysis Report information example:
- Microsoft Dynamics SL version
- Microsoft SQL version
- Overview of Microsoft Dynamics SL modules being used
- Module details including the number of:
- Records in master tables
- Records in transaction tables
The Repair Tool connects to a Microsoft Dynamics SL database.
- The Repair tool is used to validate Microsoft Dynamics SL data to identify any issues that require repair before using the online Business Central tool to migrate Microsoft Dynamics SL data to Microsoft Dynamics Business Central.
- Repair Tool:
- Includes automated fixes to the Microsoft Dynamics SL data.
- Includes repair items that need to be addressed.
Preparation
The preparation phase helps reduce migration time and problems. It typically includes these tasks:
Plan
Create a migration plan with a detailed timeline, resource requirements, and approach. A well-crafted plan can minimize downtime and help prevent users from losing work. Plan to run cloud migration between environment updates.
Learn more in Prepare and plan for cloud migration from Dynamics SL.
Verify prerequisites
Prepare your on-premises environment for migration, which includes ensuring that it meets the prerequisites for migration, such as using SL 2015 or later. This step is crucial in ensuring that your environment is ready for the migration process.
Learn more in Cloud migration prerequisites for Dynamics SL.
Verify that data is in the best state possible to complete the migration:
This step involves reviewing your data to ensure that it's clean, accurate, and in the best possible state for migration.
Cloud migration setup
This phase prepares the environment by establishing the connection and pipeline between the on-premises databases and the online tenant database. You also specify which companies to migrate. This phase starts when you run the Cloud Migration Setup assisted setup guide in Business Central online.
Learn more in Run cloud migration setup for Dynamics SL migration.
Configure Dynamics SL company migration
After you finish the setup guide, configure which SL company data to migrate.
Learn more in Configure Dynamics SL company migration.
Data replication
This step copies SL data into migration tables in the online environment. It starts when you select Run data replication on Cloud Migration Management.
At this point in the process, you can verify whether the migration went well or not, fix any problems, and rerun the replication multiple times if you want to. Once the data replicates to the sandbox environment, you can use the troubleshooting tools in the Business Central administration center.
Learn more in Run and manage data replication.
Data upgrade
After your final replication completes, select Run data upgrade on Cloud Migration Management. This step transforms replicated SL data into Business Central data, company by company in the background.
Learn more in Upgrade data for Dynamics SL cloud migration.
Completion and follow-up
Review migration errors, posting results, historical data, and the migrated business data. After testing is complete, disable cloud migration and complete these follow-up tasks:
Optimize your Business Central online environment
Configure the system to meet your business needs. This task might include setting up security, customizing forms and reports, and integrating with other systems. By taking the time to optimize your new environment, you can ensure that it meets your specific requirements and works seamlessly with your existing systems.
Set up user access
Grant access to your new Business Central online system for all relevant users. This task includes creating new user accounts, setting up permissions, and defining roles and responsibilities.
Go live
Once you're satisfied with the new environment setup, switch to the new Business Central online system. This task involves decommissioning the on-premises deployment and ensuring all users use the new system.
Learn more in Complete Dynamics SL cloud migration to Business Central online.
By completing these tasks, you can ensure a successful migration to the cloud-based Business Central solution.
Working with environments during cloud migration
You manage the cloud migration from Business Central online. But once you start the migration phase, the on-premises solution remains the operative environment until you complete the migration. Don't set up cloud migration for a production environment that's already in use for business. You risk that the migration process overwrites data that's needed to run the business. Even if your migration targets a different company in that environment, you risk that the upgrade overwrites data that's shared across companies in the target environment.
Rerunning migration can overwrite data in the target online companies.
If you don't want data in Business Central online to be overwritten, don't configure the connection.
Limited data entry during the migration period
Once cloud migration is set up and underway, avoid entering data in the online companies being migrated. Data entered there can be overwritten when you rerun migration.
Dynamics SL migration retains existing Business Central user permissions. It doesn't automatically assign users to the Intelligent Cloud permission set. Review access and restrict data entry for existing users and users you add during migration.
Note
Before you configure a connection from on-premises to Business Central online, make sure that at least one user in each company has the SUPER permission set.
If you manually assign the Intelligent Cloud permission set, users can read all data by default. If you need to further restrict what a user can read, a user with SUPER can create and assign a more restrictive permission set. We recommend that you copy Intelligent Cloud and remove the permissions you don't want users to have.
Warning
If you grant insert, modify, or delete permissions to any resource set to read-only, it could negatively impact the data in Business Central online. If this occurs, you might need to clear all your data and rerun a full migration to correct it.
Related information
Migrate Dynamics SL data to the cloud
FAQ about migrating to Business Central online from on-premises solutions
Managing capacity