このクイックスタートでは、MIP C++ SDK が実行時に使用するクライアント初期化パターンを実装する方法について説明します。
注
MIP Protection SDK を使用するすべてのクライアント アプリケーションには、このクイック スタートの手順が必要です。 アプリケーションの初期化と認証デリゲートクラスと同意デリゲート クラスの実装後に、これらのクイック スタートを順次実行します。
[前提条件]
まだ行っていない場合は、次の手順を実行してください。
- Microsoft Information Protection (MIP) SDK のセットアップと構成の手順を完了します。 この "クライアント アプリケーションの初期化" クイック スタートでは、適切な SDK のセットアップと構成に依存しています。
- 必要 に応じて:
- プロファイル オブジェクトとエンジン オブジェクトを確認します。 プロファイル オブジェクトとエンジン オブジェクトは、MIP ファイル/ポリシー/保護 SDK を使用するクライアントに必要なユニバーサル概念です。
- 認証の概念を確認して、SDK とクライアント アプリケーションによって認証と同意がどのように実装されるかを確認します。
- オブザーバーの概念を確認して、オブザーバーとその実装方法の詳細を確認します。 MIP SDK は、オブザーバー パターンを使用して非同期イベント通知を実装します。
Visual Studio ソリューションとプロジェクトを作成する
最初に、他のクイック スタートで構築されている初期Visual Studio ソリューションとプロジェクトを作成して構成します。
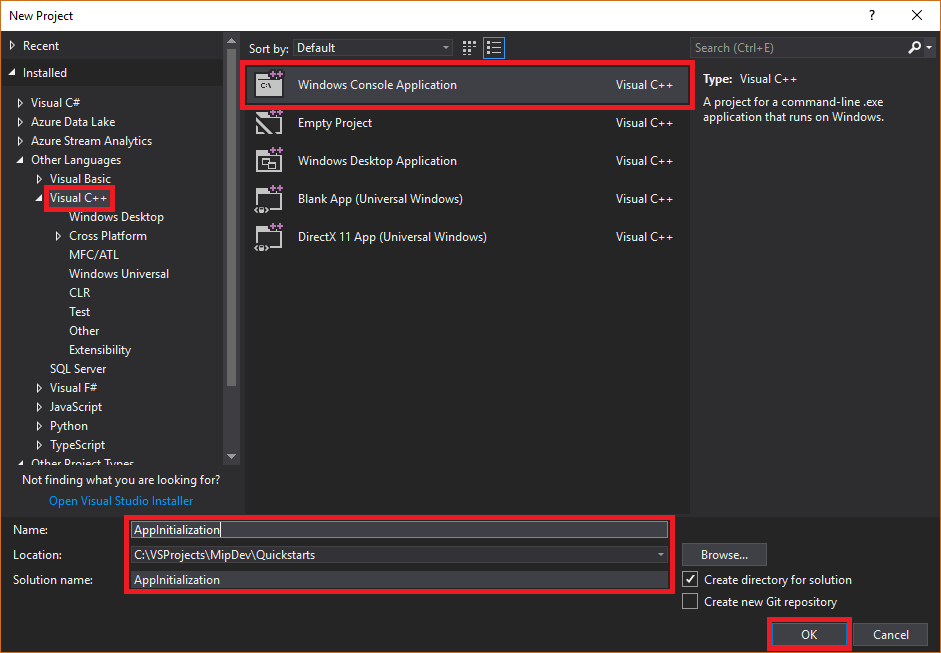
Visual Studio 2022 以降を開き、[ ファイル ] メニューの [ 新規作成]、[ プロジェクト] の順に選択します。 [ 新しいプロジェクト ] ダイアログで、次の手順を実行します。
左側のウィンドウの [ インストール済み] の [ その他の言語] で、[ Visual C++] を選択します。
中央のウィンドウで、[ Windows コンソール アプリケーション] を選択します。
下部のウィンドウで、プロジェクト 名、 場所、および含まれている ソリューション名 を適宜更新します。
完了したら、右下隅の [OK] を選択します 。
MIP Protection SDK の NuGet パッケージをプロジェクトに追加します。
ソリューション エクスプローラーで、上部のソリューション ノードのすぐ下にあるプロジェクト ノードを右クリックし、[NuGet パッケージの管理]を選択します。..:
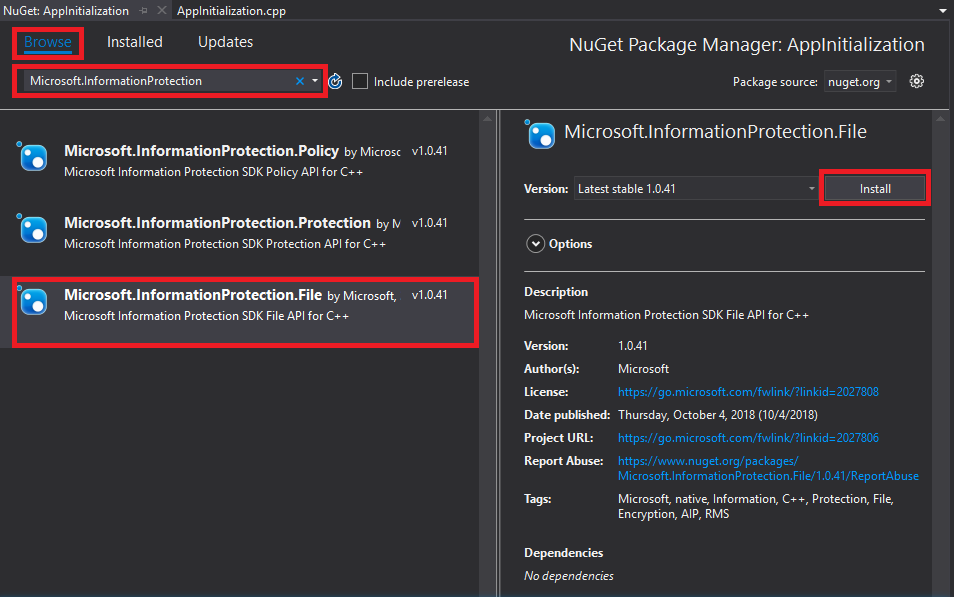
[エディター グループ] タブ領域で [NuGet パッケージ マネージャー ] タブが開いたとき:
- を選択し、を参照します。
- 検索ボックスに、
Microsoft.InformationProtectionと入力します。 -
Microsoft.InformationProtection.Protectionパッケージを選択します。 - [インストール] を選択し、[プレビューの変更の確認] ダイアログが表示されたら [OK] を選択します。
オブザーバー クラスを実装して保護プロファイルとエンジン オブジェクトを監視する
次に、SDK の mip::ProtectionProfile::Observer クラスを拡張して、Protection プロファイル オブザーバー クラスの基本的な実装を作成します。 SDK はオブザーバーをインスタンス化し、後でそれを使用して保護プロファイル オブジェクトの読み込みを監視し、エンジン オブジェクトをプロファイルに追加します。
プロジェクトに新しいクラスを追加すると、ヘッダー (.h) ファイルと実装 (.cpp) ファイルの両方が生成されます。
ソリューション エクスプローラーで、プロジェクト ノードをもう一度右クリックし、[追加] を選択して、[クラス] を選択します。
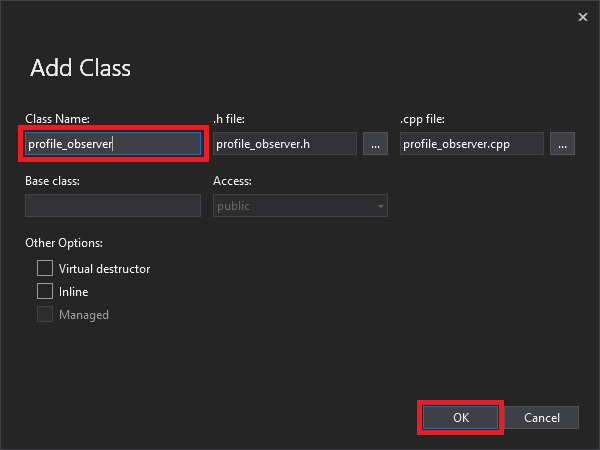
[ クラスの追加 ] ダイアログで、次の手順を実行します。
- [ クラス名] フィールドに「
profile_observer」と入力します。 入力した名前に基づいて、Visual Studio によって .h ファイル フィールドと .cpp ファイル フィールドの両方に自動的に入力されることに注意してください。 - 終わったら、 [OK] を選択します。
- [ クラス名] フィールドに「
クラスの .h ファイルと .cpp ファイルを生成した後、Visual Studioエディター グループ タブで両方のファイルを開きます。 次に、新しいオブザーバー クラスを実装するように各ファイルを更新します。
生成された
profile_observerクラスを選択して削除して、profile_observer.hを更新します。 前の手順で生成されたプリプロセッサ ディレクティブ (#pragma、#include) は削除しないでください。 次に、既存のプリプロセッサ ディレクティブの後に、次のソースをコピーしてファイルに貼り付けます。#include <memory> #include "mip/protection/protection_profile.h" using std::exception_ptr; using std::shared_ptr; class ProtectionProfileObserver final : public mip::ProtectionProfile::Observer { public: ProtectionProfileObserver() { } void OnLoadSuccess(const std::shared_ptr<mip::ProtectionProfile>& profile, const std::shared_ptr<void>& context) override; void OnLoadFailure(const std::exception_ptr& Failure, const std::shared_ptr<void>& context) override; void OnAddEngineSuccess(const std::shared_ptr<mip::ProtectionEngine>& engine, const std::shared_ptr<void>& context) override; void OnAddEngineFailure(const std::exception_ptr& Failure, const std::shared_ptr<void>& context) override; };生成された
profile_observerクラス実装を選択して削除することで、profile_observer.cppを更新します。 前の手順で生成されたプリプロセッサ ディレクティブ (#pragma、#include) は削除しないでください。 次に、既存のプリプロセッサ ディレクティブの後に、次のソースをコピーしてファイルに貼り付けます。#include <future> using std::promise; using std::shared_ptr; using std::static_pointer_cast; using mip::ProtectionEngine; using mip::ProtectionProfile; void ProtectionProfileObserver::OnLoadSuccess(const shared_ptr<ProtectionProfile>& profile, const shared_ptr<void>& context) { auto promise = static_pointer_cast<std::promise<shared_ptr<ProtectionProfile>>>(context); promise->set_value(profile); } void ProtectionProfileObserver::OnLoadFailure(const std::exception_ptr& error, const shared_ptr<void>& context) { auto promise = static_pointer_cast<std::promise<shared_ptr<ProtectionProfile>>>(context); promise->set_exception(error); } void ProtectionProfileObserver::OnAddEngineSuccess(const shared_ptr<ProtectionEngine>& engine, const shared_ptr<void>& context) { auto promise = static_pointer_cast<std::promise<shared_ptr<ProtectionEngine>>>(context); promise->set_value(engine); } void ProtectionProfileObserver::OnAddEngineFailure(const std::exception_ptr& error, const shared_ptr<void>& context) { auto promise = static_pointer_cast<std::promise<shared_ptr<ProtectionEngine>>>(context); promise->set_exception(error); }
手順 1. を繰り返して、保護エンジン オブザーバー (
engine_observer) の新しいクラスをプロジェクトに追加します。 このクラスは、ヘッダー (.h) ファイルと実装 (.cpp) ファイルの両方を生成します。クラスの .h ファイルと .cpp ファイルを生成した後、Visual Studioエディター グループ タブで両方のファイルを開きます。 次に、新しいオブザーバー クラスを実装するように各ファイルを更新します。
生成された
engine_observerクラスを選択して削除して、engine_observer.hを更新します。 前の手順で生成されたプリプロセッサ ディレクティブ (#pragma、#include) は削除しないでください。 次に、既存のプリプロセッサ ディレクティブの後に、次のソースをコピーしてファイルに貼り付けます。#include <memory> #include "mip/protection/protection_engine.h" using std::vector; using std::exception_ptr; using std::shared_ptr; class ProtectionEngineObserver final : public mip::ProtectionEngine::Observer { public: ProtectionEngineObserver() {} void OnGetTemplatesSuccess(const vector<std::shared_ptr<mip::TemplateDescriptor>>& templateDescriptors, const shared_ptr<void>& context) override; void OnGetTemplatesFailure(const exception_ptr& Failure, const shared_ptr<void>& context) override; };生成された
engine_observerクラス実装を選択して削除することで、engine_observer.cppを更新します。 前の手順で生成されたプリプロセッサ ディレクティブ (#pragma、#include) は削除しないでください。 次に、既存のプリプロセッサ ディレクティブの後に、次のソースをコピーしてファイルに貼り付けます。#include "mip/protection/protection_profile.h" #include "engine_observer.h" using std::promise; void ProtectionEngineObserver::OnGetTemplatesSuccess(const vector<shared_ptr<mip::TemplateDescriptor>>& templateDescriptors,const shared_ptr<void>& context) { auto loadPromise = static_cast<promise<vector<shared_ptr<mip::TemplateDescriptor>>>*>(context.get()); loadPromise->set_value(templateDescriptors); }; void ProtectionEngineObserver::OnGetTemplatesFailure(const exception_ptr& Failure, const shared_ptr<void>& context) { auto loadPromise = static_cast<promise<vector<shared_ptr<mip::TemplateDescriptor>>>*>(context.get()); loadPromise->set_exception(Failure); };
必要に応じて、 Ctrl + Shift + B (ソリューションのビルド) を使用して、ソリューションのテスト コンパイルとリンクを実行し、続行する前に正常にビルドされることを確認します。
認証デリゲートと同意代理人を実装する
MIP SDK は、認証作業をクライアント アプリケーションと共有するメカニズムを提供するクラス拡張を通じて認証を実装します。 クライアントは、適切な OAuth2 アクセス トークンを取得し、実行時に MIP SDK に提供する必要があります。
SDK の mip::AuthDelegate クラスを拡張し、 mip::AuthDelegate::AcquireOAuth2Token() 純粋仮想関数をオーバーライド/実装することで、認証デリゲートの実装を作成します。
File SDK アプリケーションの初期化クイック スタートで詳しく説明されている手順に従います。 保護プロファイルと保護エンジン オブジェクトは、後で認証デリゲートをインスタンス化して使用します。
同意デリゲートを実装する
次に、SDK の mip::ConsentDelegate クラスを拡張し、 mip::AuthDelegate::GetUserConsent() 純粋仮想関数をオーバーライド/実装することで、同意デリゲートの実装を作成します。
File SDK アプリケーションの初期化クイック スタートで詳しく説明されている手順に従います。 保護プロファイルと保護エンジン オブジェクトは、後で同意デリゲートをインスタンス化して使用します。
保護プロファイルとエンジンを構築する
前述のように、MIP API を使用する SDK クライアントにはプロファイル オブジェクトとエンジン オブジェクトが必要です。 プロファイルとエンジン オブジェクトをインスタンス化するコードを追加して、このクイックスタートのコーディング部分を完了します。
ソリューション エクスプローラーで、
main()メソッドの実装を含む.cpp ファイルをプロジェクトで開きます。 既定の名前は、それが含まれるプロジェクトと同じであり、プロジェクトの作成時に指定したものです。生成された
main()の実装を削除します。 プロジェクトの作成時に Visual Studio によって生成されたプリプロセッサ ディレクティブ (#pragma、#include) は削除しないでください。 プリプロセッサ ディレクティブの後に次のコードを追加します。
#include "mip/mip_context.h"
#include "auth_delegate.h"
#include "consent_delegate.h"
#include "profile_observer.h"
#include"engine_observer.h"

using std::promise;
using std::future;
using std::make_shared;
using std::shared_ptr;
using std::string;
using std::cout;
using mip::ApplicationInfo;
using mip::ProtectionProfile;
using mip::ProtectionEngine;

int main(){

  // Construct/initialize objects required by the application's profile object
  // ApplicationInfo object (App ID, name, version)
  ApplicationInfo appInfo{"<application-id>",
                          "<application-name>",
                          "<application-version>"};

  std::shared_ptr<mip::MipConfiguration> mipConfiguration = std::make_shared<mip::MipConfiguration>(appInfo,
				                                                                                               "mip_data",
                                                                                      			         mip::LogLevel::Trace,
                                                                                                     false,
                                                                                                     mip::CacheStorageType::OnDisk);

  std::shared_ptr<mip::MipContext> mMipContext = mip::MipContext::Create(mipConfiguration);

  auto profileObserver = make_shared<ProtectionProfileObserver>(); // Observer object
  auto authDelegateImpl = make_shared<AuthDelegateImpl>("<application-id>"); // Authentication delegate object (App ID)
  auto consentDelegateImpl = make_shared<ConsentDelegateImpl>(); // Consent delegate object

  // Construct/initialize profile object
  ProtectionProfile::Settings profileSettings(
    mMipContext,
    mip::CacheStorageType::OnDisk,
    consentDelegateImpl,
    profileObserver);

  // Set up promise/future connection for async profile operations; load profile asynchronously
  auto profilePromise = make_shared<promise<shared_ptr<ProtectionProfile>>>();
  auto profileFuture = profilePromise->get_future();
  try
  {
    mip::ProtectionProfile::LoadAsync(profileSettings, profilePromise);
  }
  catch (const std::exception& e)
  {
    cout << "An exception occurred... are the Settings and ApplicationInfo objects populated correctly?\n\n"
          << e.what() << "'\n";
    system("pause");
    return 1;
  }

  auto profile = profileFuture.get();

  // Construct/initialize engine object
  ProtectionEngine::Settings engineSettings(
     mip::Identity("<engine-account>"),         // Engine identity (account used for authentication)
     authDelegateImpl,                          // Reference to mip::AuthDelegate implementation
     "",                                        // ClientData field
     "en-US");                                  // Locale (default = en-US)

  // Set the engineId so it can be cached and reused.
  engineSettings.SetEngineId("<engine-account>");

  // Set up promise/future connection for async engine operations; add engine to profile asynchronously
  auto enginePromise = make_shared<promise<shared_ptr<ProtectionEngine>>>();
  auto engineFuture = enginePromise->get_future();
  profile->AddEngineAsync(engineSettings, enginePromise);
  std::shared_ptr<ProtectionEngine> engine;

  try
  {
    engine = engineFuture.get();
  }
  catch (const std::exception& e)
  {
    cout << "An exception occurred... is the access token incorrect/expired?\n\n"
         << e.what() << "'\n";
    system("pause");
    return 1;
  }

  // Application shutdown. Null out profile and engine, call ReleaseAllResources();
  // Application may crash at shutdown if resources aren't properly released.
  engine = nullptr;
  profile = nullptr;
  mMipContext->ShutDown();
  mMipContext = nullptr;

  return 0;
}
文字列定数を使用して、貼り付けたソース コード内のすべてのプレースホルダー値を置き換えます。
プレースホルダー 価値 例 <application-id> MIP SDK のセットアップと構成に関する記事の手順 2 で登録したアプリケーションに割り当てられたMicrosoft Entra アプリケーション ID (GUID)。 2 つのインスタンスを置き換えます。 "00001111-aaaa-2222-bbbb-3333cccc4444"<アプリケーション名> アプリケーションのユーザー定義のフレンドリ名。 有効な ASCII 文字(';' を除く)を含める必要があり、できれば Microsoft Entra の登録時に使用したアプリケーション名と一致している必要があります。 "AppInitialization"<アプリケーションのバージョン> アプリケーションのユーザー定義バージョン情報。 有効な ASCII 文字 (';' を除く) を含める必要があります。 "1.1.0.0"<エンジンアカウント> エンジンの ID に使用されるアカウント。 トークンの取得中にユーザー アカウントで認証を行う場合は、この値と一致する必要があります。 "user1@tenant.onmicrosoft.com"<エンジン状態> エンジンに関連付けるユーザー定義の状態。 "My App State"次に、アプリケーションの最終的なビルドを行い、エラーを解決します。 コードは正常にビルドされますが、次のクイック スタートを完了するまで正しく実行されません。 アプリケーションを実行すると、次のような出力が表示されます。 アプリケーションは保護プロファイルと保護エンジンを正常に構築しますが、認証モジュールは起動せず、次のクイック スタートを完了するまでアクセス トークンはありません。
 C:\MIP Sample Apps\ProtectionQS\Debug\ProtectionQS.exe (process 8252) exited with code 0.
 To automatically close the console when debugging stops, enable Tools->Options->Debugging->Automatically close the console when debugging stops.
 Press any key to close this window . . .
次のステップ
初期化コードが完了したら、MIP Protection SDK の使用を開始する次のクイック スタートの準備ができました。
- GitHubの MIP Protection SDK C++ サンプルについて説明します。