Notitie
Voor toegang tot deze pagina is autorisatie vereist. U kunt proberen u aan te melden of de directory te wijzigen.
Voor toegang tot deze pagina is autorisatie vereist. U kunt proberen de mappen te wijzigen.
Meer informatie over het maken van een ontwikkelomgeving voor het ontwikkelen en testen van implementatiescripts met een image voor implementatiescripts. U kunt een Azure-containerinstantie maken of Docker gebruiken. Beide opties worden behandeld in dit artikel.
Vereisten
Azure PowerShell-container
Als u geen Azure PowerShell-implementatiescript hebt, kunt u een hello.ps1-bestand maken met behulp van de volgende inhoud:
param([string] $name)
$output = 'Hello {0}' -f $name
Write-Output $output
$DeploymentScriptOutputs = @{}
$DeploymentScriptOutputs['text'] = $output
param([string] $name, [string] $subscription)
$output = 'Hello {0}' -f $name
#Write-Output $output

Connect-AzAccount -UseDeviceAuthentication
Set-AzContext -subscription $subscription

$kv = Get-AzKeyVault
#Write-Output $kv

$DeploymentScriptOutputs = @{}
$DeploymentScriptOutputs['greeting'] = $output
$DeploymentScriptOutputs['kv'] = $kv.resourceId
Write-Output $DeploymentScriptOutputs
In een Azure PowerShell-implementatiescript wordt de variabele $DeploymentScriptOutputs gebruikt om de uitvoerwaarden op te slaan. Zie Werken met uitvoer voor meer informatie over het werken met Azure PowerShell-uitvoer.
Azure CLI-container
Voor een Azure CLI-containerimage kunt u een bestand met de naam hello.sh maken met de volgende inhoud:
FIRSTNAME=$1
LASTNAME=$2
OUTPUT="{\"name\":{\"displayName\":\"$FIRSTNAME $LASTNAME\",\"firstName\":\"$FIRSTNAME\",\"lastName\":\"$LASTNAME\"}}"
echo -n "Hello "
echo $OUTPUT | jq -r '.name.displayName'
In een Azure CLI-implementatiescript slaat een omgevingsvariabele met de naam AZ_SCRIPTS_OUTPUT_PATH de locatie van het scriptuitvoerbestand op. De omgevingsvariabele is niet beschikbaar in de container voor de ontwikkelomgeving. Zie Werken met uitvoer van Azure CLI voor meer informatie over het werken met Azure CLI-uitvoer.
Important
Implementatiescriptlogs kunnen inhoud bevatten die geschreven is naar Write-Host, echo, stdout, en stderr. Je kunt deze informatie ophalen via het /deploymentScripts/logs endpoint of gerelateerde API's. Schrijf geen gevoelige informatie naar de scriptuitvoer, inclusief access tokens, bearer tokens, SAS-tokens, verbindingsstrings, inloggegevens of andere geheimen. Scriptauteurs zijn verantwoordelijk voor het waarborgen dat implementatiescriptlogs geen gevoelige informatie blootleggen.
Azure PowerShell-containerinstantie gebruiken
Als u Azure PowerShell-scripts op uw computer wilt maken, moet u een opslagaccount maken en het opslagaccount koppelen aan de containerinstantie. U kunt uw script dus uploaden naar het opslagaccount en het script uitvoeren op de containerinstantie. Het opslagaccount dat u maakt om uw script te testen, is niet hetzelfde opslagaccount dat door de implementatiescriptservice wordt gebruikt om het script uit te voeren. De service voor implementatiescripts maakt bij elke uitvoering een unieke naam voor een bestandsshare.
Een Azure PowerShell-containerinstantie maken
Met het volgende Bicep-bestand maakt u een containerinstantie en een bestandsshare en koppelt u vervolgens de bestandsshare aan de containerinstallatiekopie.
@description('Specify a project name that is used for generating resource names.')
param projectName string

@description('Specify the resource location.')
param location string = resourceGroup().location

@description('Specify the container image.')
param containerImage string = 'mcr.microsoft.com/azuredeploymentscripts-powershell:az9.7'

@description('Specify the mount path.')
param mountPath string = '/mnt/azscripts/azscriptinput'

var storageAccountName = toLower('${projectName}store')
var fileShareName = '${projectName}share'
var containerGroupName = '${projectName}cg'
var containerName = '${projectName}container'

resource storageAccount 'Microsoft.Storage/storageAccounts@2025-06-01' = {
  name: storageAccountName
  location: location
  sku: {
    name: 'Standard_LRS'
  }
  kind: 'StorageV2'
  properties: {
    accessTier: 'Hot'
  }
}

resource fileShare 'Microsoft.Storage/storageAccounts/fileServices/shares@2025-06-01' = {
  name: '${storageAccountName}/default/${fileShareName}'
  dependsOn: [
    storageAccount
  ]
}

resource containerGroup 'Microsoft.ContainerInstance/containerGroups@2025-09-01' = {
  name: containerGroupName
  location: location
  properties: {
    containers: [
      {
        name: containerName
        properties: {
          image: containerImage
          resources: {
            requests: {
              cpu: 1
              memoryInGB: json('1.5')
            }
          }
          ports: [
            {
              protocol: 'TCP'
              port: 80
            }
          ]
          volumeMounts: [
            {
              name: 'filesharevolume'
              mountPath: mountPath
            }
          ]
          command: [
            '/bin/sh'
            '-c'
            'pwsh -c \'Start-Sleep -Seconds 1800\''
          ]
        }
      }
    ]
    osType: 'Linux'
    volumes: [
      {
        name: 'filesharevolume'
        azureFile: {
          readOnly: false
          shareName: fileShareName
          storageAccountName: storageAccountName
          storageAccountKey: storageAccount.listKeys().keys[0].value
        }
      }
    ]
  }
}
De standaardwaarde voor het aankoppelpad is /mnt/azscripts/azscriptinput. Dit is het pad in de containerinstantie waar deze aan de bestandsshare is gekoppeld.
De standaardcontainerinstallatiekopie die is opgegeven in het Bicep-bestand is mcr.microsoft.com/azuredeploymentscripts-powershell:az9.7. Bekijk een lijst met alle ondersteunde Azure PowerShell-versies.
Het Bicep-bestand onderbreekt de containerinstantie na 1800 seconden. U hebt 30 minuten voordat de containerinstantie de status Beëindigd krijgt en de sessie wordt beëindigd.
Gebruik het volgende script om het Bicep-bestand te implementeren:
$projectName = Read-Host -Prompt "Enter a project name that is used to generate resource names"
$location = Read-Host -Prompt "Enter the location (i.e. centralus)"
$templateFile = Read-Host -Prompt "Enter the Bicep file path and file name"
$resourceGroupName = "${projectName}rg"

New-AzResourceGroup -Location $location -name $resourceGroupName
New-AzResourceGroupDeployment -resourceGroupName $resourceGroupName -TemplateFile $templatefile -projectName $projectName
Het implementatiescript uploaden
Upload uw implementatiescript naar het opslagaccount. Hier volgt een voorbeeld van een PowerShell-script:
$projectName = Read-Host -Prompt "Enter the same project name that you used earlier"
$fileName = Read-Host -Prompt "Enter the deployment script file name with the path"

$resourceGroupName = "${projectName}rg"
$storageAccountName = "${projectName}store"
$fileShareName = "${projectName}share"

$context = (Get-AzStorageAccount -ResourceGroupName $resourceGroupName -Name $storageAccountName).Context
Set-AzStorageFileContent -Context $context -ShareName $fileShareName -Source $fileName -Force
U kunt het bestand ook uploaden met behulp van Azure Portal of de Azure CLI.
Het implementatiescript testen
Open in Azure Portal de resourcegroep waarin u de containerinstantie en het opslagaccount hebt geïmplementeerd.
Open de containergroep. De standaardnaam van de containergroep is de projectnaam die is toegevoegd aan cg. De containerinstantie heeft de status Actief .
Selecteer in het resourcemenu Containers. De naam van het containerexemplaar is de projectnaam met daaraan toegevoegd container.
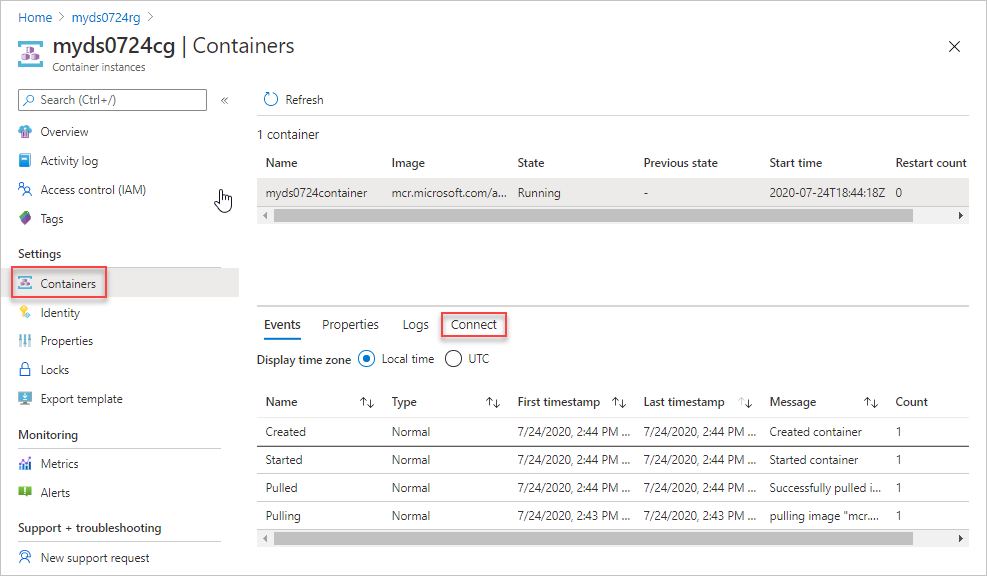
Selecteer Verbinding maken en selecteer vervolgens Verbinding maken. Als u geen verbinding kunt maken met de containerinstantie, start u de containergroep opnieuw en probeert u het opnieuw.
Voer in het consolevenster de volgende opdrachten uit:
cd /mnt/azscripts/azscriptinput
ls
pwsh ./hello.ps1 "John Dole"
De uitvoer is Hello John Dole.

Een Azure CLI-containerinstantie gebruiken
Als u Azure CLI-scripts op uw computer wilt maken, maakt u een opslagaccount en koppelt u het opslagaccount aan de containerinstantie. Vervolgens kunt u uw script uploaden naar het opslagaccount en het script uitvoeren op de containerinstantie. Het opslagaccount dat u maakt om uw script te testen, is niet hetzelfde opslagaccount dat door de implementatiescriptservice wordt gebruikt om het script uit te voeren. De service voor implementatiescripts maakt bij elke uitvoering een bestandsshare met een unieke naam.
Een Azure CLI-containerinstantie maken
Met het volgende Bicep-bestand maakt u een containerinstantie en een bestandsshare, en koppelt u de bestandsshare vervolgens aan de containerimage:
@description('Specify a project name that is used for generating resource names.')
param projectName string

@description('Specify the resource location.')
param location string = resourceGroup().location

@description('Specify the container image.')
param containerImage string = 'mcr.microsoft.com/azure-cli:2.9.1'

@description('Specify the mount path.')
param mountPath string = '/mnt/azscripts/azscriptinput'

var storageAccountName = toLower('${projectName}store')
var fileShareName = '${projectName}share'
var containerGroupName = '${projectName}cg'
var containerName = '${projectName}container'

resource storageAccount 'Microsoft.Storage/storageAccounts@2025-06-01' = {
  name: storageAccountName
  location: location
  sku: {
    name: 'Standard_LRS'
  }
  kind: 'StorageV2'
  properties: {
    accessTier: 'Hot'
  }
}

resource fileshare 'Microsoft.Storage/storageAccounts/fileServices/shares@2025-06-01' = {
  name: '${storageAccountName}/default/${fileShareName}'
  dependsOn: [
    storageAccount
  ]
}

resource containerGroup 'Microsoft.ContainerInstance/containerGroups@2025-09-01' = {
  name: containerGroupName
  location: location
  properties: {
    containers: [
      {
        name: containerName
        properties: {
          image: containerImage
          resources: {
            requests: {
              cpu: 1
              memoryInGB: json('1.5')
            }
          }
          ports: [
            {
              protocol: 'TCP'
              port: 80
            }
          ]
          volumeMounts: [
            {
              name: 'filesharevolume'
              mountPath: mountPath
            }
          ]
          command: [
            '/bin/bash'
            '-c'
            'echo hello; sleep 1800'
          ]
        }
      }
    ]
    osType: 'Linux'
    volumes: [
      {
        name: 'filesharevolume'
        azureFile: {
          readOnly: false
          shareName: fileShareName
          storageAccountName: storageAccountName
          storageAccountKey: storageAccount.listKeys().keys[0].value
        }
      }
    ]
  }
}
De standaardwaarde voor het aankoppelpad is /mnt/azscripts/azscriptinput. Dit is het pad in de containerinstantie waar deze aan de bestandsshare is gekoppeld.
De standaardcontainerimage die in het Bicep-bestand is opgegeven, is mcr.microsoft.com/azure-cli:2.9.1. Bekijk een lijst met ondersteunde Azure CLI-versies. Het implementatiescript maakt gebruik van de beschikbare CLI-installatiekopieën van Microsoft Container Registry (MCR). Het duurt ongeveer één maand om een CLI-image te certificeren voor een deploymentscript. Gebruik niet de CLI-versies die binnen 30 dagen zijn uitgebracht. Raadpleeg de releaseopmerkingen van Azure CLI om de releasedatums voor de installatiekopieën te vinden. Als u een niet-ondersteunde versie gebruikt, worden in het foutbericht de ondersteunde versies vermeld.
Het Bicep-bestand onderbreekt de containerinstantie na 1800 seconden. U hebt 30 minuten voordat de containerinstantie de terminalstatus krijgt en de sessie wordt beëindigd.
Ga als volgt te werk om het Bicep-bestand te implementeren:
$projectName = Read-Host -Prompt "Enter a project name that is used to generate resource names"
$location = Read-Host -Prompt "Enter the location (i.e. centralus)"
$templateFile = Read-Host -Prompt "Enter the Bicep file path and file name"
$resourceGroupName = "${projectName}rg"

New-AzResourceGroup -Location $location -name $resourceGroupName
New-AzResourceGroupDeployment -resourceGroupName $resourceGroupName -TemplateFile $templatefile -projectName $projectName
Het implementatiescript uploaden
Upload uw implementatiescript naar het opslagaccount. Het volgende script is een PowerShell-voorbeeld:
$projectName = Read-Host -Prompt "Enter the same project name that you used earlier"
$fileName = Read-Host -Prompt "Enter the deployment script file name with the path"

$resourceGroupName = "${projectName}rg"
$storageAccountName = "${projectName}store"
$fileShareName = "${projectName}share"

$context = (Get-AzStorageAccount -ResourceGroupName $resourceGroupName -Name $storageAccountName).Context
Set-AzStorageFileContent -Context $context -ShareName $fileShareName -Source $fileName -Force
U kunt het bestand ook uploaden met behulp van Azure Portal of de Azure CLI.
Het implementatiescript testen
Open in Azure Portal de resourcegroep waarin u de containerinstantie en het opslagaccount hebt geïmplementeerd.
Open de containergroep. De standaardnaam van de containergroep is de projectnaam die is toegevoegd aan cg. De containerinstantie wordt weergegeven in de status Actief .
Selecteer in het resourcemenu Containers. De naam van het containerexemplaar is de projectnaam met daaraan toegevoegd container.
Selecteer Verbinding maken en selecteer vervolgens Verbinding maken. Als u geen verbinding kunt maken met de containerinstantie, start u de containergroep opnieuw en probeert u het opnieuw.
Voer in het consolevenster de volgende opdrachten uit:
cd /mnt/azscripts/azscriptinput
ls
./hello.sh John Dole
De uitvoer is Hello John Dole.

Docker gebruiken
U kunt een vooraf geconfigureerde Docker-containerimage gebruiken als ontwikkelomgeving voor uw implementatiescriptontwikkeling. Zie Docker downloaden om Docker te installeren. U moet ook het delen van bestanden configureren om de map te koppelen, die de implementatiescripts bevat in de Docker-container.
Haal de containerimage van het deploymentscript op naar de lokale computer:
docker pull mcr.microsoft.com/azuredeploymentscripts-powershell:az10.0In het voorbeeld wordt versie PowerShell 4.3.0 gebruikt.
Een CLI-image ophalen van een MCR:
docker pull mcr.microsoft.com/azure-cli:2.52.0In dit voorbeeld wordt versie CLI 2.52.0 gebruikt. Implementatiescript maakt gebruik van de standaard-CLI-containersinstallatiekopieën.
Voer de Docker-image lokaal uit.
docker run -v <host drive letter>:/<host directory name>:/data -it mcr.microsoft.com/azuredeploymentscripts-powershell:az10.0Vervang <hoststationsletter> en <hostmapnaam door een bestaande map op de gedeelde schijf. Het koppelt de map aan de map /data in de container. Bijvoorbeeld om D:\docker toe te wijzen:
docker run -v d:/docker:/data -it mcr.microsoft.com/azuredeploymentscripts-powershell:az10.0-it betekent dat de containerimage actief wordt gehouden.
Een CLI-voorbeeld:
docker run -v d:/docker:/data -it mcr.microsoft.com/azure-cli:2.52.0In de volgende schermopname ziet u hoe u een PowerShell-script uitvoert, ervan uitgaande dat u een helloworld.ps1-bestand op de gedeelde schijf hebt.
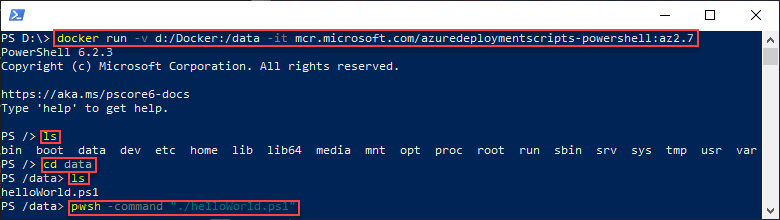
Nadat het script is getest, kunt u het gebruiken als een implementatiescript in uw Bicep-bestanden.
Volgende stappen
In dit artikel hebt u geleerd hoe u scriptontwikkelingsomgevingen maakt. Zie voor meer informatie: