這個快速入門會教你如何實作 MIP SDK .NET 包裝器在執行時使用的客戶端初始化模式。
備註
任何使用 MIP .NET 包裝器的檔案、政策或保護 SDK 的客戶端應用程式,都必須遵循本快速入門中所述的步驟。 雖然這個快速入門說明了檔案 SDK 的使用,但同樣的模式也適用於使用政策與保護 SDK 的客戶端。 未來快速入門要依序完成,因為每個快速入門都是建立在前一個基礎上,而這個是第一個。 此程式代碼旨在示範如何開始使用 MIP SDK, 不適用於生產環境。
先決條件
如果您尚未這麼做,請務必:
- 完成 Microsoft 資訊保護 (MIP) SDK 設定和配置中的步驟。 本「用戶端應用程式初始化」快速入門依賴適當的 SDK 安裝和設定。
- 選擇:
建立 Visual Studio 方案和專案
首先,建立並設定初始的 Visual Studio 解決方案與專案,其他快速入門工具則在此基礎上建置。
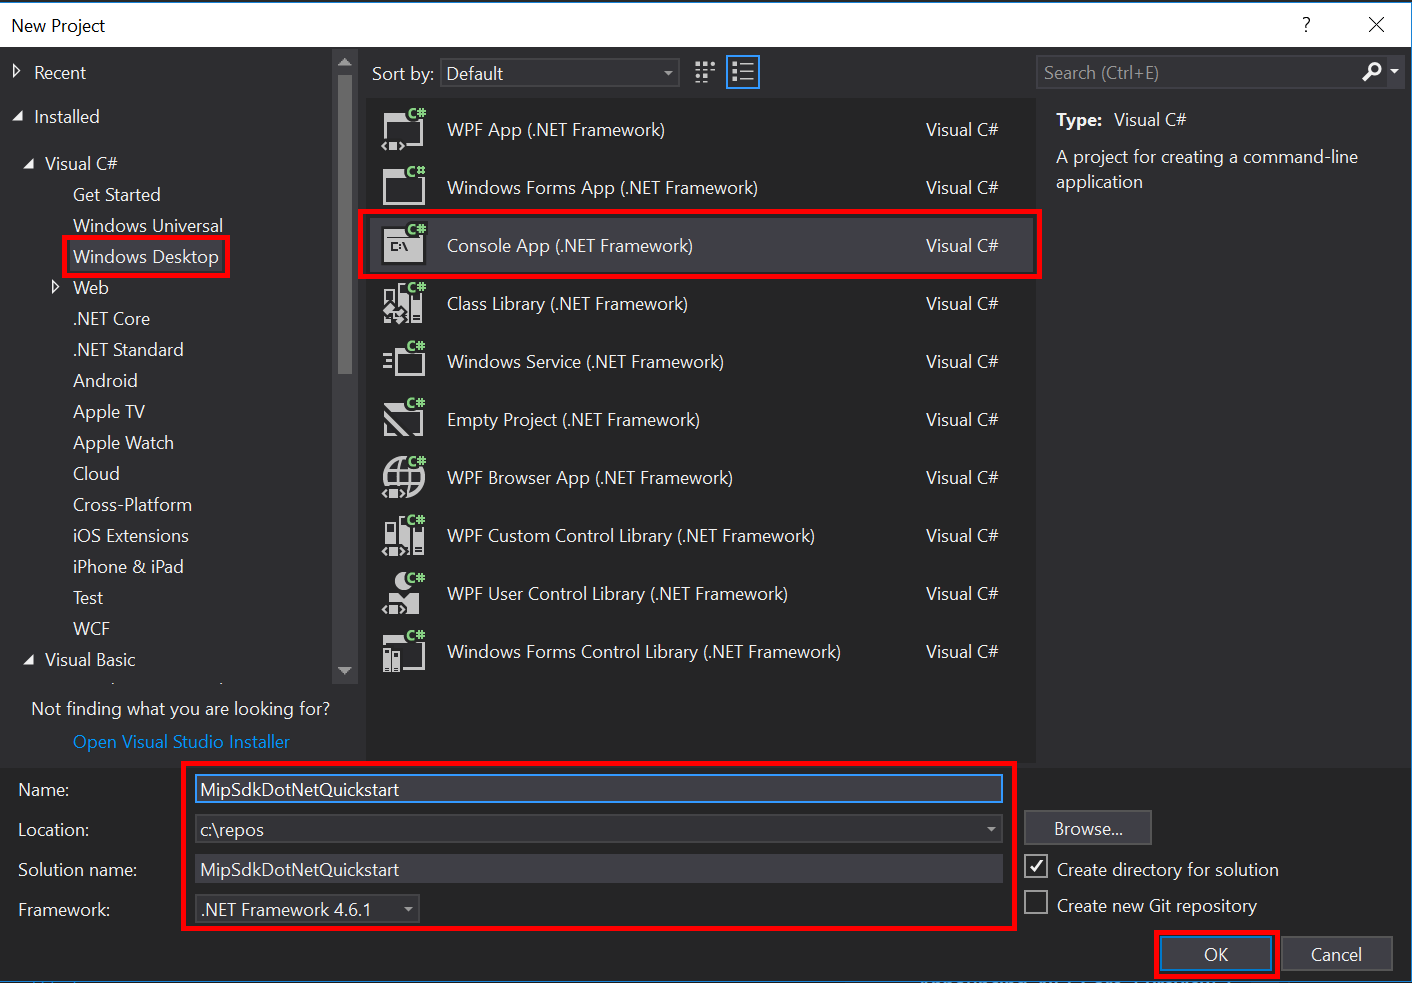
開啟 Visual Studio 2022 或更新版本,選擇 檔案 選單, 新增, 專案。 在 [ 新增專案] 對話框中:
在左窗格中的 [已安裝] 底下,選取 [Visual C#],選取 [Windows 桌面]。
在中間窗格,選擇主控台應用程式(目標為 .NET 8 或更新版本)。
在底部窗格中,據以更新專案 [名稱]、[ 位置] 和包含 的方案名稱 。
完成後,按下右下角的 [ 確定] 按鈕。
將 MIP 檔案 SDK 的 NuGet 套件新增至您的專案:
- 在 [方案總管] 中,以滑鼠右鍵按兩下項目節點(直接在頂端/方案節點下),然後選取 [ 管理 NuGet 套件...] :
- 當 NuGet 套件管理員 索引標籤在編輯器群組的索引標籤區域中開啟時:
- 選擇瀏覽。
- 在搜尋方塊中輸入 「Microsoft.InformationProtection」。。
- 選取 「Microsoft.InformationProtection.File」 套件。
- 按兩下 [安裝],然後在 [預覽變更 確認] 對話框顯示時按兩下 [確定]。
重複上述步驟以新增 MIP 檔案 SDK 套件,但改為將 「Microsoft.Identity.Client」 新增至應用程式。
實作驗證代理
MIP SDK 透過類別擴充性實作認證,提供與客戶端應用程式共享認證工作的機制。 用戶端必須取得合適的 OAuth2 存取權杖,並在執行時提供給 MIP SDK。
接著透過擴展 SDK Microsoft.InformationProtection.IAuthDelegate 介面並覆寫或實作 IAuthDelegate.AcquireToken() 虛擬函式,建立認證代理的實作。
FileProfile和 FileEngine 物件會實例化,之後再使用認證代理。
以滑鼠右鍵按兩下 Visual Studio 中的項目名稱,選取 [ 新增 ] 和 [ 類別]。
在 [ 名稱 ] 字段中輸入 “AuthDelegateImplementation”。 按下 新增。
新增 Microsoft 驗證程式庫 (MSAL) 和 MIP 程式庫的 using 指令:
using Microsoft.InformationProtection;
using Microsoft.Identity.Client;
將
AuthDelegateImplementation設為繼承Microsoft.InformationProtection.IAuthDelegate,並實作Microsoft.InformationProtection.ApplicationInfo類型的私有變數,以及接受相同類型的建構函式。public class AuthDelegateImplementation : IAuthDelegate { private ApplicationInfo _appInfo; // Microsoft Authentication Library IPublicClientApplication private IPublicClientApplication _app; public AuthDelegateImplementation(ApplicationInfo appInfo) { _appInfo = appInfo; } }物件
ApplicationInfo包含三個屬性。AuthDelegateImplementation類別使用_appInfo.ApplicationId將用戶端 ID 提供給驗證程式庫。ApplicationName並ApplicationVersion出現在 Microsoft Purview 稽核報告中。新增
public string AcquireToken()方法。 如果必要,此方法應該接受Microsoft.InformationProtection.Identity和三個字串:授權單位 URL、資源 URI 和宣告。 API 會把這些字串變數傳入認證函式庫,你不應該去操作它們。 從 Azure 入口網站輸入租戶的 GUID。 編輯租戶 GUID 以外的字串可能導致認證失敗。public string AcquireToken(Identity identity, string authority, string resource, string claims) { var authorityUri = new Uri(authority); authority = String.Format("https://{0}/{1}", authorityUri.Host, "<Tenant-GUID>"); _app = PublicClientApplicationBuilder.Create(_appInfo.ApplicationId).WithAuthority(authority).WithDefaultRedirectUri().Build(); var accounts = (_app.GetAccountsAsync()).GetAwaiter().GetResult(); // Append .default to the resource passed in to AcquireToken(). string[] scopes = new string[] { resource[resource.Length - 1].Equals('/') ? $"{resource}.default" : $"{resource}/.default" }; var result = _app.AcquireTokenInteractive(scopes).WithAccount(accounts.FirstOrDefault()).WithPrompt(Prompt.SelectAccount) .ExecuteAsync().ConfigureAwait(false).GetAwaiter().GetResult(); return result.AccessToken; }
實作同意委派
現在,透過擴展 SDK Microsoft.InformationProtection.IConsentDelegate 介面並覆蓋或實作 GetUserConsent(),建立同意代理的實作。 檔案設定檔與檔案引擎物件會在之後實例化並使用同意代理。 同意代理會在 url 參數中收到使用者必須同意才能使用之服務的位址。 代理通常應該提供一個流程,讓使用者可以接受或拒絕存取服務的同意。 在本快速入門中,請將 Consent.Accept 直接寫死。
使用我們先前使用的相同 Visual Studio「新增類別」功能,將另一個類別新增至您的專案。 這次,在 [類別名稱 ] 字段中輸入 「ConsentDelegateImplementation」。。
現在更新 ConsentDelegateImpl.cs 以實作新的同意委派類別。 新增 using 語句
Microsoft.InformationProtection,並將 類別設定為繼承IConsentDelegate。class ConsentDelegateImplementation : IConsentDelegate { public Consent GetUserConsent(string url) { return Consent.Accept; } }選擇性地嘗試建置解決方案,以確保其編譯時不會發生任何錯誤。
初始化 MIP SDK 受管理的包裝器
從 [方案總管] 中,開啟專案中包含 方法實作
Main()的 .cs 檔案。 它預設為與包含它的專案相同的名稱,此專案名稱是在您建立專案時指定的。移除生成的實作
main()。Managed 包裝函式包含靜態類別,
Microsoft.InformationProtection.MIP用於初始化、建立MipContext、載入配置檔,以及釋放資源。 若要初始化檔案 SDK 作業的包裝函式,請呼叫MIP.Initialize(),傳入MipComponent.File以載入檔案作業所需的連結庫。在
Main()Program.cs 中新增下列內容,將 <application-id> 替換為先前建立之 Microsoft Entra Application Registration 的 ID。
using System;
using System.Threading.Tasks;
using Microsoft.InformationProtection;
using Microsoft.InformationProtection.Exceptions;
using Microsoft.InformationProtection.File;
using Microsoft.InformationProtection.Protection;

namespace mip_sdk_dotnet_quickstart
{
    class Program
    {
        private const string clientId = "<application-id>";
        private const string appName = "<friendly-name>";

        static void Main(string[] args)
        {
            //Initialize Wrapper for File SDK operations
            MIP.Initialize(MipComponent.File);

        }
    }
}
建構檔案概要和引擎
如前所述,使用 MIP API 的 SDK 用戶端需要設定檔和引擎物件。 完成這個快速入門的程式部分,加入載入原生 DLL 的程式碼,然後實例化設定檔和引擎物件。
using System;
using System.Threading.Tasks;
using Microsoft.InformationProtection;
using Microsoft.InformationProtection.File;

namespace mip_sdk_dotnet_quickstart
{
  class Program
  {
       private const string clientId = "<application-id>";
       private const string appName = "<friendly-name>";

       static void Main(string[] args)
       {
            // Initialize Wrapper for File SDK operations.
            MIP.Initialize(MipComponent.File);

            // Create ApplicationInfo, setting the clientID from Microsoft Entra App Registration as the ApplicationId.
            ApplicationInfo appInfo = new ApplicationInfo()
            {
                 ApplicationId = clientId,
                 ApplicationName = appName,
                 ApplicationVersion = "1.0.0"
            };

            // Instantiate the AuthDelegateImpl object, passing in AppInfo.
            AuthDelegateImplementation authDelegate = new AuthDelegateImplementation(appInfo);

            // Create MipConfiguration Object
            MipConfiguration mipConfiguration = new MipConfiguration(appInfo, "mip_data", LogLevel.Trace, false);

            // Create MipContext using Configuration
            MipContext mipContext = MIP.CreateMipContext(mipConfiguration);

            // Initialize and instantiate the File Profile.
            // Create the FileProfileSettings object.
            // Initialize file profile settings to create/use local state.
            var profileSettings = new FileProfileSettings(mipContext,
                                     CacheStorageType.OnDiskEncrypted,
                                     new ConsentDelegateImplementation());

            // Load the Profile async and wait for the result.
            var fileProfile = Task.Run(async () => await MIP.LoadFileProfileAsync(profileSettings)).Result;

            // Create a FileEngineSettings object, then use that to add an engine to the profile.
            // This pattern sets the engine ID to user1@tenant.com, then sets the identity used to create the engine.
            var engineSettings = new FileEngineSettings("user1@tenant.com", authDelegate, "", "en-US");
            engineSettings.Identity = new Identity("user1@tenant.com");

            var fileEngine = Task.Run(async () => await fileProfile.AddEngineAsync(engineSettings)).Result;

            // Application Shutdown
            // handler = null; // This will be used in later quick starts.
            fileEngine = null;
            fileProfile = null;
            mipContext.ShutDown();
            mipContext = null;
       }
  }
}
請使用以下值來替換你貼上的原始碼中的佔位值:
佔位符 價值 範例 <應用程式識別碼> 指派給「MIP SDK 設定與設定」(2 個實例)中註冊的應用程式的 Microsoft Entra 應用程式 ID。 00001111-aaaa-2222-bbbb-3333cccc4444 <友好的名稱> 應用程式的使用者自訂友善名稱。 應用程式初始化 <租戶-GUID> 您的 Microsoft Entra 租戶的租戶識別碼。 TenantID 現在請執行應用程式的最終組建,並解決任何錯誤。 您的程式碼應該能建置成功。
下一步
現在您已完成初始化程式碼,可以繼續進行下一個快速入門,開始體驗 MIP File SDK。