這個快速入門工具會教你如何實作 MIP C++ SDK 在執行時使用的用戶端初始化模式。
備註
任何使用 MIP Protection SDK 的客戶端應用程式都需要完成此快速入門中的步驟。 在應用程式初始化及驗證代理與同意代理類別實作後,依序完成這些快速啟動。
先決條件
如果您尚未這麼做,請務必:
- 完成 Microsoft 信息保護 (MIP) SDK 設定和設定配置中的步驟。 這個「用戶端應用程式初始化」快速啟動依賴於正確的 SDK 設定與設定。
- 選擇:
建立 Visual Studio 方案和專案
首先,建立並設定其他快速入門工具所建立的初始 Visual Studio 解決方案與專案。
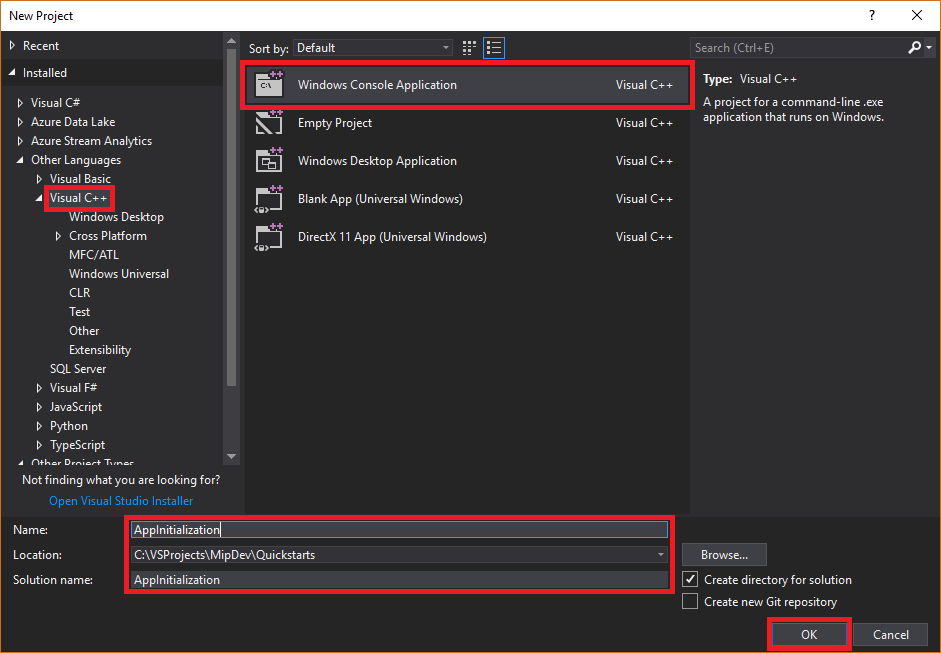
開啟 Visual Studio 2022 或更新版本,選擇 檔案 選單, 新增, 專案。 在 [ 新增專案] 對話框中:
在左窗格中的 [ 已安裝] 底下,選取 [ 其他語言],選取 [Visual C++]。
在中央窗格中,選取 [Windows 主控台應用程式]。
在底部窗格中,據以更新專案 [名稱]、[ 位置] 和包含 的方案名稱 。
完成後,請在右下角選擇 「確定 」。
將 MIP 保護 SDK 的 NuGet 套件新增至您的專案:
在 方案總管 中,右鍵點擊專案節點,直接位於頂端解決方案節點下方,然後選擇「管理 NuGet 套件...」:
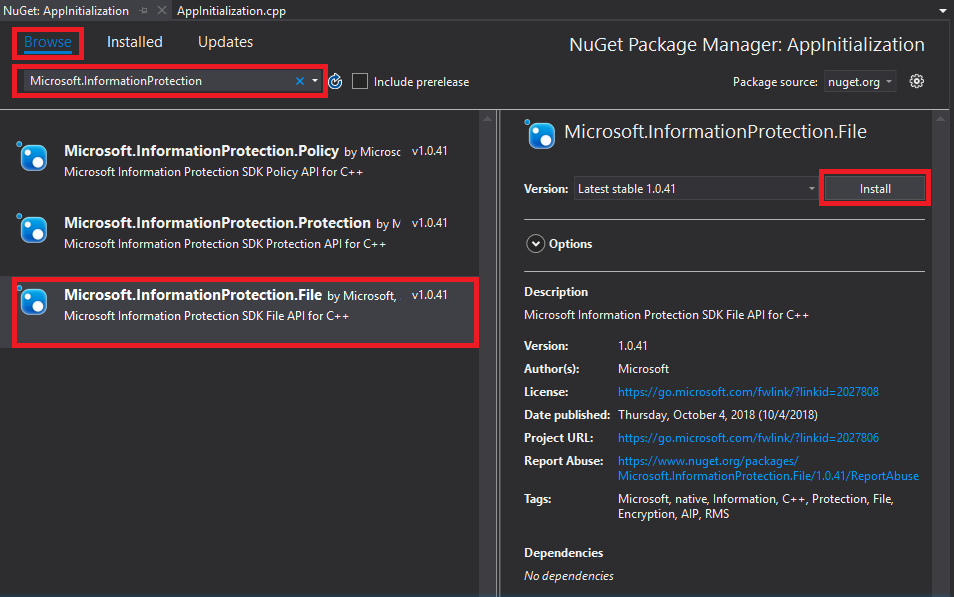
當 NuGet 套件管理員 索引標籤在 [編輯器群組] 索引標籤區域中開啟時:
- 選擇瀏覽。
- 在搜尋方塊中輸入
Microsoft.InformationProtection。 - 選取
Microsoft.InformationProtection.Protection套件。 - 選擇安裝,當預覽變更確認對話框出現時,再選擇確定。
實作觀察者類別來監視保護配置檔和引擎物件
現在,藉由擴充 SDK 的 mip::ProtectionProfile::Observer 類別,建立 Protection 設定檔觀察者類別的基本實作。 SDK 實例化觀察者,並用它來監控 Protection 設定檔物件的載入,並將引擎物件加入設定檔。
為你的專案新增一個類別,該類別會同時產生標頭(.h)和實作(.cpp)檔案:
在 方案總管 中,再次右鍵點擊專案節點,選擇新增,然後選擇類別。
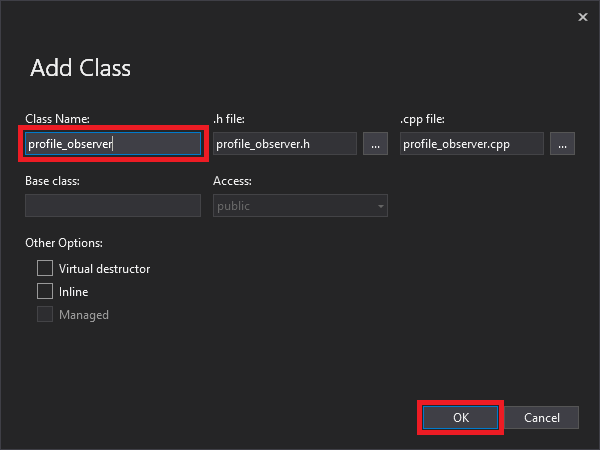
在 [ 新增類別 ] 對話框中:
- 在 類別名稱 欄位輸入
profile_observer。 注意Visual Studio會根據你輸入的名稱自動填入 .h 檔案和 .cpp 檔案欄位。 - 完成後,選取 [確定]。
- 在 類別名稱 欄位輸入
產生 .h 和 .cpp 檔案後,Visual Studio 會在編輯器群組分頁中開啟兩個檔案。 現在更新每個檔案以實作新的觀察者類別:
選取並刪除產生的
profile_observer.h類別,以更新profile_observer。 不要 移除前一步產生的預處理器指令(#pragma、#include)。 接著在任何現有的預處理器指令後,複製並貼上以下原始碼到檔案中:#include <memory> #include "mip/protection/protection_profile.h" using std::exception_ptr; using std::shared_ptr; class ProtectionProfileObserver final : public mip::ProtectionProfile::Observer { public: ProtectionProfileObserver() { } void OnLoadSuccess(const std::shared_ptr<mip::ProtectionProfile>& profile, const std::shared_ptr<void>& context) override; void OnLoadFailure(const std::exception_ptr& Failure, const std::shared_ptr<void>& context) override; void OnAddEngineSuccess(const std::shared_ptr<mip::ProtectionEngine>& engine, const std::shared_ptr<void>& context) override; void OnAddEngineFailure(const std::exception_ptr& Failure, const std::shared_ptr<void>& context) override; };透過選取並刪除產生
profile_observer的類別實作來更新profile_observer.cpp。 不要 移除前一步產生的預處理器指令(#pragma、#include)。 接著在任何現有的預處理器指令後,複製並貼上以下原始碼到檔案中:#include <future> using std::promise; using std::shared_ptr; using std::static_pointer_cast; using mip::ProtectionEngine; using mip::ProtectionProfile; void ProtectionProfileObserver::OnLoadSuccess(const shared_ptr<ProtectionProfile>& profile, const shared_ptr<void>& context) { auto promise = static_pointer_cast<std::promise<shared_ptr<ProtectionProfile>>>(context); promise->set_value(profile); } void ProtectionProfileObserver::OnLoadFailure(const std::exception_ptr& error, const shared_ptr<void>& context) { auto promise = static_pointer_cast<std::promise<shared_ptr<ProtectionProfile>>>(context); promise->set_exception(error); } void ProtectionProfileObserver::OnAddEngineSuccess(const shared_ptr<ProtectionEngine>& engine, const shared_ptr<void>& context) { auto promise = static_pointer_cast<std::promise<shared_ptr<ProtectionEngine>>>(context); promise->set_value(engine); } void ProtectionProfileObserver::OnAddEngineFailure(const std::exception_ptr& error, const shared_ptr<void>& context) { auto promise = static_pointer_cast<std::promise<shared_ptr<ProtectionEngine>>>(context); promise->set_exception(error); }
重複步驟 1,為保護引擎觀察器
engine_observer新增一個類別,加入你的專案。 這個類別會幫你產生標頭(.h)和實作(.cpp)檔案。產生 .h 和 .cpp 檔案後,Visual Studio 會在編輯器群組分頁中開啟兩個檔案。 現在更新每個檔案以實作新的觀察者類別:
選取並刪除產生的
engine_observer.h類別,以更新engine_observer。 不要 移除前一步產生的預處理器指令(#pragma、#include)。 接著在任何現有的預處理器指令後,複製並貼上以下原始碼到檔案中:#include <memory> #include "mip/protection/protection_engine.h" using std::vector; using std::exception_ptr; using std::shared_ptr; class ProtectionEngineObserver final : public mip::ProtectionEngine::Observer { public: ProtectionEngineObserver() {} void OnGetTemplatesSuccess(const vector<std::shared_ptr<mip::TemplateDescriptor>>& templateDescriptors, const shared_ptr<void>& context) override; void OnGetTemplatesFailure(const exception_ptr& Failure, const shared_ptr<void>& context) override; };透過選取並刪除產生
engine_observer的類別實作來更新engine_observer.cpp。 不要 移除前一步產生的預處理器指令(#pragma、#include)。 接著在任何現有的預處理器指令後,複製並貼上以下原始碼到檔案中:#include "mip/protection/protection_profile.h" #include "engine_observer.h" using std::promise; void ProtectionEngineObserver::OnGetTemplatesSuccess(const vector<shared_ptr<mip::TemplateDescriptor>>& templateDescriptors,const shared_ptr<void>& context) { auto loadPromise = static_cast<promise<vector<shared_ptr<mip::TemplateDescriptor>>>*>(context.get()); loadPromise->set_value(templateDescriptors); }; void ProtectionEngineObserver::OnGetTemplatesFailure(const exception_ptr& Failure, const shared_ptr<void>& context) { auto loadPromise = static_cast<promise<vector<shared_ptr<mip::TemplateDescriptor>>>*>(context.get()); loadPromise->set_exception(Failure); };
可選擇使用 Ctrl+Shift+B (建置解決方案)執行測試編譯並連結你的解決方案,確認是否成功建置後再繼續。
實作身份驗證代理和同意代理
MIP SDK 透過類別擴充性實作認證,提供與客戶端應用程式共享認證工作的機制。 用戶端必須取得合適的 OAuth2 存取權杖,並在執行時提供給 MIP SDK。
透過擴展 SDK mip::AuthDelegate 類別並覆蓋/實作 mip::AuthDelegate::AcquireOAuth2Token() 純虛擬函式,建立認證代理的實作。 請依照 File SDK 應用程式初始化快速啟動中的步驟操作。 保護設定檔與保護引擎物件會在之後實例化並使用認證代理。
實作同意委派
現在,透過擴展 SDK mip::ConsentDelegate 類別並覆蓋/實作 mip::AuthDelegate::GetUserConsent() 純虛擬函式,建立一個同意代理的實作。 請依照 File SDK 應用程式初始化快速啟動中的步驟操作。 保護設定檔與保護引擎物件之後實例化並使用同意代理。
建構保護配置檔和引擎
如前所述,使用 MIP API 的 SDK 用戶端需要設定檔和引擎物件。 完成這個快速入門中的程式碼部分,加入程式碼來具現化設定檔和引擎物件:
從 [方案總管] 中,開啟專案中包含 方法實作
main()的 .cpp 檔案。 預設名稱為包含它的專案的同一名稱,而這是在您建立專案時指定的。移除生成的實作
main()。 請勿 在專案建立期間移除 Visual Studio 所產生的預處理器指示詞(#pragma、#include)。 在任何預處理器指示詞之後附加下列程序代碼:
#include "mip/mip_context.h"
#include "auth_delegate.h"
#include "consent_delegate.h"
#include "profile_observer.h"
#include"engine_observer.h"

using std::promise;
using std::future;
using std::make_shared;
using std::shared_ptr;
using std::string;
using std::cout;
using mip::ApplicationInfo;
using mip::ProtectionProfile;
using mip::ProtectionEngine;

int main(){

  // Construct/initialize objects required by the application's profile object
  // ApplicationInfo object (App ID, name, version)
  ApplicationInfo appInfo{"<application-id>",
                          "<application-name>",
                          "<application-version>"};

  std::shared_ptr<mip::MipConfiguration> mipConfiguration = std::make_shared<mip::MipConfiguration>(appInfo,
				                                                                                               "mip_data",
                                                                                      			         mip::LogLevel::Trace,
                                                                                                     false,
                                                                                                     mip::CacheStorageType::OnDisk);

  std::shared_ptr<mip::MipContext> mMipContext = mip::MipContext::Create(mipConfiguration);

  auto profileObserver = make_shared<ProtectionProfileObserver>(); // Observer object
  auto authDelegateImpl = make_shared<AuthDelegateImpl>("<application-id>"); // Authentication delegate object (App ID)
  auto consentDelegateImpl = make_shared<ConsentDelegateImpl>(); // Consent delegate object

  // Construct/initialize profile object
  ProtectionProfile::Settings profileSettings(
    mMipContext,
    mip::CacheStorageType::OnDisk,
    consentDelegateImpl,
    profileObserver);

  // Set up promise/future connection for async profile operations; load profile asynchronously
  auto profilePromise = make_shared<promise<shared_ptr<ProtectionProfile>>>();
  auto profileFuture = profilePromise->get_future();
  try
  {
    mip::ProtectionProfile::LoadAsync(profileSettings, profilePromise);
  }
  catch (const std::exception& e)
  {
    cout << "An exception occurred... are the Settings and ApplicationInfo objects populated correctly?\n\n"
          << e.what() << "'\n";
    system("pause");
    return 1;
  }

  auto profile = profileFuture.get();

  // Construct/initialize engine object
  ProtectionEngine::Settings engineSettings(
     mip::Identity("<engine-account>"),         // Engine identity (account used for authentication)
     authDelegateImpl,                          // Reference to mip::AuthDelegate implementation
     "",                                        // ClientData field
     "en-US");                                  // Locale (default = en-US)

  // Set the engineId so it can be cached and reused.
  engineSettings.SetEngineId("<engine-account>");

  // Set up promise/future connection for async engine operations; add engine to profile asynchronously
  auto enginePromise = make_shared<promise<shared_ptr<ProtectionEngine>>>();
  auto engineFuture = enginePromise->get_future();
  profile->AddEngineAsync(engineSettings, enginePromise);
  std::shared_ptr<ProtectionEngine> engine;

  try
  {
    engine = engineFuture.get();
  }
  catch (const std::exception& e)
  {
    cout << "An exception occurred... is the access token incorrect/expired?\n\n"
         << e.what() << "'\n";
    system("pause");
    return 1;
  }

  // Application shutdown. Null out profile and engine, call ReleaseAllResources();
  // Application may crash at shutdown if resources aren't properly released.
  engine = nullptr;
  profile = nullptr;
  mMipContext->ShutDown();
  mMipContext = nullptr;

  return 0;
}
用字串常數替換你貼上的原始碼中所有的佔位值:
佔位符 價值 範例 <應用程式識別碼> 指派給您在 MIP SDK 設定和配置 文章第 #2 步中註冊之應用程式的 Microsoft Entra 應用程式 ID(GUID)。 取代 2 個實例。 "00001111-aaaa-2222-bbbb-3333cccc4444"<應用程式名稱> 為您的應用程式設定的使用者友好名稱。 必須包含有效的 ASCII 字元(不含 ';')且理想狀況下,與你在 Microsoft Entra 註冊時使用的應用程式名稱相符。 "AppInitialization"<應用程式版本> 應用程式的使用者定義版本資訊。 必須包含有效的 ASCII 字元(不含 ';')。 "1.1.0.0"<引擎帳戶> 用於引擎身份識別的帳戶。 當您在令牌擷取期間使用使用者帳戶進行驗證時,必須符合此值。 "user1@tenant.onmicrosoft.com"<引擎狀態> 使用者自訂狀態,用來與引擎關聯。 "My App State"現在請執行應用程式的最終組建,並解決任何錯誤。 你的程式碼應該能成功建置,但要等到完成下一個快速入門後才會正常執行。 如果您執行應用程式,您會看到類似下列的輸出。 應用程式成功建構了保護設定檔和保護引擎,但不會觸發認證模組,且你在完成下一個快速啟動前沒有存取權杖。
 C:\MIP Sample Apps\ProtectionQS\Debug\ProtectionQS.exe (process 8252) exited with code 0.
 To automatically close the console when debugging stops, enable Tools->Options->Debugging->Automatically close the console when debugging stops.
 Press any key to close this window . . .
下一步
現在你的初始化程式碼完成,你就可以進入下一個快速入門階段,開始體驗 MIP 保護 SDK。
- 請在 GitHub 上探索 MIP Protection SDK C++ 範例。