在本 教學課程的上一個階段中,我們在您的計算機上安裝 PyTorch。 現在,我們將使用它來設定程式碼與我們將用來建立模型的數據。
在 Visual Studio 中開啟新的專案。
- 開啟 Visual Studio,然後選擇
create a new project。

- 在搜尋列中,輸入
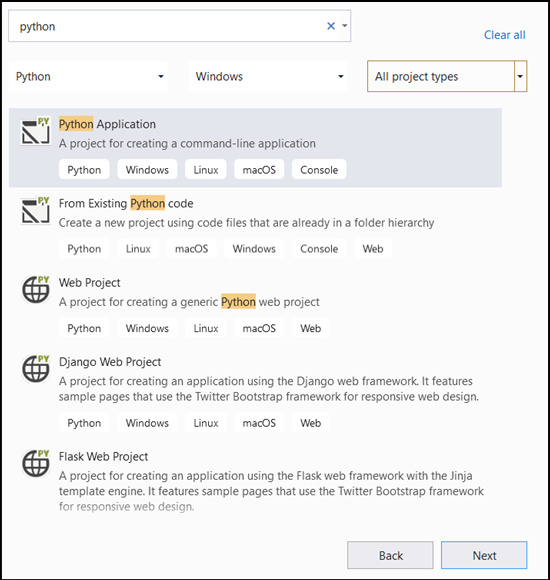
Python並選取Python Application作為專案範本。
- 在組態視窗中:
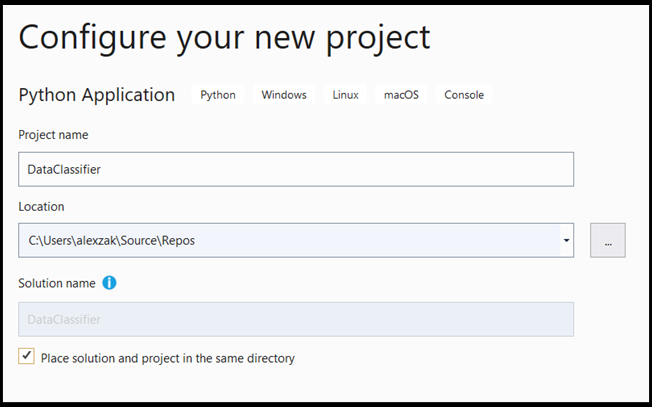
- 命名專案。 在這裡,我們稱之為 DataClassifier。
- 選擇專案的位置。
- 如果您使用 VS2019,請確定
Create directory for solution已核取 。 - 如果您使用 VS2017,請確定
Place solution and project in the same directory未核取。
按 create 以建立您的專案。
建立 Python 解釋器
現在,您需要定義新的 Python 解釋器。 這必須包含您最近安裝的 PyTorch 套件。
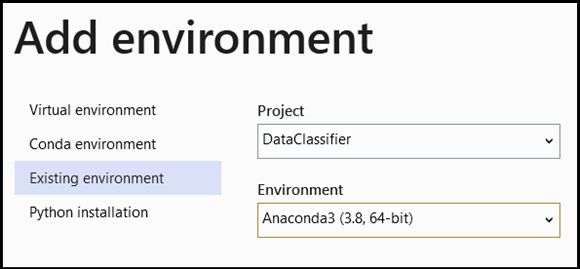
- 瀏覽至解釋器選取項目,然後選取
Add Environment:

- 在
Add Environment視窗中,選取Existing environment,然後選擇Anaconda3 (3.6, 64-bit)。 這包括 PyTorch 套件。
若要測試新的 Python 解釋器和 PyTorch 套件,請在檔案中輸入下列程式代碼 DataClassifier.py :
from __future__ import print_function

import torch

x=torch.rand(2, 3)

print(x)
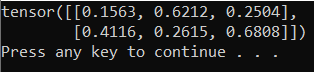
輸出應該是類似下面的隨機生成的 5x3 張量。
備註
有興趣深入瞭解嗎? 流覽 PyTorch 官方網站。
了解資料
我們將使用費雪氏的鳶尾花數據集來訓練模型。 這個著名的數據集包含每種鳶尾花物種的 50 筆記錄:鳶尾花 setosa、鳶尾花維吉尼亞,以及鳶尾花雜色。
已發行數個數據集版本。 您可以在 UCI 機器學習資料庫找到鳶尾花數據集,直接從 Python Scikit-learn 函式庫 匯入數據集,或使用先前發佈的任何其他版本。 若要瞭解鳶尾花數據集,請瀏覽 其維基百科頁面。
在本教學課程中,為了示範如何使用表格類型的輸入來訓練模型,您將使用匯出至 Excel 檔案的鳶尾花數據集。
Excel 表格的每一行都會顯示鳶尾花的四個特徵:萼片長度 (cm)、萼片寬度 (cm)、花瓣長度 (cm) 和花瓣寬度 (cm)。這些特徵將作為您的輸入。 最後一個數據行包含與這些參數相關的鳶尾花類型,並代表回歸輸出。 整個數據集包括四個特徵的150個樣本,每個樣本都對應相關的鳶尾花類型。
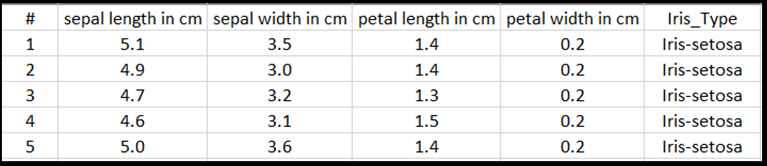
回歸分析會查看輸入變數與結果之間的關聯性。 根據輸入,模型將學習預測正確的輸出類型 - 三種鳶尾花類型之一:鳶尾花-山梔、鳶尾花-變色、鳶尾花-維吉尼亞。
這很重要
如果您決定使用任何其他數據集來建立自己的模型,則必須根據您的案例指定模型輸入變數和輸出。
載入數據集。
下載 Excel 格式的鳶尾花數據集。 您可以在這裡找到它。
在 [
DataClassifier.py方案總管檔案] 資料夾中的 檔案中,新增下列 import 語句,以存取我們需要的所有套件。
import torch
import pandas as pd
import torch.nn as nn
from torch.utils.data import random_split, DataLoader, TensorDataset
import torch.nn.functional as F
import numpy as np
import torch.optim as optim
from torch.optim import Adam
如您所見,您將使用 pandas (Python 數據分析)套件來載入和操作數據,以及使用 torch.nn 套件,其中包含用於建置神經網路的模組和可延伸類別。
- 將數據載入記憶體,並確認類別數目。 我們預期會看到每個鳶尾花類型的50件。 請務必指定您計算機上的數據集位置。
將下列程式碼新增至 DataClassifier.py 檔案。
# Loading the Data
df = pd.read_excel(r'C:…\Iris_dataset.xlsx')
print('Take a look at sample from the dataset:')
print(df.head())

# Let's verify if our data is balanced and what types of species we have
print('\nOur dataset is balanced and has the following values to predict:')
print(df['Iris_Type'].value_counts())
當我們執行此程式代碼時,預期的輸出如下所示:

若要能夠使用數據集並定型模型,我們需要定義輸入和輸出。 輸入包含 150 行的特徵,輸出是鳶尾花類型的欄位。 我們將使用的類神經網路需要數值變數,因此您將輸出變數轉換成數值格式。
- 在數據集中建立新的數據行,以數值格式表示輸出,並定義回歸輸入和輸出。
將下列程式碼新增至 DataClassifier.py 檔案。
# Convert Iris species into numeric types: Iris-setosa=0, Iris-versicolor=1, Iris-virginica=2.
labels = {'Iris-setosa':0, 'Iris-versicolor':1, 'Iris-virginica':2}
df['IrisType_num'] = df['Iris_Type']   # Create a new column "IrisType_num"
df.IrisType_num = [labels[item] for item in df.IrisType_num]  # Convert the values to numeric ones

# Define input and output datasets
input = df.iloc[:, 1:-2]            # We drop the first column and the two last ones.
print('\nInput values are:')
print(input.head())
output = df.loc[:, 'IrisType_num']   # Output Y is the last column
print('\nThe output value is:')
print(output.head())
當我們執行此程式代碼時,預期的輸出如下所示:

若要定型模型,我們需要將模型輸入和輸出轉換成 Tensor 格式:
- 轉換為 Tensor:
將下列程式碼新增至 DataClassifier.py 檔案。
# Convert Input and Output data to Tensors and create a TensorDataset
input = torch.Tensor(input.to_numpy())      # Create tensor of type torch.float32
print('\nInput format: ', input.shape, input.dtype)     # Input format: torch.Size([150, 4]) torch.float32
output = torch.tensor(output.to_numpy())        # Create tensor type torch.int64
print('Output format: ', output.shape, output.dtype)  # Output format: torch.Size([150]) torch.int64
data = TensorDataset(input, output)    # Create a torch.utils.data.TensorDataset object for further data manipulation
如果我們執行程式代碼,預期的輸出會顯示輸入和輸出格式,如下所示:

有 150 個輸入值。 大約 60 個% 會是模型訓練數據。 您將保留 20 個% 進行驗證,並將 30 個% 用於測試。
在本教學課程中,定型數據集的批次大小定義為10。 訓練集共有95個項目,這表示平均有9個完整批次逐一遍歷訓練集一次(一個訓練週期)。 您將保留驗證和測試集的批次大小為 1。
- 分割資料以定型、驗證和測試集:
將下列程式碼新增至 DataClassifier.py 檔案。
# Split to Train, Validate and Test sets using random_split
train_batch_size = 10
number_rows = len(input)    # The size of our dataset or the number of rows in excel table.
test_split = int(number_rows*0.3)
validate_split = int(number_rows*0.2)
train_split = number_rows - test_split - validate_split
train_set, validate_set, test_set = random_split(
    data, [train_split, validate_split, test_split])

# Create Dataloader to read the data within batch sizes and put into memory.
train_loader = DataLoader(train_set, batch_size = train_batch_size, shuffle = True)
validate_loader = DataLoader(validate_set, batch_size = 1)
test_loader = DataLoader(test_set, batch_size = 1)
後續步驟
隨著數據準備就緒,是時候定型 PyTorch 模型了