Note
Access to this page requires authorization. You can try signing in or changing directories.
Access to this page requires authorization. You can try changing directories.
Important
- This is a preview feature provided under Microsoft Product Terms.
- Preview features may have restricted functionality and may not be released for general availability. These features are available before an official release so that customers can get early access and provide feedback.
- You need to be part of the Frontier preview program to get early access. Frontier connects you directly with Microsoft's latest AI innovations. Frontier previews are subject to the existing preview terms of your customer agreements. As these features are still in development, their availability and capabilities may change over time.
Copilot Code lets you describe the software you want—a dashboard, an internal tool, a website, or a script—and builds it for you. This article walks you through opening the Code tab in Microsoft Copilot, starting your first project, and previewing the result.
Prerequisites
Before you begin, make sure you have:
Microsoft Copilot access: An active Microsoft Copilot license assigned to your account, or a personal Microsoft account on a supported plan.
Your system administrator must ensure users in the tenant can get Copilot Code on their Windows app by following these steps:
Opt the tenant in to the unified Copilot app rollout: Deploy the unified Microsoft Copilot application.
Set the update target channel to Beta on Windows: Microsoft Copilot update policies for Windows
Where group policy is not practical, apply the setting manually because it's registry backed. Set
HKEY_LOCAL_MACHINE\SOFTWARE\Policies\Microsoft\EdgeUpdate\TargetChannel{C50565E9-CCCF-44B4-BA15-5AC5C6569197}to the valuebeta. Customers can push that key through MDM or their management tool of choice.
Copilot Code available: The Code tab is enabled in your Microsoft Copilot environment.
The desktop app or a supported browser: Copilot Code runs in the Microsoft Copilot desktop app for Windows and Mac, and on the web for cloud development.
For full details on licensing and supported platforms, see Copilot Code requirements.
Open Copilot Code
To open Copilot Code, follow these steps:
- Open the Microsoft Copilot app, or go to copilot.cloud.microsoft in your browser.
- Select Code in the tab switcher at the top of the app.
The first time you open Copilot Code on Windows, the app downloads a set of assets it needs. This download happens once.
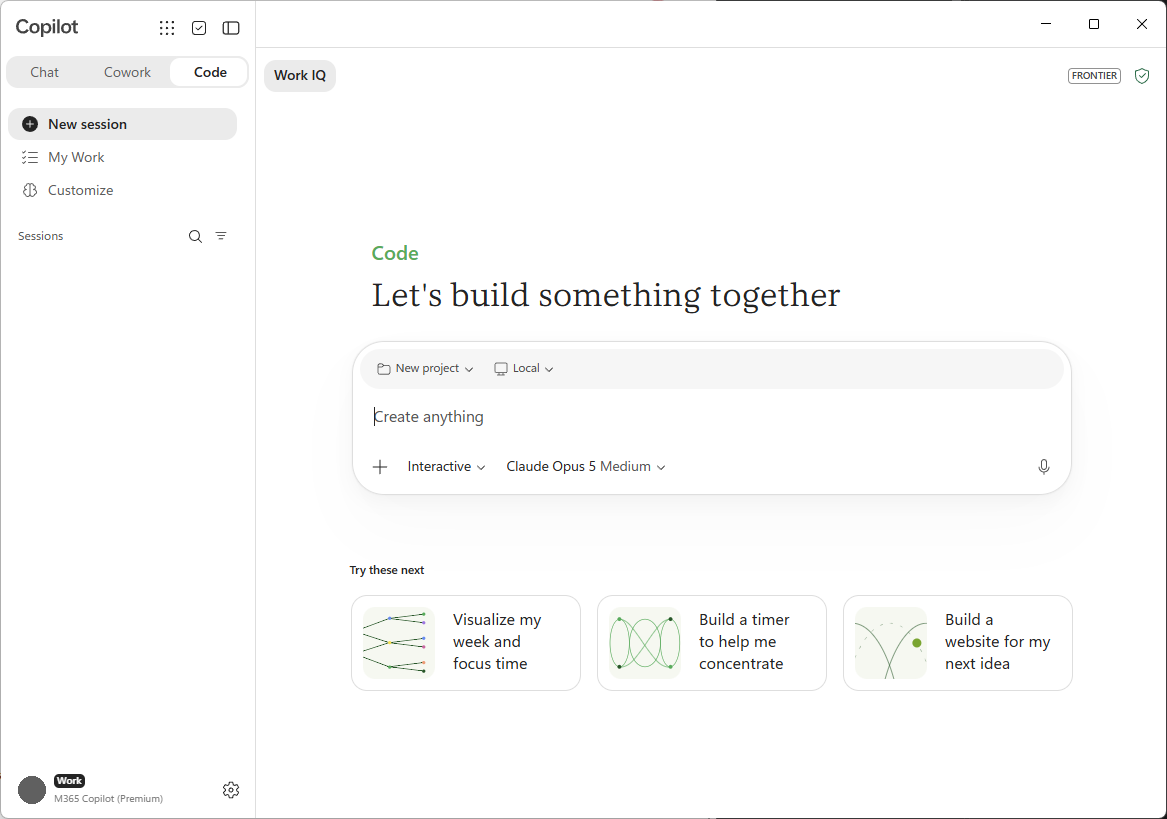
When the Copilot Code home screen loads, you see:
- A task input where you describe what you want to build.
- Suggested prompts to help you start, such as Build a dashboard or Automate a workflow.
- Create new to start a project, and Search to find an earlier one.
- Recents, which lists projects you can reopen and keep working on.
- A model picker, so you can choose the model that works best or let Copilot Code decide.
Start your first project
- In the task input, describe the outcome you want. Be specific about what the result should do and who it's for. For example: Build a dashboard that tracks weekly signups by channel.
- Add files or context to give Copilot Code something to work from:
- Select the + button to upload files or attach your work context.
- Drag and drop files—such as CSV, spreadsheets, images, documents, PDFs, or presentations—onto the input.
- Paste text data directly into the input.
- (Optional) For a local project, open an existing folder on your device to work in.
- Send your message.
Tip
Start with the core of what you want, then add features as you go. A focused first prompt gives Copilot Code a clear starting point.
Choose local or cloud
Copilot Code can run your project on your own device (local) or in a secure, isolated environment in the cloud. Choose the option that fits your work:
- Local: Copilot Code works inside a project folder on your device, so it can use your local files and iterate quickly.
- Cloud: Copilot Code runs and keeps your project in the cloud, so you can work with it across devices and share it with your organization.
For a comparison, see Build locally or in the cloud.
Choose a model
Select the model picker in the composer to choose the model Copilot Code uses, or leave it set to Auto (cloud only) to let Copilot Code choose. Some of the available models include:
- Claude Opus 5, Opus 4.8, Opus 4.7, and Opus 4.6
- Claude Sonnet 5 and Sonnet 4.6
- Claude Haiku 4.5
- GPT 5.6 (sol, terra, and luna) and GPT 5.5
- MAI-Code-1-Flash
Watch Copilot Code build and preview the result
After you send your first message, Copilot Code gets to work.
- Clarifying questions: Copilot Code might ask a few questions before it builds, such as what kind of app you want and how it should look. Answer them to guide the result.
- Progress steps: Copilot Code shows each step as it works, so you can follow along.
- Live preview: The canvas next to the conversation shows the artifact as it's built. Switch between the preview and the code view to see or edit the generated files.
Iterate on your project
Building is a conversation. To refine the result:
- Describe a change in plain language, such as adding a feature, adjusting the layout, or fixing a problem.
- (Optional) Select an element directly on the canvas to point Copilot Code at it, then describe the change.
- Watch the preview update.
- If you want to undo a direction, ask Copilot Code to revert to an earlier version.
Repeat until the project works the way you want.
Save, reopen, and share
- Save: Your project is saved automatically—on your device for local projects, or in the cloud for cloud projects. The conversation stays tied to the project.
- Reopen: Find a project under Recents, or use Search, and select it to continue where you left off.
- Share: Share a static app as a link that's scoped to your organization (cloud only).
For more tasks, including working with GitHub and setting up automations, see Use Code.