Observação
O acesso a essa página exige autorização. Você pode tentar entrar ou alterar diretórios.
O acesso a essa página exige autorização. Você pode tentar alterar os diretórios.
Importante
Algumas informações neste artigo estão relacionadas ao produto pré-lançado que pode ser modificado substancialmente antes de ser lançado comercialmente. A Microsoft não faz garantias, expressas ou implícitas, quanto às informações fornecidas aqui.
A coleção de ferramentas de criação de agente no servidor MCP (protocolo de contexto de modelo) do Microsoft Sentinel permite que os desenvolvedores usem linguagem natural para criar agentes do Security Copilot em um IDE compatível com MCP de sua escolha.
Nesta introdução, você aprenderá como:
Configurar e autenticar no servidor MCP
Habilitar o modo de agente do GitHub Copilot
Gerenciar o contexto para ferramentas MCP
Pré-requisitos
O suporte do Microsoft Sentinel para as ferramentas MCP de criação do agente do Security Copilot está disponível para os seguintes editores de código com tecnologia de IA:
Configurar e autenticar no servidor MCP
As etapas para instalar o servidor MCP são as seguintes:
Inicie o Visual Studio Code (VS Code).
Adicione a conexão do servidor MCP no VS Code. Pressione
Ctrl + Shift + Ppara abrir a Paleta de Comandos e digiteMCP: Add server.
Selecione
HTTP (HTTP or Server-Sent Events).
Digite a seguinte URL do servidor e selecione Enter. Essa URL diferencia maiúsculas de minúsculas.
https://sentinel.microsoft.com/mcp/security-copilot-agent-creationDigite uma ID de servidor amigável.

Você é solicitado a Confiar no servidor.

Selecione Permitir quando solicitado a autenticar a definição do servidor.
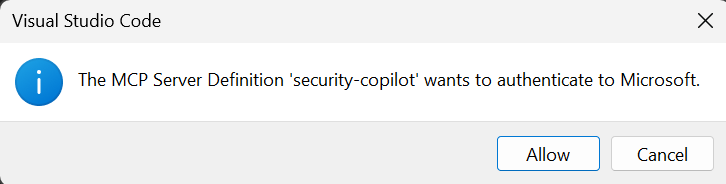
Escolha se deseja disponibilizar o servidor em todos os workspaces do VS Code ou apenas no atual.

Uma vez autenticado, o servidor começa a Executar. Um arquivo chamado
mcp.jsonaparece e verifica as configurações do MCP Server em seu espaço de trabalho do VS Code.


Habilitar o modo de agente do GitHub Copilot
Você pode executar as seguintes etapas para habilitar o modo de agente do GitHub Copilot no VS Code:
Abra o menu >Exibir do chat > do VS Code Chat ou pressione
CRTL + ALT + I.Defina o chat para o modo de agente.
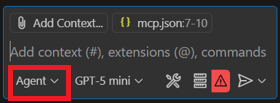
Selecione o ícone de ferramentas na barra de prompts.
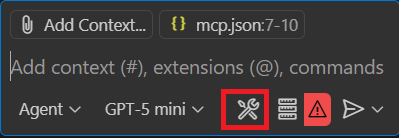
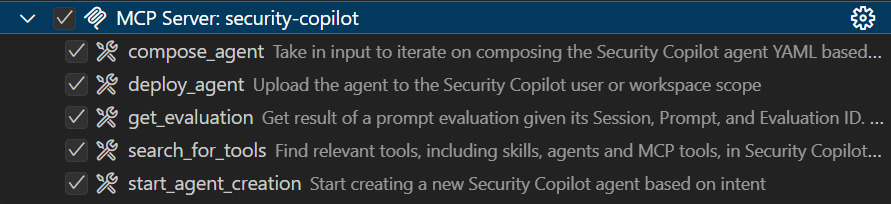
Você pode ver uma lista das ferramentas que estão sendo usadas pelo GitHub Copilot. Expanda a linha do servidor MCP que você acabou de adicionar para ver as cinco ferramentas para criação de agentes:
Gerenciar o contexto para ferramentas MCP
Quando você fornece o contexto certo, pode obter ajuda da IA no VS Code para fornecer respostas relevantes e precisas. Há duas opções para gerenciar o contexto e garantir que o assistente de IA use as ferramentas MCP conforme o esperado e com maior consistência.
Você pode escolher uma das seguintes opções para gerenciar o contexto:
Configurar instruções personalizadas
Instruções personalizadas permitem definir diretrizes ou regras comuns em um arquivo Markdown para descrever como as tarefas devem ser executadas. Em vez de incluir manualmente o contexto em cada prompt de chat, especifique instruções personalizadas em um arquivo Markdown para garantir respostas consistentes de IA que se alinhem aos requisitos do seu projeto.
Você pode configurar instruções personalizadas para aplicar automaticamente a todas as solicitações de chat ou apenas a arquivos específicos.
Usar um arquivo de instruções personalizadas
Defina suas instruções personalizadas em um único .github/copilot-instructions.md arquivo Markdown na raiz do seu espaço de trabalho. O VS Code aplica as instruções nesse arquivo automaticamente a todas as solicitações de chat nesse workspace.
As etapas para usar um .github/copilot-instructions.md arquivo são as seguintes:
Habilite a
github.copilot.chat.codeGeneration.useInstructionFilesconfiguração.Crie um
.github/copilot-instructions.mdarquivo na raiz do seu espaço de trabalho. Se necessário, crie um.githubdiretório primeiro.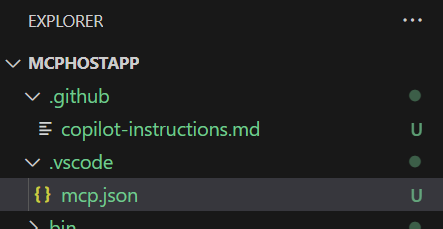
Descreva suas instruções usando linguagem natural e no formato Markdown.
Para começar, copie o conteúdo do arquivo
scp-mcp-context.mdde contexto para ocopilot-instructions.mdarquivo. Consulte o arquivo de contexto para ferramentas MCP.
Adicionar um arquivo de contexto para ferramentas MCP
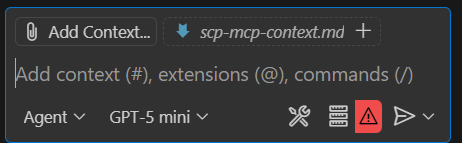
Para ajudar a garantir que o assistente de IA possa usar as ferramentas MCP conforme o esperado e com maior consistência, adicione o arquivo de scp-mcp-context.md contexto ao IDE. Certifique-se de que o assistente de IA esteja se referindo a esse arquivo quando você o solicitar.
Adicione o
scp-mcp-context.mdarquivo de contexto ao VS Code ou cole-o diretamente no seu espaço de trabalho. Para obter o conteúdo do arquivo, consulte Arquivo de contexto para ferramentas MCP. Seu espaço de trabalho é mais ou menos assim:
Selecione Adicionar Contexto na barra de prompts e selecione o arquivo de contexto.

Arquivo de contexto de exemplo para ferramentas MCP
O arquivo de contexto de exemplo a seguir, scp-mcp-context.md, fornece instruções que o assistente de IA usa com ferramentas MCP. Copie-o para usar com a implementação do início rápido do MCP.
# MCP Tools Available for Agent Building
    1. **start_agent_creation**
        - **Purpose**: Creates a new Security Copilot session and starts the agent building process.
        - The userQuery input will be the user's problem statement (what they want the agent to do).
        - The output of the tool should be returned IN FULL WITHOUT EDITS.
        - The tool will return an initial agent YAML definition.
    2. **compose_agent**
        - **Purpose**: Continues the session and agent building process created by *start_agent_creation*. Outputs agent definition YAML or can ask clarifying questions to the user.
        - The sessionId input is obtained from the output of *start_agent_creation*
        - The existingDefinition input is optional. If an agent definition YAML has not been created yet, this should be blank (can be an empty string).
    3. **search_for_tools**
        - **Purpose: Discover relevant skills (tools) based on the user's query
        - This will create a new Security Copilot session, but it should not be included in the start_agent/continue_agent flow.
          - A user might want to know about Security Copilot skills they have access to without wanting to create an agent
          - The session ID created should NOT be reused in any capacity
    4. **get_evaluation**
        - **Purpose: Get the results of the evaluations triggered by each of the above tools. You MUST repeatedly activate this tool until the property of the result "state" is equal to "Completed" in order to get the fully processed result. The "state" may equal "Created" or "Running" but again, you must repeat the process until the state is "Completed". There is NO MAXIMUM amount of times you might call this tool in a row.
    5. **deploy_agent**
        - **Purpose: Deploy an agent to Security Copilot.
        - The user must provide the scope as either "User" or "Workspace".
        - Unless they already have an AGENT definition yaml provided, *start_agent_creation* must be run before to generate an agentDefinition
        - "agentSkillsetName" should be COPIED EXACTLY from the value of "Descriptor: Name:" in the agent definition YAML, including any special characters like ".". This will NOT work if the two do not match EXACTLY.
        - DO NOT use *get_evaluation* after this tool.

# Agent Building Execution Flow

## Step 1: Problem Statement Check
- If the user did **not** provide a problem statement, prompt them to do so.
- If the user **did** provide a problem statement, proceed to Step 2.

## Step 2: Start Agent Creation
- Use the `start_agent_creation` tool with `userQuery = <problem statement>`.
  - **DO NOT** include any quotation marks in the userQuery
- Then, use `get_evaluation` to retrieve the initial response.
  - **DO** repeatedly call `get_evaluation` until the `"state"` property of the result equals `"Completed"`.
  - **DO NOT** require the user to ask again to get the results.
  - **DO NOT** edit or reword the response content.

## Step 2.5: Output Handling
- **DO NOT** reformat, summarize, or describe the YAML output.
- **DO** return the YAML output **verbatim**.
- **DO** return the output in **AGENT FORMAT**.

## Step 3: Agent Refinement
- Ask the user if they would like to edit the agent or if they would like to deploy the agent. If they want to deploy, skip to **Step 4**.
- If the user wants to edit the agent definition:
  - If they respond with edits directly, use `compose_agent` with:
    - `sessionId` from `start_agent_creation`
    - `existingDefinition = <previous AGENT YAML>`
      - `\n` MUST be rewritten as `\\n`
    - `userQuery = <user’s new input>`
      - **DO NOT** include any quotation marks in the userQuery
  - If they attach a manually edited YAML file to the context, use the file content as `existingDefinition`.
    - **DO NOT** edit the file directly, you MUST use `compose_agent`
    - `\n` MUST be rewritten as `\\n`

## Step 4: Agent Deployment
- If the user asks to deploy the agent, use `deploy_agent`.
  - You **must confirm the scope**: either `"User"` or `"Workspace"`.
    - If not provided, ask the user to specify.
  - `agentSkillsetName` must **exactly match** the value of `Descriptor: Name:` in the YAML.
    - This includes any special characters.
  - Leave existing instances of `\n` inside `agentDefinition` as-is
- **DO NOT** run `get_evaluation` after deployment.
- **DO** include all of these things in the tool response to the user:
    1. Confirm successful deployment to the user
    2. Direct the user to the Security Copilot portal to test and view the agent with this link: https://securitycopilot.microsoft.com/agents
    3. Direct the user to read more on how to test their agent in Security Copilot with this link: https://learn.microsoft.com/en-us/copilot/security/developer/mcp-quickstart#test-agent

## Step 5: Further Agent Refinement and Redeployment
- After deployment, the user may still want to **edit the agent definition**.
  - If so, you must support calling `compose_agent` again.
  - Follow the same process as described in **Step 3**:
    - If the user asks for edits directly, use the previous AGENT YAML as `existingDefinition`.
    - If the user uploads a manually edited YAML file, use the file content as `existingDefinition`.
- The user may also want to **redeploy the agent** after making refinements.
  - You must run `deploy_agent` again using the updated YAML.
  - Ensure the `agentSkillsetName` matches **exactly** the value of `Descriptor: Name:` in the latest YAML, including any special characters.
  - Leave existing instances of `\n` inside `agentDefinition` as-is
  - Confirm the deployment scope: either `"User"` or `"Workspace"`.
    - If the scope is not provided, prompt the user to specify.
  - Do **not** run `get_evaluation` after deployment.
  - Confirm successful redeployment to the user.
- Alternatively, the user may want to **create a new agent**.
  - Restart the procedure from **Step 1**.
  - When using `start_agent_creation`, a new session ID will be created.
  - **DO** keep track of which session IDs correspond to which problem statements or agents so the user can return to previous sessions if needed.

## Additional Rules
- Only call `compose_agent` **after** the user has provided a response. Do not proceed automatically.
- Agent creation must remain **user-driven**. Do not initiate steps without explicit user input.
- Wait for the user to respond before continuing to the next step.
- Tool responses must be returned **directly to the user** in full.
  - Do **not** alter, reformat, summarize, or reword the content of any tool response.
  - This applies specifically to the `"result": "content"` field in the JSON returned by tool executions.
  - LEAVE OUT any "Grounding Notes"

## Error Handling
- If any tool call fails:
  - Inform the user of the failure.
  - If it is a client error, make an attempt to retry the tools, rewriting inputs based on the error message.
    - Example: If the error indicates invalid JSON characters, escape or remove those characters from the input and retry. Always attempt escaping first.
Próximas etapas
- Saiba como usar as ferramentas MCP para criar agentes do Security Copilot no VS Code. Para obter mais informações, consulte Guia de início rápido de MCP para criar agentes do Security Copilot