หมายเหตุ
การเข้าถึงหน้านี้ต้องได้รับการอนุญาต คุณสามารถลอง ลงชื่อเข้าใช้หรือเปลี่ยนไดเรกทอรีได้
การเข้าถึงหน้านี้ต้องได้รับการอนุญาต คุณสามารถลองเปลี่ยนไดเรกทอรีได้
This article helps you troubleshoot slow replication or stuck migration issues that you may encounter when you replicate on-premises VMware VMs using the Server Migration agentless method.
Replication is slow or stuck for VM
While you perform replications, you might observe that replication for a particular VM isn't progressing at the expected pace. Generally, the underlying reason for this issue is an unavailability or scarcity of some resources required for replication. Other VMs that are replicating or some other process running on the appliance in the datacenter might consume the resources.
Expedite and remediate slow or stuck replications using monitoring and expedite tool
You can use PowerShell to view Time Remaining across all stages of server migration in Azure Migrate. This helps you monitor replication progress and remediate slow or stuck replications and plan cutover accurately. You can use PowerShell, Windows PowerShell, or Cloud Shell on Azure portal.
Open the Azure portal, and then select Cloud Shell at the upper right of the page. When prompted, select PowerShell.
Run this command in Azure Cloud Shell to monitor the migration status of the server you need.
Get-AzMigrateServerMigrationStatus -ProjectName "<your-project-name>" -ResourceGroupName "<your-resource-group>" -MachineName "<your-server-name>"Replace
your-project-name,your-resource-group, andyour-server-namewith the actual Azure Migrate project, resource group, and server name.Run the command and get the following output:
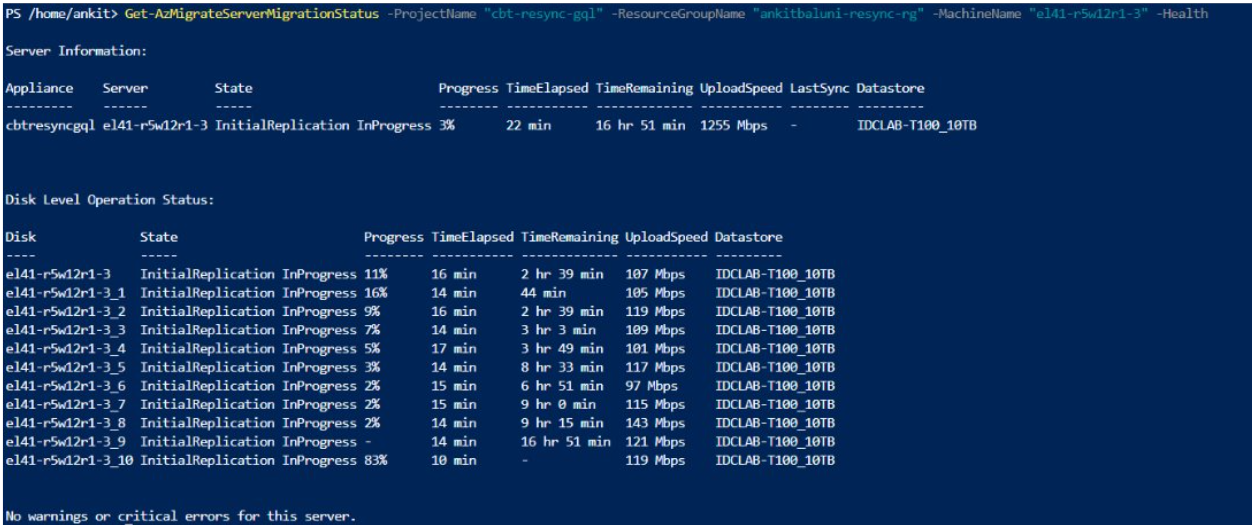
The output shows the server replication status, disk progress, time left, upload speed, and datastore details.
Fix slow or stuck replications by using the "Expedite" command: To retrieve appliance operating parameters and a prioritized list of recommended actions that can help reduce the remaining migration time for the specified server and to fix slow or stuck replications, run the command with the
Expediteflag. For guidance on resolving issues identified by the command, see the Frequent issues section.Get-AzMigrateServerMigrationStatus -ProjectName "<your-project-name>" -ResourceGroupName "<your-resource-group>" -MachineName "<your-server-name>" -ExpediteYou get the following output:

Run the command without the
-MachineNameparameter to view migration status and time remaining for all servers in the project. For example:Get-AzMigrateServerMigrationStatus -ProjectName "<your-project-name>" -ResourceGroupName "<your-resource-group>"Replace
your-project-nameandyour-resource-groupwith the actual Azure Migrate project and resource group names.You run this command and get the following output:

If there's a problem with replication or cutover, the
-Healthflag shows errors, possible causes, and recommended actions to troubleshoot the migration.Get-AzMigrateServerMigrationStatus -ProjectName "<your-project-name>" -ResourceGroupName "<your-resource-group>" -MachineName "<your-server-name>" -HealthYou run this command and get the following output:
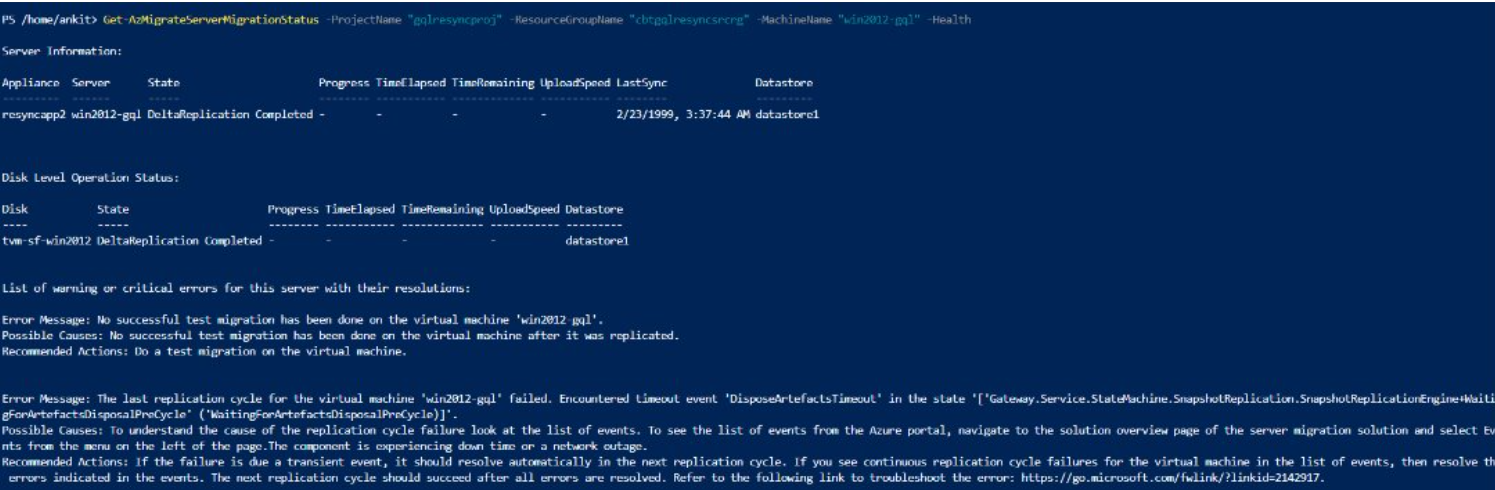
To view the migration status, time remaining, and a health summary for all servers connected to that appliance, run the command with only
-ApplianceName. For a server's errors, possible causes, and recommended actions, use-MachineNamewith-Health.Get-AzMigrateServerMigrationStatus -ProjectName "<your-project-name>" -ResourceGroupName "<your-resource-group>" -ApplianceName "<your-appliance-name>"Replace
your-project-name,your-resource-group, andyour-appliance-namewith the actual values from your Azure Migrate setup.Run this command to get the following output:


Note
You can run the above commands in Azure Cloud Shell. You can also use PowerShell or Windows PowerShell on any Windows machine. A machine refers to any Windows PC, not an appliance, or server, as long as it has access to the Azure Migrate project.
Frequent issues that cause slow or stuck replications
NFC buffer size low
The Azure Migrate appliance uses the ESXi host Network File Copy (NFC) buffer when it reads disks for replication. Azure Migrate budgets 4 MB of NFC buffer for each replicating disk and assumes 32 MB per ESXi host by default, so it typically replicates about eight disks per host at a time.
A VM can remain queued even when the host shows free NFC buffer. A VM starts only when at least half of the buffer it needs is free. The scheduler can also hold the host for a higher-priority VM, or for a VM that has waited longer, until a replication cycle on that host releases capacity. The monitoring tool doesn't show these holds.
Use the monitoring and expedite tool with the -Expedite parameter to review the ESXi host NFC buffer utilization and the other replicating VMs that share the same ESXi host.
You might also get the following exception:
Exception: GatewayErrorHandling.GatewayServiceException: The operation failed with the error 'Memory allocation failed. Out of memory.'
Remediation
- Stop initial replication or pause delta replication for lower-priority VMs on the same ESXi host to release NFC buffer capacity. Stopping replication removes the intermediate replicated data, so use it only when restarting replication later is acceptable. Pausing takes effect after the current delta replication cycle completes.
- If backup operations run on the same host, schedule them outside replication activity. You can also configure an Azure Migrate blackout window. A blackout window prevents new replication cycles but lets cycles in progress finish, and migrations that you start during the window fail.
- Use vMotion to move the affected VM, or another lower-priority replicating VM, to an ESXi host with available capacity. Move VMs between replication cycles. Azure Migrate detects the new host after its next refresh, which can take up to 10 minutes.
- If contention persists, you can increase the NFC buffer beyond 32 MB. Configure the same value on the ESXi host and the appliance. Mismatched values can reduce replication performance.
Caution
Increasing the size to more than 32 MB might cause resource constraints in the environment. Before proceeding, consult with the System Administrator to understand the implications.
Changes in ESXi host
Note
Starting with ESXi 7.0 Update 2, hostd settings are stored in the ESXi configuration store and are changed by using configstorecli. For these versions, follow the Broadcom procedure to increase NFC memory. The following steps apply to earlier ESXi versions.
SSH to the ESXi host as root.
Use the vi editor to open
/etc/vmware/hostd/config.xml.Find the section that looks like the one below:
<nfcsvc>
<enabled>true</enabled>
<maxMemory>134217728</maxMemory>
<maxStreamMemory>10485760</maxStreamMemory>
<path>libnfcsvc.so</path>
</nfcsvc>
Edit the value of
maxMemoryto the value (in bytes) that you want to configure for the NFC buffer. In this example, it's set to 128 MB (128 * 1024 * 1024).Save and exit.
Restart the management agents from the shell by running the following commands:
/etc/init.d/hostd restart/etc/init.d/vpxa restart
Changes in Appliance
- Sign in to the primary Azure Migrate appliance as an administrator by using Remote Desktop. Azure Migrate uses the value from the primary appliance for scheduling. Configure the same value on any scale-out appliances.
- Open the
GatewayDataWorker.jsonfile in the%programdata%\Microsoft Azure\Configfolder. - Create an empty JSON file if it doesn't exist and paste the following text in the new file created.
{ "HostBufferSizeInMB": "32" } - Change the value of
HostBufferSizeInMBto the value that you set in the ESXi host. - Save and exit.
- Restart the Azure Migrate gateway service that is running on the appliance. Go to PowerShell and run the following commands:
net stop asrgwy(wait for the service to stop)net start asrgwy
Parallel disk replication capacity
By default, a single Azure Migrate appliance replicates up to 52 disks in parallel, and a primary appliance with scale-out appliances replicates up to 110 disks in parallel. When this capacity is in use, other VMs remain queued until running replication cycles complete. A VM with many disks might wait until enough capacity is free for its disks, and VMs queued after it for delta replication can also wait.
Remediate parallel disk capacity
- Use the monitoring and expedite tool with the
-Expediteparameter to review the combined parallel disk utilization of the primary and scale-out appliances, and the other VMs that replicate through the same appliance. - Stop initial replication or pause delta replication for lower-priority VMs that use the same appliance. Stopping replication removes the intermediate replicated data, so use it only when restarting replication later is acceptable.
- If you replicate through a single appliance, deploy a scale-out appliance to increase parallel disk capacity to up to 110 disks. Ensure that VMware migration is enabled on the scale-out appliance.
Datastore snapshot capacity
Azure Migrate creates a VMware snapshot for each disk that it replicates. By default, Azure Migrate runs up to 15 of its own disk snapshots per datastore at a time. This limit is a configurable Azure Migrate limit, not a VMware limit. It doesn't include snapshots created by other tools, such as backup software, or by other Azure Migrate appliances.
When the limit is reached, other VMs on the same datastore remain queued until running replication cycles complete. A VM with many disks on one datastore might wait until no other replication is using that datastore.
Remediate datastore snapshot capacity
- Use the monitoring and expedite tool with the
-Expediteparameter to review the snapshot count for each datastore and the other replicating VMs that share the same datastore. - Stop initial replication or pause delta replication for lower-priority VMs that use the same datastore. Stopping replication removes the intermediate replicated data. To avoid overlap with backup or other snapshot-intensive operations, schedule them outside replication activity or configure an Azure Migrate blackout window.
- Use Storage vMotion to distribute lower-priority VMs across datastores with available snapshot capacity.
- If the datastore has low free space, increase its capacity or move VMs to a datastore with sufficient space.
- If contention persists and the datastore has enough free space and storage performance headroom, you can increase the snapshot limit per datastore.
Caution
Increasing the limit allows more concurrent VMware snapshots on the datastore. Snapshot delta files consume datastore space and add I/O to the storage that hosts production workloads. If the datastore runs out of space, source VMs can become unresponsive. Before proceeding, consult with your VMware and storage administrators.
To increase the snapshot limit per datastore:
- Sign in to the primary Azure Migrate appliance as an administrator by using Remote Desktop.
- Open the GatewayDataWorker.json file in the "%programdata%\Microsoft Azure\Config" folder. Create the file if it doesn't exist.
- Add the
SnapshotLimitPerDatastoresetting, or update its value, and keep any existing settings in the file. For example:{ "SnapshotLimitPerDatastore": "30" } - Save and exit.
- Restart the Azure Migrate gateway service that is running on the appliance. Go to PowerShell and execute the following commands:
net stop asrgwy(wait for the service to stop)net start asrgwy
ESXi host available RAM low
When the ESXi host on which the replicating VM is present is too busy, the replication process slows down due to unavailability of RAM.
Remediation
Use vMotion to move the VM with slow replication to an ESXi host that isn't too busy.
Network bandwidth
Replication might be slow because of low network bandwidth available to the Azure Migrate appliance. Low bandwidth might be due to other applications using up the bandwidth or presence of bandwidth throttling applications or a proxy setting restricting the bandwidth use of replication appliance.
Remediation
In case of low bandwidth, you can first reduce the number of applications using network bandwidth. Check with your network administrator if any throttling application or proxy setting is present.
Disk I/O
Replication can be slow because the server that you're replicating has too much load on it and this condition causes high I/O operations on disks attached to it. Reduce the load on the server to increase the replication speed. You might also encounter the following error:
The last replication cycle for the virtual machine ‘VM Name’ failed. Encountered timeout event.
If you take no action, the replication proceeds and completes with a delay.
Disk write rates
Replication can be slower than expected if the data upload speed is higher than the write speed of the disk that you selected while enabling replication. To get better speeds at the same upload speeds, you need to restart the replication and select Premium while selecting the disk type for replication.
Caution
The disk type recommended during assessment might not be Premium for a particular VM. In this case, switching to Premium disk to improve replication speeds isn't advisable since it might not be required post migration to have a Premium disk attached to this VM.
Migration operation on VM is stuck
When you trigger migration for a particular VM, you might observe that the migration is stuck at some stage (queued or delta sync) longer than expected. Generally, the underlying reason for this issue is an unavailability or scarcity of some resources required for migration. Other VMs that are replicating or some other process running on the appliance in the datacenter might consume the resources. Following are some reasons that generally cause this issue and the remedies.
NFC buffer size low
If an initial replication (IR) cycle for a server with large disks is ongoing while you trigger migration for second VM, the second VM’s migration job can get stuck. Even though migration jobs have high priority, the NFC buffer might not be available for migration. In this case, stop the initial replication of servers with large disks or pause delta replication, and complete the migration of the second VM. Refer the section on how to remediate issues due to low NFC buffer size.
Ongoing delta sync cycle isn't complete
If migration is triggered during an ongoing delta replication cycle, it gets queued. The delta replication cycle on the VM finishes first, and then migration starts. The time required to trigger migration depends on the time taken to complete one delta sync cycle.
Shutdown of on-premises VM taking longer than usual
Try to migrate without shutting down the VM or turn off the VM manually and then migrate it.
Next steps
Learn more about migrating VMware VMs.